Blog

  • 18 Halloween Fireplace Decor Ideas for Cozy & Spooky Spaces

    18 Halloween Fireplace Decor Ideas for Cozy & Spooky Spaces

    Your fireplace can become the most eye-catching spot in your home this Halloween!
    With the right layers, textures, and colors, even a simple mantel can feel completely transformed.

    These halloween fireplace decor ideas are designed to help you create a seasonal fireplace that feels warm, stylish, and thoughtfully decorated without filling the space with predictable Halloween pieces. From antique mirrors and dried branches to rich velvet, ceramics, vintage books, and earthy autumn textures, these ideas offer plenty of inspiration for different decorating styles and room sizes. In my experience, the best seasonal displays usually combine a strong focal point with a few carefully chosen supporting details. You’ll find practical ways to add depth, warmth, and personality while keeping your fireplace visually balanced and inviting.

    Antique Mirror Focal Point
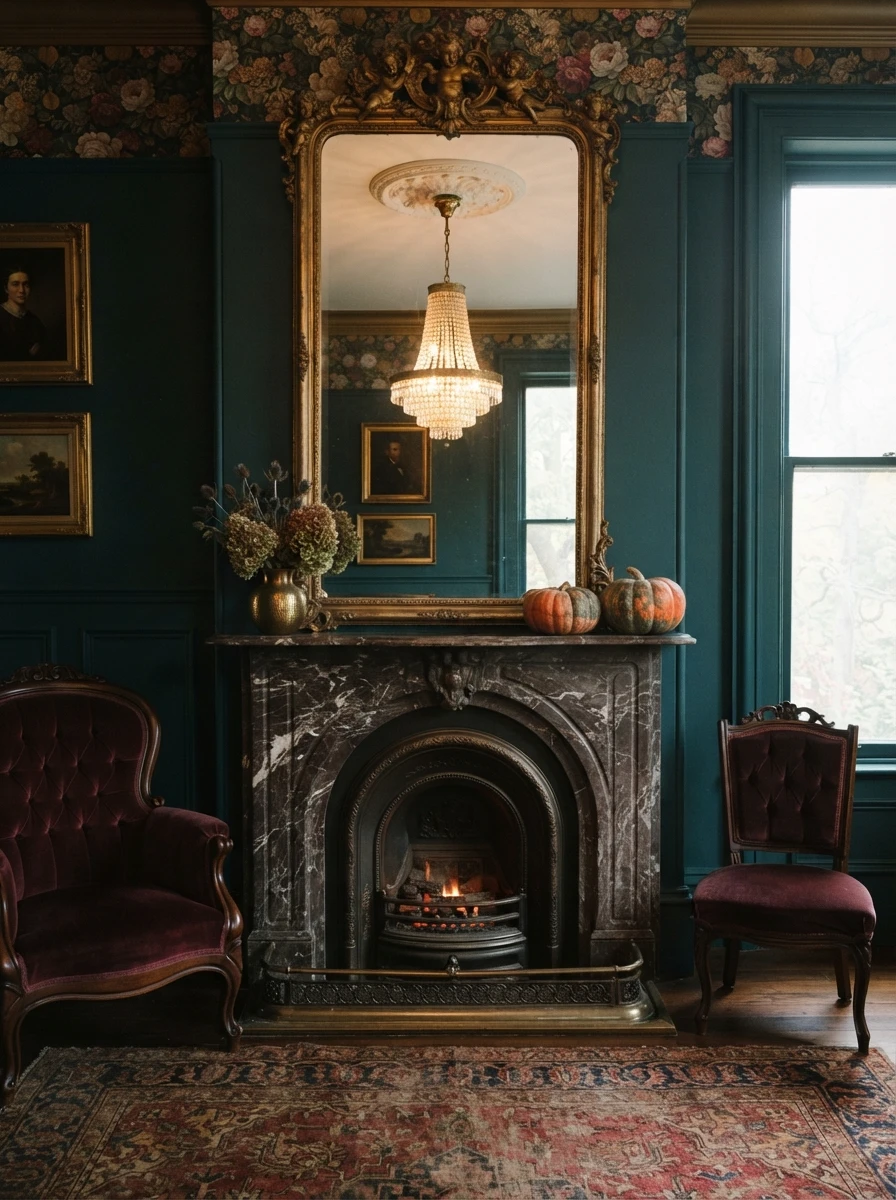
    • Center a large antique mirror above the fireplace for instant visual height.
    • Layer a few aged brass accents around the mantel without overcrowding it.
    • Use deep brown, charcoal, and muted copper for a sophisticated Halloween palette.
    • Let the mirror reflect nearby lighting to make the room feel larger.

    A striking mirror can completely change a fireplace without requiring a collection of obvious Halloween decorations. Choose an oversized antique mirror with a distressed bronze, blackened wood, or aged-gold frame and make it the main focal point above the mantel. Surround it with a few understated autumn-toned accents rather than filling every inch. The reflective surface adds depth, especially in smaller living rooms, while the aged frame brings character. In my experience, this approach works especially well when you want seasonal styling that feels sophisticated enough to remain attractive throughout October rather than looking overly themed.

    Keep the rest of the mantel deliberately restrained so the mirror remains the star. A pair of small brass objects, stacked vintage books, or sculptural ceramic pieces can provide balance without competing for attention. If your fireplace has a dark stone or painted surround, the reflective glass creates an appealing contrast. Position a floor lamp or nearby table lamp where its glow can softly appear in the mirror after sunset. The result is atmospheric without being cluttered, giving your fireplace a refined Halloween character while making the surrounding living room feel deeper and more thoughtfully styled.

    Dried Branch Arrangement
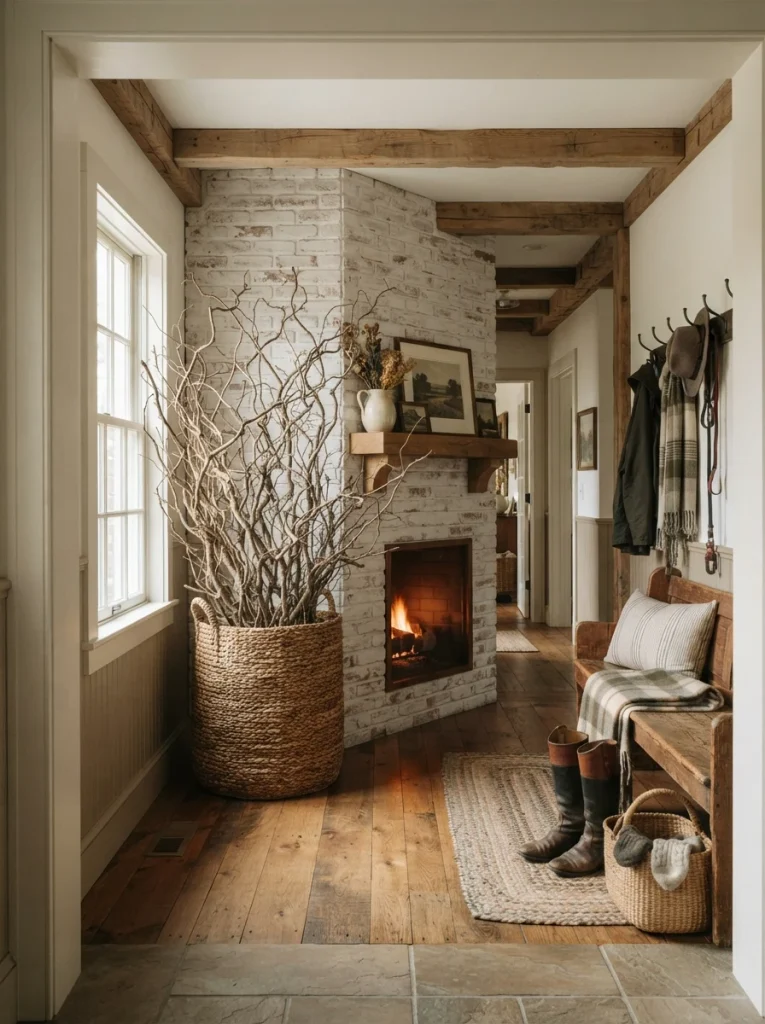
    • Use tall sculptural branches to create height without covering the fireplace.
    • Place them asymmetrically in a large ceramic floor vase beside the hearth.
    • Choose smoky brown, charcoal, rust, and muted cream for an earthy palette.
    • Add a few dried seed pods for natural texture and movement.

    Bring an organic, slightly wild feeling to the fireplace with a dramatic arrangement of dried branches. Instead of decorating the mantel heavily, place tall sculptural branches in an oversized ceramic vase beside one side of the hearth. Their irregular shapes create height and draw attention upward without relying on traditional Halloween symbols. Choose branches in smoky brown, charcoal, rust, or faded cream, depending on your room. I’ve noticed that natural arrangements are particularly useful when a fireplace already has strong architectural details because they soften the hard edges while still making the area feel intentionally decorated.

    Balance the branches with just a few smaller pieces on the mantel, such as a textured ceramic bowl, aged wooden object, or neutral stone sculpture. Keep the opposite side visually quieter so the arrangement has room to breathe. A matte black, terracotta, or weathered beige vase can reinforce the seasonal palette without looking overly decorative. This setup also works beautifully in modern, farmhouse, and rustic interiors because the materials feel natural. The finished fireplace has an understated Halloween mood that comes from shape, texture, and earthy color rather than obvious themed decorations.

    Vintage Clock Display

    • Make an oversized vintage clock the central decorative element above the mantel.
    • Pair it with small ceramic objects in black, cream, and aged bronze.
    • Use weathered finishes to create an old-world Halloween atmosphere.
    • Keep the mantel uncluttered so the clock remains visually dominant.

    Give the fireplace an old-world Halloween character by building the display around an oversized vintage clock. Choose a weathered clock with a dark wood, antique bronze, or aged-black frame and position it prominently above the mantel. Its large circular shape creates an immediate focal point while suggesting an atmospheric, slightly mysterious feeling without using typical Halloween motifs. In my experience, statement clocks work especially well above fireplaces because their vertical placement fills empty wall space and gives the entire arrangement a sense of structure.

    Keep the surrounding pieces low and understated so the clock remains dominant. Small cream ceramics, aged bronze objects, stacked books, or a single textured vessel can add interest without making the mantel feel crowded. Consider a dark plaster, exposed brick, or warm taupe wall behind the fireplace to reinforce the vintage character. Soft directional lighting will emphasize the clock’s aged surface and surrounding textures. The finished arrangement feels collected rather than themed, creating a subtle Halloween atmosphere that works particularly well in traditional, cottage, or vintage-inspired living rooms.

    Layered Stoneware Vessels
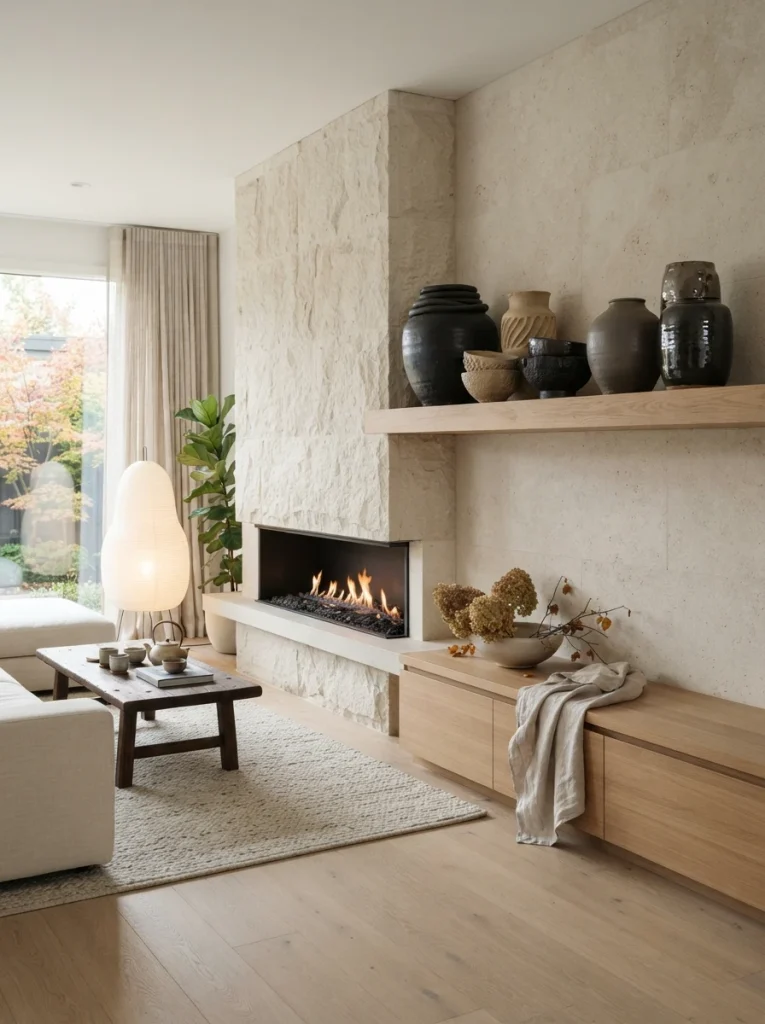
    • Arrange stoneware pitchers and vases at different heights along the mantel.
    • Mix charcoal, cream, rust, and warm clay finishes for seasonal depth.
    • Choose handmade or imperfect ceramics to keep the display natural.
    • Leave generous negative space between pieces for a cleaner look.

    Create a sophisticated seasonal display by layering stoneware vessels across the mantel instead of relying on traditional Halloween decorations. Combine pitchers, narrow-neck vases, shallow bowls, and small sculptural ceramics in different heights to create an organic arrangement. Choose charcoal, cream, terracotta, and warm clay finishes for an earthy autumn palette. The subtle variation in shape and texture gives the fireplace visual interest without making it feel busy. I’ve noticed that handmade-looking ceramics are particularly effective because their small imperfections make a mantel arrangement feel collected and authentic rather than overly coordinated.

    Start with the tallest vessel toward one side and gradually reduce the height toward the opposite end. This creates movement while keeping the fireplace visually balanced. You can introduce seasonal character through dried grasses, muted foliage, or a few natural seed pods placed inside selected vessels. Matte finishes work especially well against glossy tile, stone, or painted fireplace surrounds. Keep plenty of empty space between pieces so each shape remains visible. The finished display feels warm, artistic, and understated, making it suitable for homes that prefer subtle autumn styling over traditional Halloween decorations.

    Blackened Wood Mantel
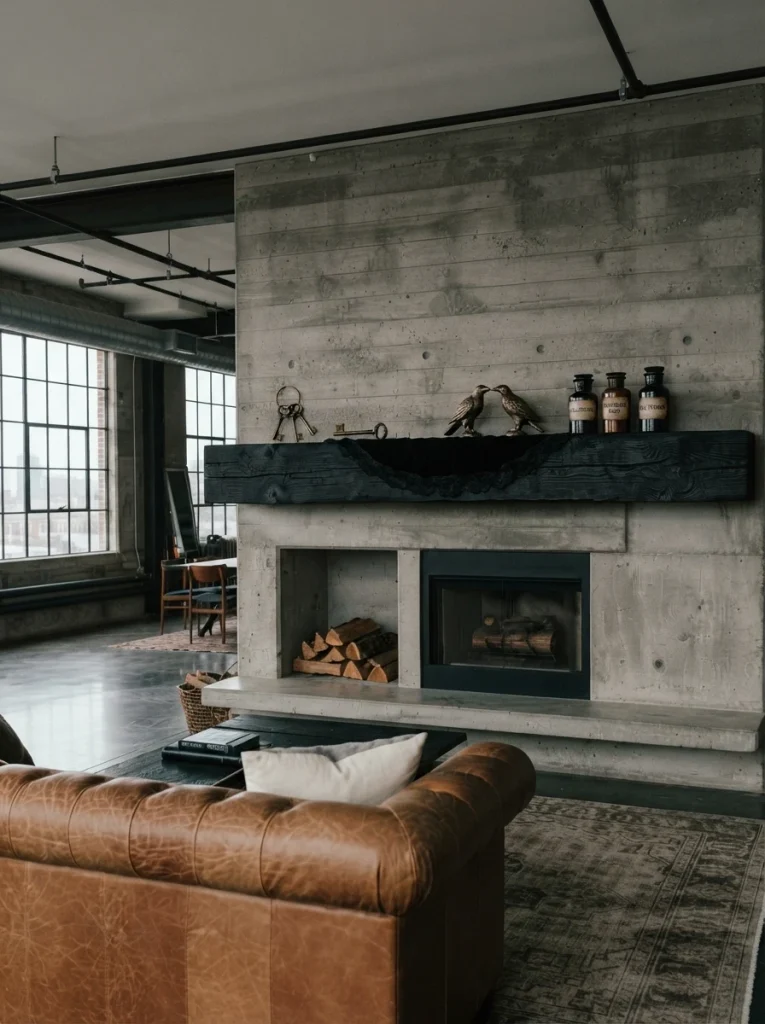
    • Use dark reclaimed wood to give the fireplace a dramatic architectural presence.
    • Keep accessories minimal so the material remains the visual focus.
    • Pair blackened timber with warm cream walls and natural flooring.
    • Add subtle metal hardware for contrast without overwhelming the rustic finish.

    Turn the mantel itself into the seasonal statement with a dramatic blackened-wood treatment. Reclaimed timber with a naturally charred or deeply stained surface creates instant depth and gives the fireplace a moody autumn character. Rather than covering the shelf with decorations, let the wood provide most of the visual impact. Pair it with warm cream plaster walls, natural oak flooring, or textured stone to prevent the room from feeling too dark. In my experience, strong architectural materials often create a more sophisticated seasonal effect than adding numerous decorative objects.

    Keep accessories intentionally sparse around the dark timber. A single sculptural ceramic, small aged-metal vessel, or neutral stone object can provide enough contrast while preserving the minimalist composition. If your fireplace already has a substantial surround, choose a thinner wood shelf so the proportions remain balanced. Soft natural light during the day will reveal the grain and irregularities, while warm lamps create a richer atmosphere at night. The finished fireplace feels modern, rustic, and quietly dramatic, with Halloween character coming primarily from material, contrast, and atmosphere.

    Copper Hearth Accents

    • Introduce aged copper through vessels, trays, or sculptural fireplace accessories.
    • Combine copper with deep brown, cream, and muted olive tones.
    • Use natural patina instead of polished metal for a more authentic appearance.
    • Repeat the warm metal subtly elsewhere in the room for cohesion.

    Add warmth and subtle seasonal richness with aged copper accents around the hearth. Instead of bright, polished metal, look for copper with a naturally weathered or slightly greened patina. A shallow copper vessel, antique tray, tall planter, or sculptural object can introduce a warm metallic layer without making the fireplace feel overly decorated. Combine these pieces with cream ceramics, dark brown wood, and muted olive textiles for an earthy autumn palette. That combination works particularly well because the copper catches light beautifully while the surrounding neutral materials keep the overall arrangement grounded.

    Try placing a larger copper vessel near one end of the mantel and a smaller metal object closer to the opposite side for balance. A textured wool throw over a nearby chair can reinforce the cozy seasonal feeling without adding more decorations to the fireplace itself. If the hearth is stone, brick, or plaster, the contrast between rough mineral surfaces and aged metal becomes especially attractive. Warm evening lighting will bring out the copper’s orange-brown tones, creating a welcoming fireplace area that feels sophisticated, tactile, and distinctly autumnal.

    Moody Gallery Wall

    • Create a curated arrangement of dark-framed artwork above the fireplace.
    • Mix vintage portraits, botanical sketches, and abstract pieces for visual variety.
    • Keep frames in black, walnut, or aged bronze for a cohesive appearance.
    • Leave uneven spacing so the gallery feels collected rather than overly formal.

    Turn the wall above your fireplace into a moody art display by creating a curated gallery of dark-framed artwork. Mix vintage portraits, botanical sketches, architectural drawings, and abstract pieces rather than using obvious seasonal signs. Black, walnut, and aged-bronze frames create a sophisticated autumn atmosphere while giving the fireplace more visual importance. The different artwork sizes also add depth and personality. I’ve noticed that gallery walls work especially well in living rooms where the fireplace feels visually isolated because the artwork connects the mantel to the larger wall.

    Begin with your largest frame near the center, then build outward using smaller pieces with varied orientations. Keep the artwork loosely coordinated through color rather than making every frame identical. A few pieces containing muted rust, charcoal, ochre, or cream can quietly introduce seasonal warmth. Keep the mantel below relatively simple so the wall remains the focal point. Soft directional lighting will highlight individual frames after sunset. The result feels artistic and sophisticated while giving your fireplace an atmospheric Halloween update without relying on recognizable Halloween imagery.

    Draped Velvet Runner

    • Use a long velvet runner to introduce rich color and tactile depth.
    • Let the fabric fall naturally over one edge of the mantel.
    • Choose burgundy, forest green, aubergine, or deep rust.
    • Keep hard decorative objects minimal so the textile remains the focal point.

    Add dramatic texture to the fireplace with a luxurious velvet runner casually draped across the mantel. Instead of arranging numerous objects, let the fabric become the main visual feature. Choose deep burgundy, forest green, aubergine, or burnt rust to bring rich autumn color into the room. Allow one end to fall naturally over the mantel edge while the opposite side remains neatly folded. The uneven drape creates movement and makes the arrangement feel relaxed. In my experience, introducing one substantial textile can make a fireplace feel completely transformed without requiring expensive seasonal accessories.

    Balance the velvet with only a few carefully chosen objects, such as a sculptural ceramic bowl, small antique frame, or stone vessel. Matte finishes work particularly well against the fabric because they prevent the display from becoming visually shiny. A pale plaster, cream-painted, or natural stone fireplace surround provides enough contrast for darker velvet to stand out. Position the runner slightly off-center rather than perfectly symmetrical for a more contemporary appearance. Warm evening lighting will reveal the fabric’s depth, creating a cozy, elegant fireplace arrangement that feels seasonal without looking overly decorated.

    Sculptural Ceramic Forms
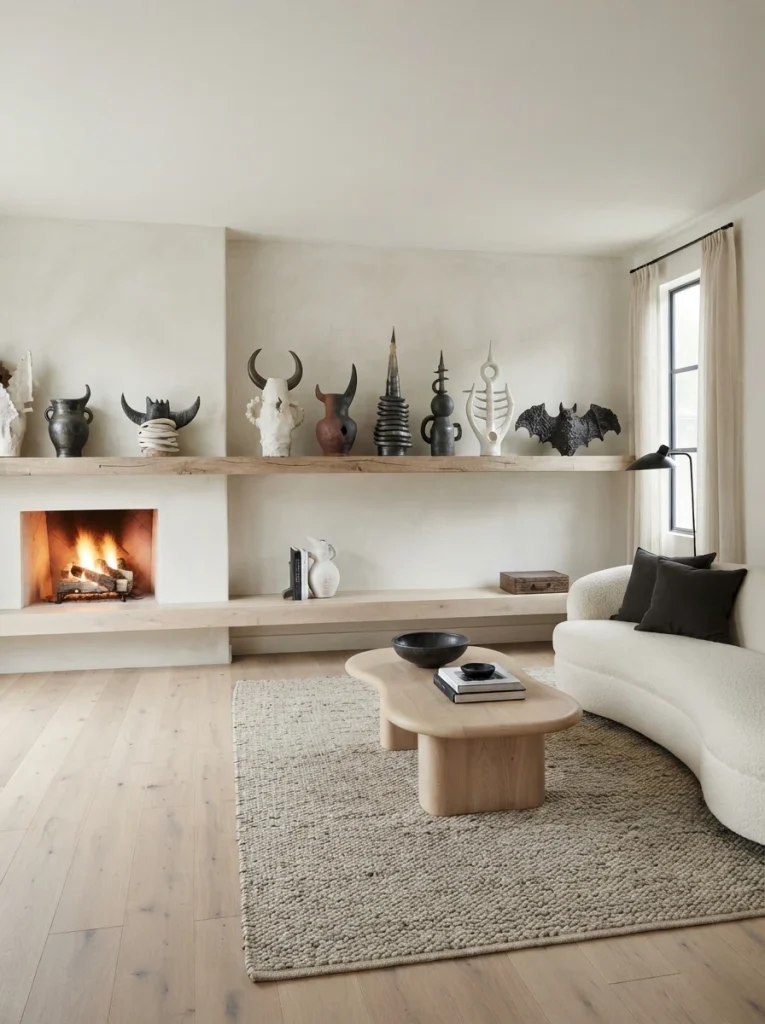
    • Arrange oversized ceramic sculptures to create an artistic mantel display.
    • Mix rounded and angular forms for contrast and visual movement.
    • Use matte black, warm ivory, taupe, and muted clay finishes.
    • Vary heights while keeping the overall arrangement intentionally uncluttered.

    Give the fireplace a contemporary art-inspired update with sculptural ceramic forms instead of conventional seasonal decorations. Choose abstract vessels, rounded forms, arches, or organically shaped pottery in matte black, ivory, taupe, and muted clay. Arrange the pieces at different heights so the mantel develops a natural rhythm without becoming crowded. Their unusual silhouettes create interest from across the room, while the restrained palette keeps the display sophisticated. I’ve seen this approach work particularly well in modern homes because the fireplace becomes part of the interior design rather than looking temporarily decorated.

    Use a larger sculptural piece toward one side and balance it with two smaller forms on the opposite side. Avoid making the arrangement perfectly symmetrical; slight variation makes the display feel more collected and contemporary. A textured plaster wall or simple painted surround provides a quiet background that allows the ceramics to stand out. Soft daylight from a nearby window will emphasize their shapes and shadows, while evening lighting creates a warmer effect. The finished fireplace feels artistic, modern, and seasonally appropriate through shape, texture, and earthy color rather than obvious Halloween symbols.

    Woven Basket Hearth

    • Place a large woven basket beside the fireplace for warmth and texture.
    • Fill it with folded blankets, chunky throws, or seasonal textiles.
    • Choose natural jute, seagrass, rattan, or darker woven finishes.
    • Keep the mantel simple so the hearth basket becomes the grounding feature.

    A large woven basket can make an overlooked fireplace corner feel warm, intentional, and beautifully layered. Choose a substantial basket made from rattan, seagrass, jute, or dark woven fibers and position it beside the hearth. Fill it with folded blankets or chunky textured throws in rust, cream, brown, or charcoal. The natural material introduces softness against stone, brick, or painted surfaces. In my experience, a basket works especially well in living rooms where the fireplace needs more visual weight near the floor rather than additional decoration on the mantel.

    Keep the basket slightly oversized so it feels substantial without blocking the fireplace opening. Fold the blankets loosely instead of arranging them perfectly to create a relaxed, lived-in appearance. You can repeat one basket material elsewhere in the room through a small tray or woven accent to connect the fireplace with surrounding furniture. Place the basket slightly to one side rather than directly centered for a more natural composition. The finished hearth feels cozy, textured, and autumn-ready while remaining useful throughout the colder months.

    Terracotta Pot Collection
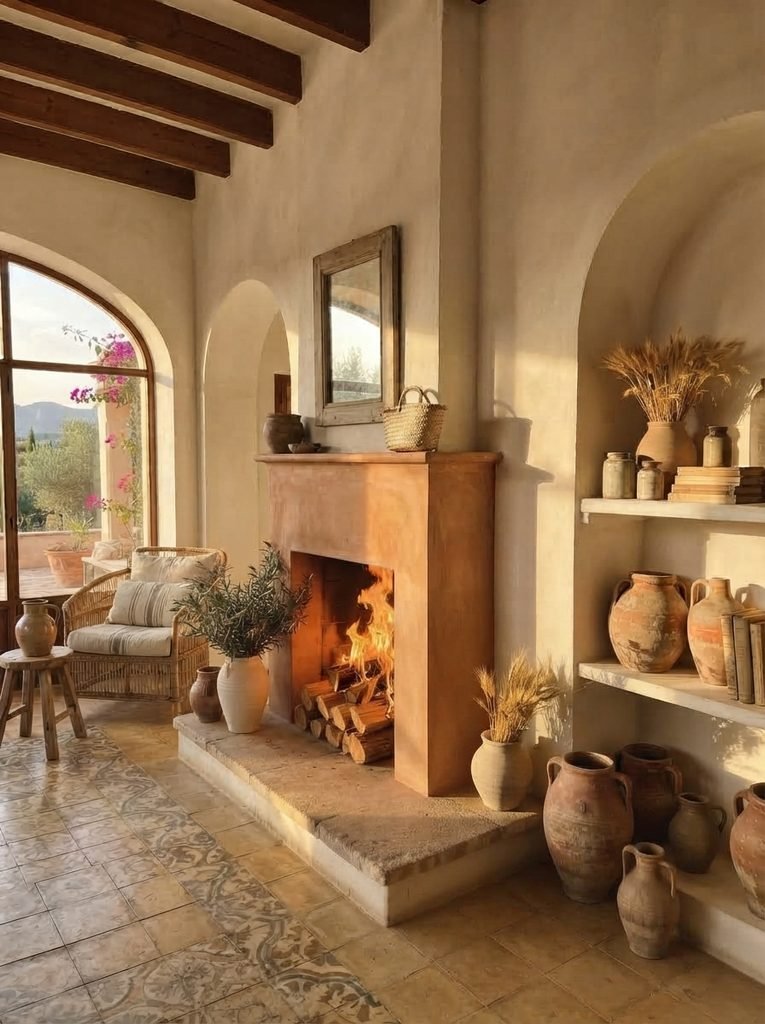
    • Group terracotta pots in several shapes and sizes around the hearth.
    • Use dried grasses or sculptural branches for subtle seasonal texture.
    • Let natural clay tones introduce warmth against neutral fireplace materials.
    • Mix smooth and weathered pots for a collected, organic appearance.

    Warm up the fireplace with a collection of terracotta pots arranged at different heights around the hearth. Use a mixture of rounded planters, narrow vessels, and weathered clay containers to create an organic display. Some can hold dried grasses or sculptural branches while others remain empty as decorative forms. The earthy orange-brown tones bring natural warmth to pale stone, cream plaster, or dark wood. I’ve noticed that terracotta looks particularly beautiful during autumn because its natural color connects easily with surrounding wood, textiles, and muted seasonal shades.

    Avoid placing every pot in a perfectly symmetrical row. Instead, create one taller grouping near a corner and allow smaller pieces to spread gradually outward. Weathered surfaces, small chips, and variations in clay color can make the arrangement feel collected over time. A neutral fireplace surround will help the terracotta become the visual focal point. Use soft daylight for a fresh appearance or warm evening illumination for richer tones. The finished fireplace feels earthy, relaxed, and thoughtfully styled without depending on traditional Halloween decorations.

    Framed Textile Art

    • Hang one large textile artwork above the fireplace for softness and character.
    • Choose woven patterns with rust, charcoal, cream, or deep brown tones.
    • Pair the fabric with a simple mantel and natural wood accessories.
    • Use texture to soften hard stone, brick, or painted fireplace surfaces.

    Replace traditional wall art with a large framed textile to create a softer, more tactile fireplace display. Choose woven artwork featuring abstract lines, geometric patterns, or muted botanical shapes in rust, charcoal, cream, and deep brown. The fabric introduces visual warmth while the frame gives the piece enough structure to work above the mantel. Unlike small decorative objects, a large textile fills the wall without making the fireplace feel crowded. In my experience, textured wall pieces are particularly useful when a room contains lots of hard surfaces such as stone, tile, wood, or metal.

    Keep the mantel below intentionally minimal so the textile remains the main feature. A low wooden bowl, ceramic vessel, or small stack of books can provide grounding without competing with the artwork. Choose a natural oak or dark walnut frame to connect the display with surrounding furniture. Position the artwork slightly above the mantel with enough breathing room around it. Soft side lighting will reveal the woven texture and create gentle shadows. The result feels warm, artistic, and sophisticated while adding seasonal richness through earthy color and material rather than obvious Halloween motifs.

    Autumn Book Stack
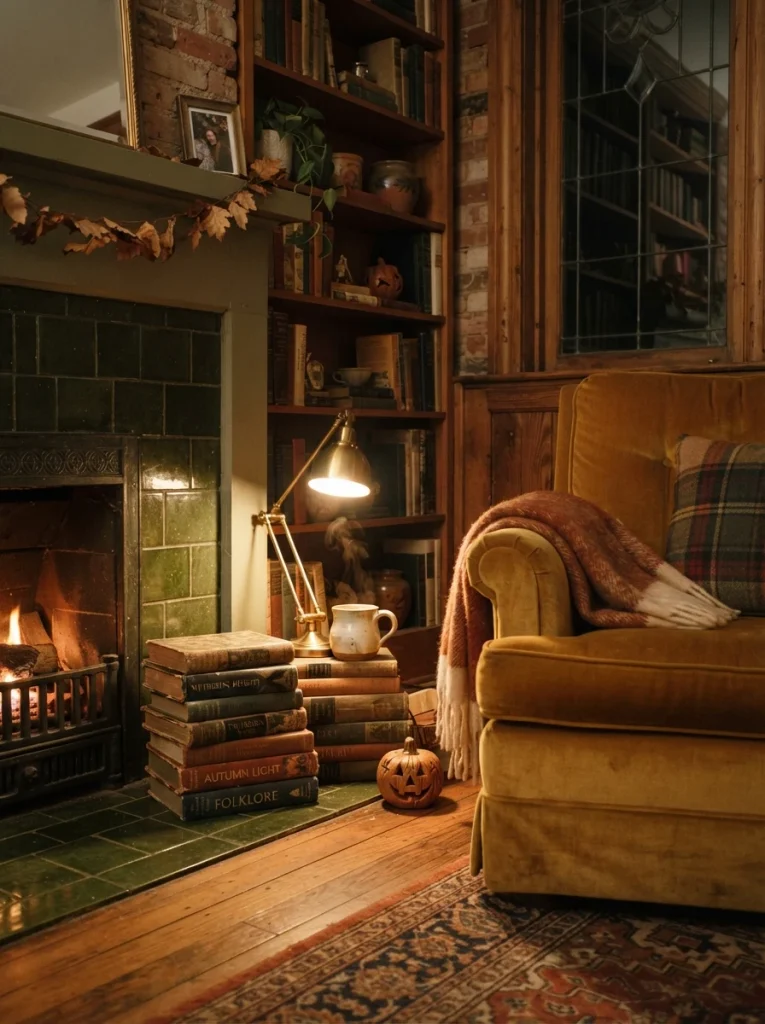
    • Stack vintage hardcover books directly on one side of the mantel.
    • Choose worn covers in brown, burgundy, olive, and muted charcoal.
    • Add a small ceramic object on top for varied height.
    • Keep the arrangement casual so it feels collected rather than staged.

    Give your fireplace a cozy literary character by building a display around a stack of vintage books. Choose worn hardcover volumes with muted brown, burgundy, olive, charcoal, or cream covers and stack them directly on one side of the mantel. Vary their sizes and orientations rather than lining every spine perfectly. The aged paper and textured covers bring warmth and personality to the room. I’ve noticed that books are especially useful for seasonal decorating because they add height and visual weight while still looking natural enough to remain in place beyond Halloween.

    Build upward gradually by placing two or three books beneath a small ceramic sculpture, stone object, or aged wooden piece. Keep the opposite side of the mantel relatively open so the arrangement does not feel crowded. A dark wood fireplace surround pairs beautifully with warm book tones, while a lighter stone surround creates stronger contrast. Soft reading-lamp light or late-afternoon daylight will emphasize the worn textures. The result is an intimate, sophisticated fireplace display that feels appropriate for autumn evenings and creates a subtle old-library atmosphere without relying on traditional Halloween decorations.

    Dried Floral Swag

    • Hang a loose dried-flower arrangement across one side of the mantel.
    • Combine wheat, pampas stems, seed pods, and muted autumn foliage.
    • Use rust, tan, cream, and faded burgundy for natural seasonal color.
    • Keep the arrangement slightly uneven for a relaxed botanical look.

    Create a softer seasonal focal point by draping a dried floral swag across one side of the fireplace mantel. Combine wheat stems, seed pods, dried grasses, faded foliage, and a few muted flowers in rust, tan, cream, and burgundy. Let the arrangement fall naturally rather than shaping it into a perfectly symmetrical garland. The loose botanical form adds movement and texture while keeping the fireplace visually light. In my experience, dried arrangements are an easy way to introduce autumn character because they feel seasonal without requiring overtly themed decorations.

    Secure the arrangement so it gently follows the mantel edge, allowing several stems to cascade downward while the opposite side remains open. Pair the natural materials with a simple ceramic vase, wooden bowl, or aged-metal object for balance. The organic shapes work beautifully against smooth plaster, painted brick, or polished stone surrounds. Natural afternoon light will bring out subtle color variations, while warm evening lamps create richer shadows. The finished fireplace feels relaxed, refined, and connected to the season, offering a decorative update that can remain attractive well after Halloween.

    Layered Picture Ledges
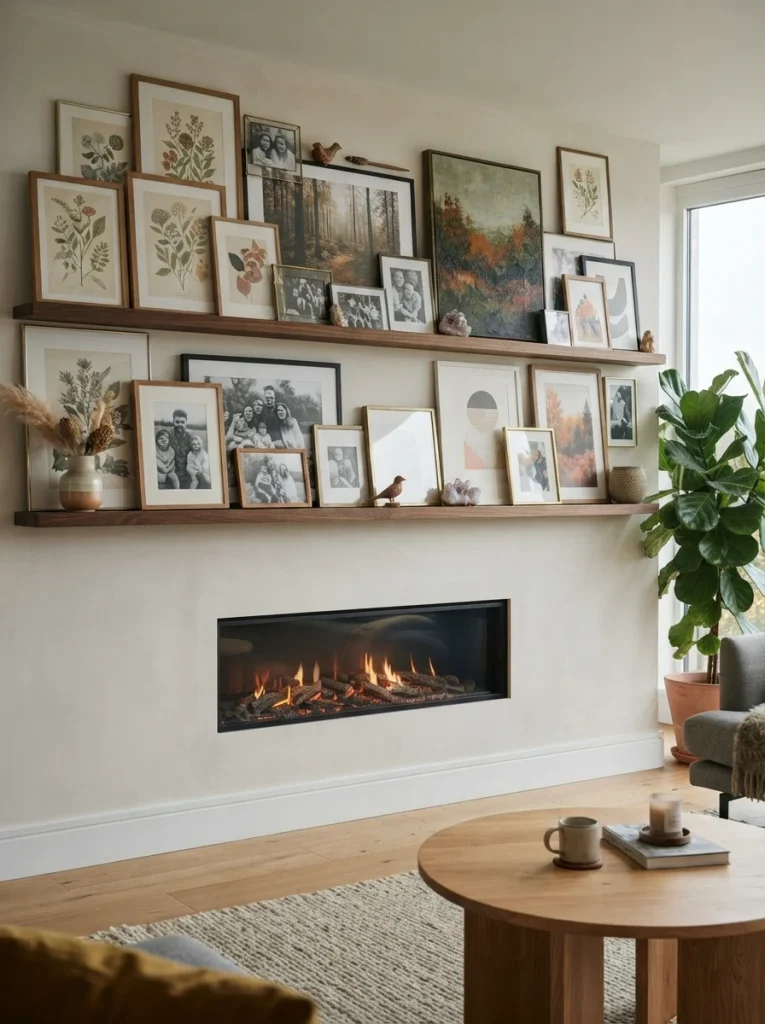
    • Install narrow picture ledges above the fireplace for flexible seasonal styling.
    • Layer framed artwork instead of hanging every piece separately.
    • Mix different frame sizes while keeping colors visually coordinated.
    • Leave some wall space visible to prevent the display from feeling heavy.

    Use layered picture ledges to create a flexible, editorial-style fireplace wall that can easily change with the season. Install two or three slim ledges above the mantel and lean framed artwork against the wall instead of permanently hanging each piece. Mix small landscape prints, abstract artwork, vintage photographs, and textured paper pieces in coordinated shades of charcoal, cream, rust, and warm brown. The overlapping frames create depth while keeping the arrangement easy to rearrange. I’ve noticed that ledges are particularly practical when you enjoy refreshing your fireplace several times throughout the year.

    Start with the largest frame on the back ledge, then layer smaller artwork in front to create natural depth. Avoid making every frame perfectly aligned; slight overlaps make the display feel more relaxed and collected. Keep the mantel itself relatively simple because the wall already carries significant visual weight. This approach works particularly well above fireplaces with plain surrounds because the layered frames provide architectural interest. Use soft directional lighting to highlight the artwork after sunset. The finished display feels curated, modern, and personalized while giving you an easy foundation for future seasonal changes.

    Hearthside Lantern Cluster
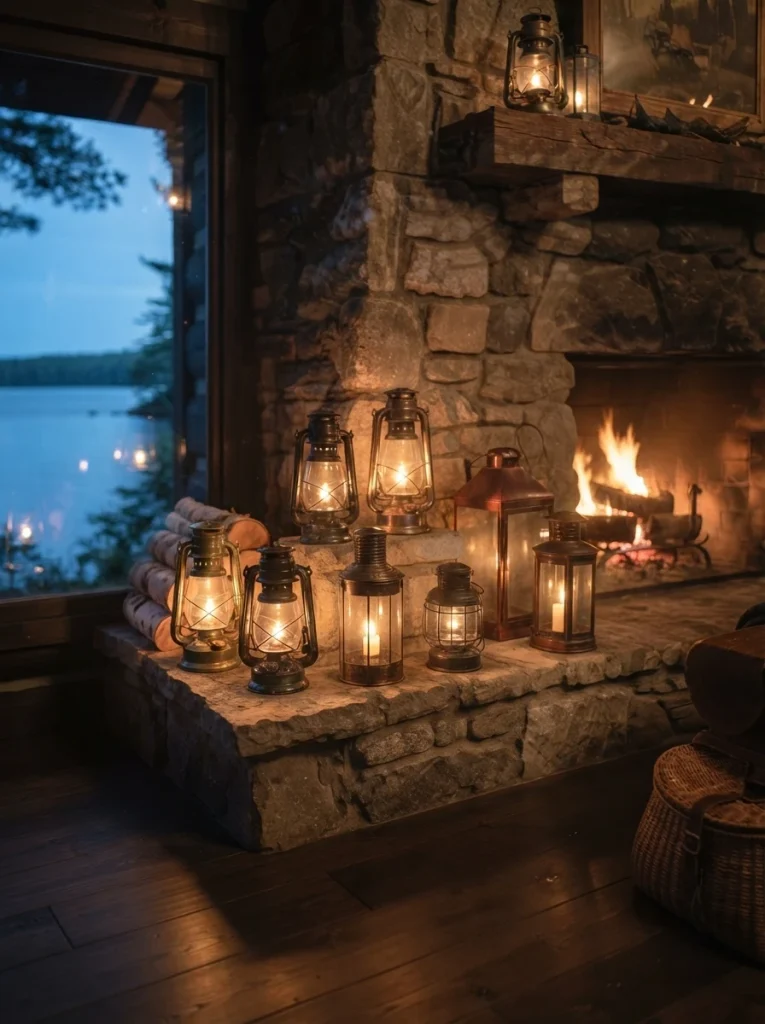
    • Group lanterns in different heights directly on the hearth.
    • Mix black metal, aged brass, and smoked-glass finishes.
    • Leave the mantel mostly open to shift attention toward the firebox.
    • Use flameless candles for a safe, warm evening glow.

    Create a grounded, intimate fireplace display by moving the decorative focus down onto the hearth. Arrange three or four lanterns in different heights beside the firebox, combining black metal, aged brass, and smoked glass for contrast. Instead of lining them up evenly, overlap their positions slightly to create depth. This arrangement adds warmth without competing with the mantel or surrounding furniture. In my experience, placing décor at floor level can make a fireplace feel more substantial, particularly in rooms with high ceilings or a large, visually dominant fireplace surround.

    Choose flameless candles inside the lanterns so the display remains practical around children, pets, and textiles. Keep the mantel relatively open and allow the lantern cluster to become the lower focal point. A woven rug, leather chair, or textured ottoman nearby can reinforce the cozy autumn character. Warm candlelight will reflect against the metal and glass after sunset, while natural daylight keeps the arrangement understated during the day. The finished space feels inviting, atmospheric, and sophisticated, creating seasonal warmth through lighting and placement rather than obvious themed decorations.

    Oversized Ceramic Urn
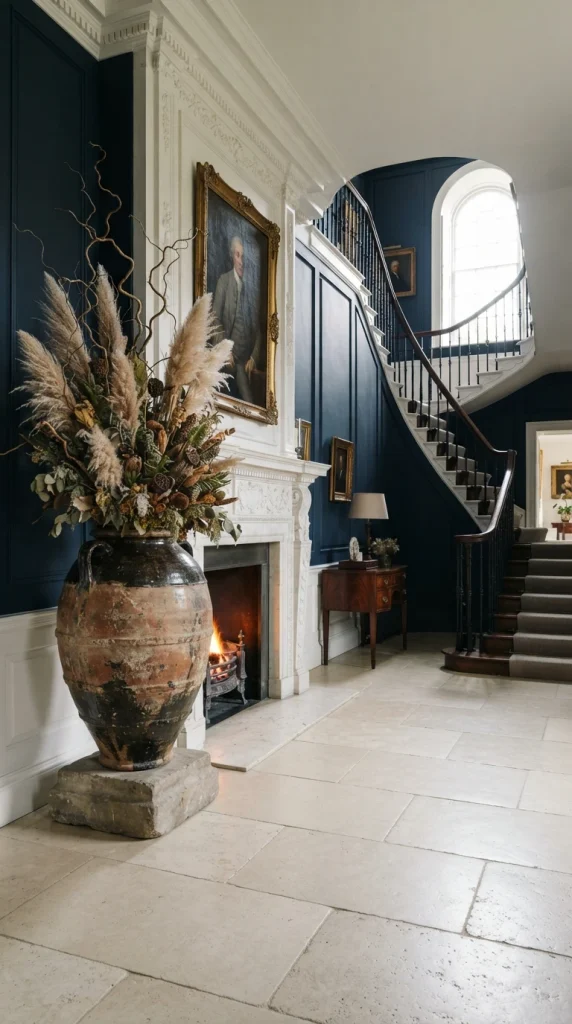
    • Make one large ceramic urn the dominant fireplace accessory.
    • Choose a weathered finish in cream, charcoal, olive, or muted terracotta.
    • Place it slightly off-center for a relaxed designer arrangement.
    • Fill it with tall dried stems to add height and movement.

    Create a dramatic but refined fireplace focal point with one oversized ceramic urn. Choose a substantial vessel with a weathered finish in cream, charcoal, olive, or muted terracotta and place it slightly off-center on the mantel or hearth. Its scale immediately adds visual weight, while the imperfect surface creates character. Rather than surrounding it with numerous decorations, let the urn stand almost alone. I’ve noticed that one oversized object can often look more sophisticated than a collection of small accessories because the eye immediately understands where to focus.

    Fill the urn with tall dried stems, sculptural branches, or muted foliage to introduce height and natural movement. Allow the stems to spread organically rather than trimming them into a perfectly uniform shape. The large vessel works especially well against a simple plaster, brick, or limestone fireplace because the contrast between smooth ceramic and rough architectural surfaces creates depth. Use daylight to emphasize the vessel’s texture, then switch to warm ambient lighting for evening atmosphere. The finished arrangement feels artistic, earthy, and elevated while remaining easy to recreate with versatile materials.

    Autumn Plaid Layers
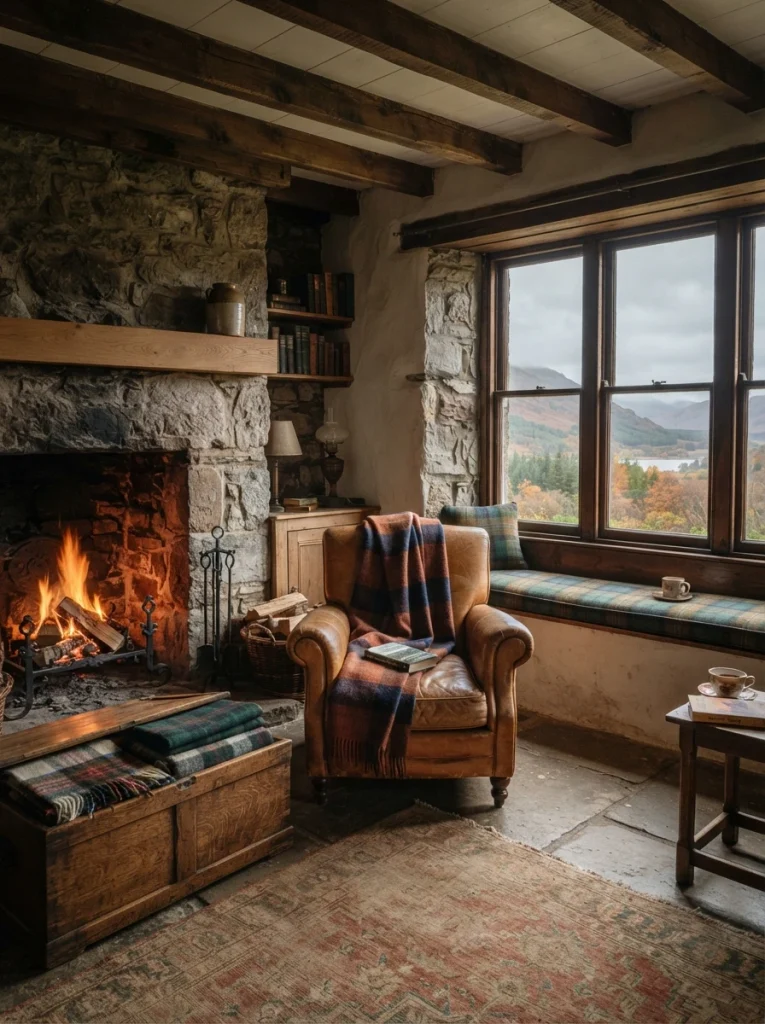
    • ntroduce seasonal color through a plaid throw on nearby seating.
    • Choose rust, forest green, cream, navy, or warm brown patterns.
    • Coordinate the textile with subtle mantel materials rather than themed décor.
    • Layer one or two cushions nearby for a comfortable finished look.

    Bring Halloween-season warmth into the fireplace area through textiles instead of decorative objects. Drape a substantial plaid throw over a nearby armchair or bench, choosing a pattern that combines rust, forest green, cream, navy, or warm brown. The textile adds immediate color and softness while allowing the fireplace itself to remain relatively uncluttered. This approach works particularly well when you want the room to feel seasonal rather than explicitly Halloween-themed. I’ve noticed that changing one prominent textile can visually refresh an entire fireplace corner without requiring a major decorating project.

    Coordinate the plaid with one or two cushions in complementary solid colors, then keep the mantel simple with natural wood, ceramic, or stone pieces. A leather chair beside a pale fireplace surround creates especially attractive contrast, while a woven rug can connect the textile layers visually. Fold or drape the blanket casually rather than arranging it too perfectly so the room feels lived-in. Warm evening light will deepen the plaid colors and create a cozy atmosphere. The result is comfortable, polished, and autumn-ready, with the fireplace becoming a welcoming gathering point.

    Create a Fireplace You’ll Love

    A beautifully decorated fireplace can instantly make a living room feel warmer, more inviting, and ready for the season. The key is choosing details that complement your existing space instead of overwhelming it. Think about texture, height, color, and how each piece works with the fireplace surround and nearby furniture.

    Whether you prefer rustic materials, sophisticated vintage accents, rich autumn colors, or a cleaner modern look, there’s an idea here you can adapt to your home. I’ve noticed that even one statement piece can make a surprising difference when it is positioned thoughtfully. Save this post on Pinterest for your decorating plans, try your favorite idea, and share it with someone who loves refreshing their home for Halloween.
  • 18 Classy Halloween Costume Ideas That Look Chic & Elegant!

    18 Classy Halloween Costume Ideas That Look Chic & Elegant!

    Halloween doesn’t have to mean over-the-top costumes or outfits you’ll never wear again. A classy halloween costume can be chic, polished, comfortable, and still feel festive enough to stand out at any celebration. Whether you love timeless glamour, rich velvet, elegant fantasy, or modern fashion-inspired looks, the right details can completely transform a simple outfit.

    This collection brings together stylish costume ideas that feel thoughtfully put together without becoming complicated. You’ll find inspiration for different personalities, color palettes, and levels of drama, along with practical styling details that make each look easier to recreate. In my experience, the most memorable costumes often come from a strong silhouette, beautiful textures, and just a few well-chosen accessories. Keep reading to find a look that feels genuinely like you.

    Old Hollywood Glamour

    • Build the look around a floor-length satin or velvet dress.
    • Use black, champagne, ivory, or deep burgundy for a refined palette.
    • Add opera gloves, pearl earrings, or a vintage-inspired clutch.
    • Keep makeup polished with defined eyes and a classic red or berry lip.

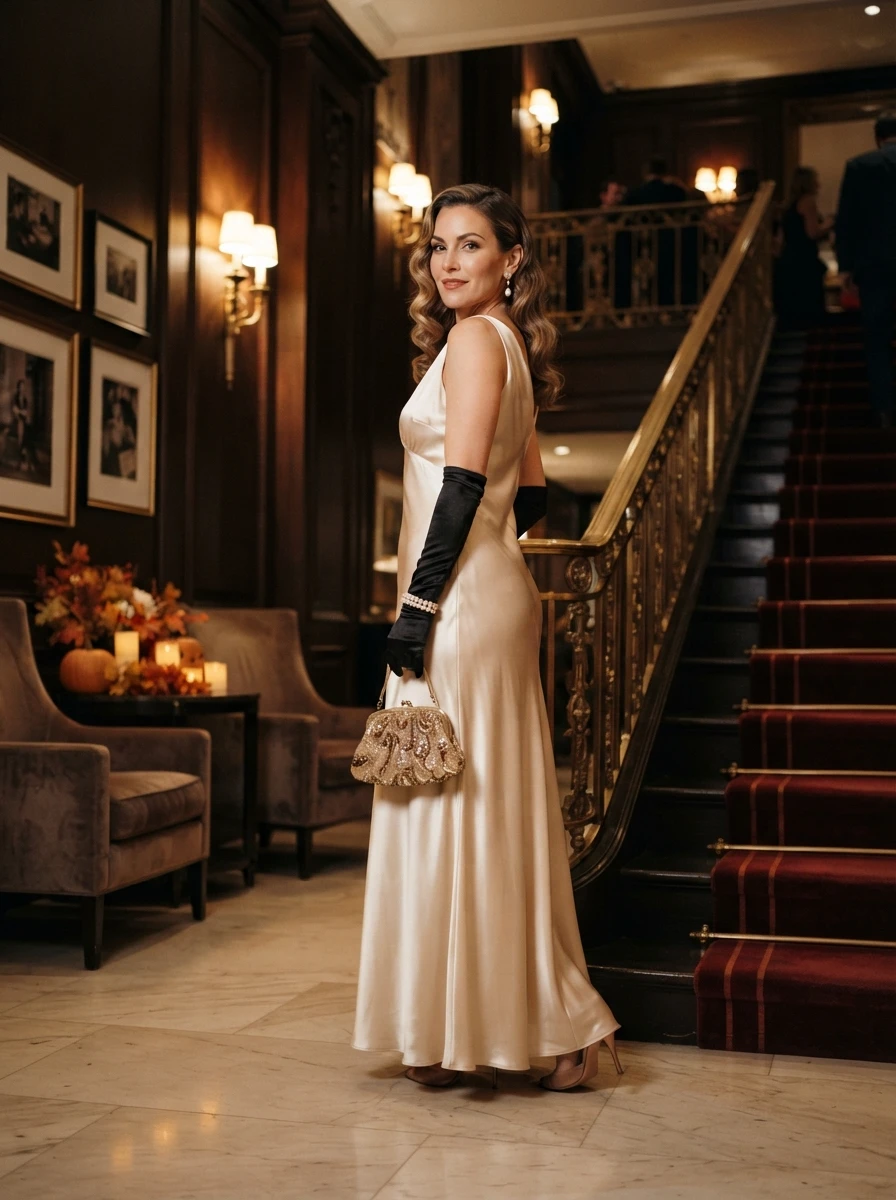
    Want a Halloween look that feels polished rather than overly theatrical? An Old Hollywood-inspired costume creates instant elegance through a dramatic dress, refined accessories, and timeless beauty details. Choose a floor-length satin or velvet gown in black, champagne, ivory, or deep burgundy, then add opera gloves, pearls, and a compact clutch. The silhouette does most of the visual work, so you can keep the costume comfortable and sophisticated. In my experience, classic fabrics such as velvet and satin photograph beautifully because their subtle sheen catches evening light and makes even a simple outfit look thoughtfully styled.

    The finishing details should feel glamorous without becoming excessive. Try softly waved hair, defined eyeliner, a berry lip, and one statement jewelry piece rather than layering several accessories. A vintage clutch or long gloves can immediately strengthen the Old Hollywood reference without making the outfit look like a costume-shop set. For photographs, choose an elegant staircase, velvet armchair, or softly illuminated hallway with warm lamps and dark wood details. Comfortable pointed flats can replace heels if you expect to stand for hours. The finished look feels timeless, sophisticated, and wearable beyond Halloween night.

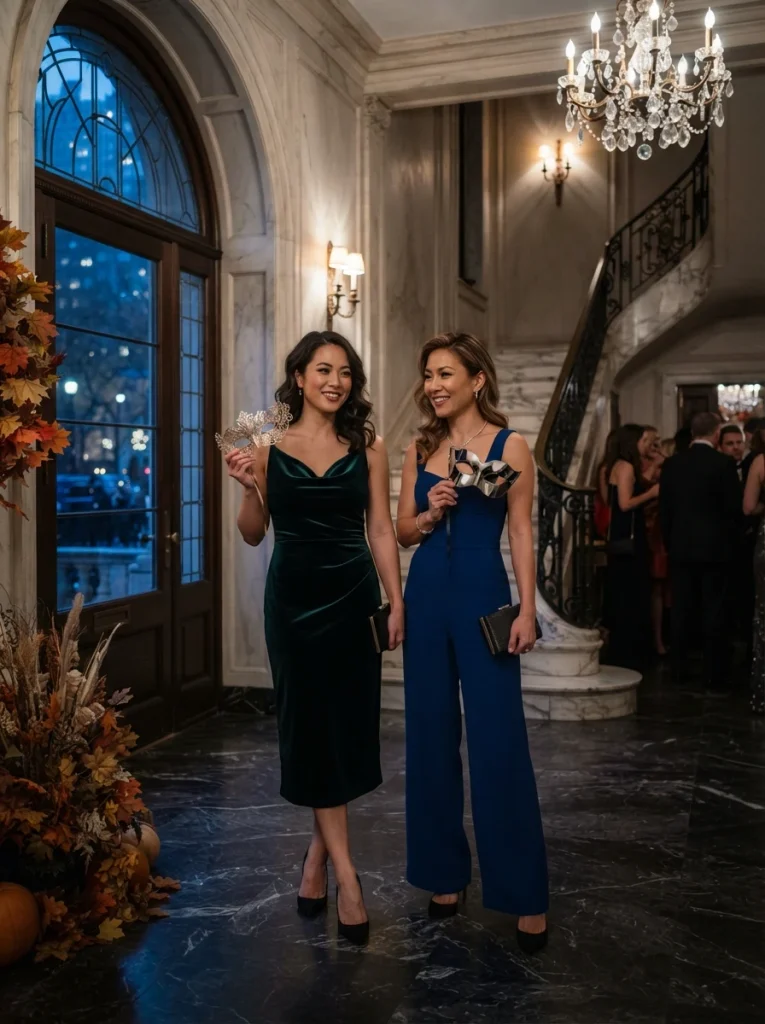
    Velvet Masquerade

    • Choose a jewel-toned velvet dress, jumpsuit, or tailored suit.
    • Use emerald, sapphire, plum, or rich wine shades for visual depth.
    • Add a sleek masquerade mask with subtle metallic detailing.
    • Finish with minimal jewelry and polished footwear for balance.

    A beautiful mask can transform an otherwise simple outfit into an elegant Halloween statement. For a sophisticated masquerade look, start with rich velvet in emerald, sapphire, plum, or wine, then pair it with a streamlined mask featuring restrained metallic details. The goal is mystery rather than costume clutter, so choose one strong fabric and let the mask become the focal point. A fitted jumpsuit, tailored dress, or polished suit can all work equally well. I’ve noticed jewel tones look especially striking in evening photographs because their depth creates a luxurious effect under soft, directional lighting.

    Keep the rest of the styling deliberately simple so the overall outfit feels expensive rather than overloaded. Choose sleek earrings, a slim bracelet, pointed shoes, and a small structured bag instead of numerous decorative pieces. Hair can be pulled into a smooth bun or styled in loose waves depending on the neckline. For a memorable setting, photograph the costume near an ornate doorway, marble foyer, or candlelit dining room with dark wood and brass accents. A three-quarter camera angle can highlight the mask and fabric texture. The result feels mysterious, elegant, and unmistakably Halloween-ready.

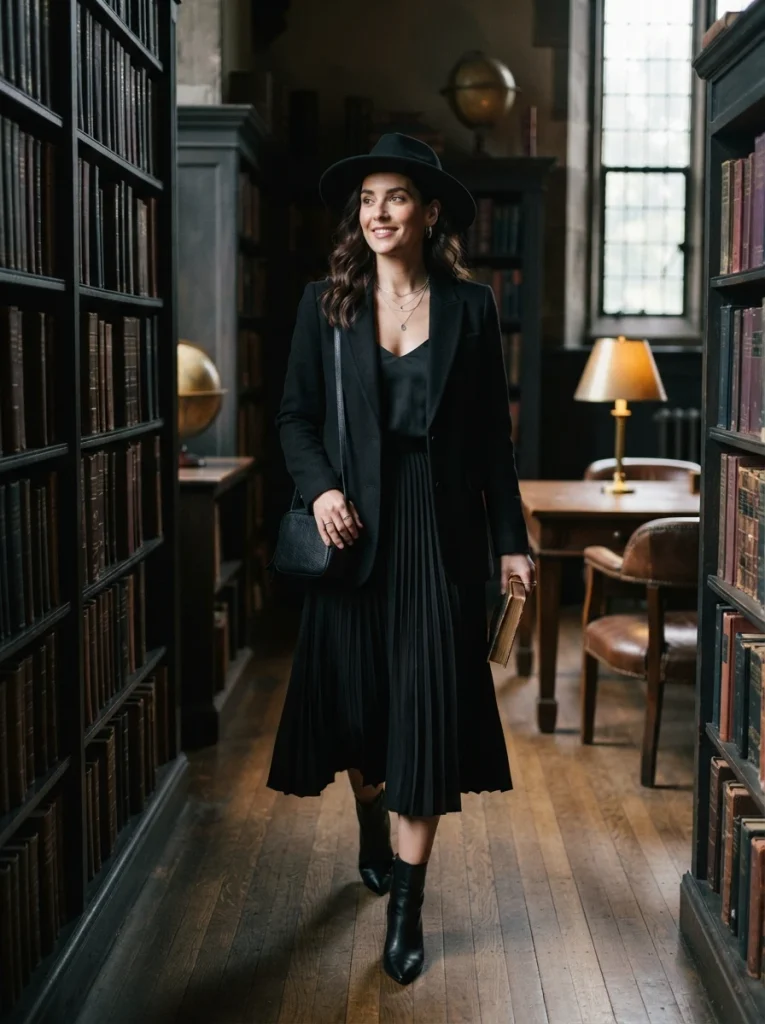
    Modern Dark Witch

    • Start with a tailored black blazer, midi dress, or flowing skirt.
    • Layer subtle lace, leather, or sheer textures for dimension.
    • Add a structured hat, pointed boots, and understated silver jewelry.
    • Use charcoal, black, and muted plum instead of bright costume colors.

    Skip the traditional pointy-hat costume and give the witch aesthetic a modern fashion update. A tailored black blazer, flowing midi skirt, or fitted dark dress creates a sleek foundation, while lace, leather, and sheer textures add subtle Halloween character. Finish with pointed ankle boots, a structured black hat, and restrained silver jewelry. The result feels mysterious without looking theatrical or childish. This is one of those polished Halloween outfits that can transition naturally from dinner to a party. I’ve seen this approach work particularly well when the clothing remains sophisticated and the spooky details are kept intentionally minimal.

    The secret is creating contrast through texture instead of piling on accessories. Pair matte black fabric with a lace sleeve, polished leather boot, or softly sheer layer to make the outfit visually interesting. A muted plum lip or smoky eye can add another seasonal detail without overpowering the clothing. For photographs, use a dark-paneled hallway, vintage library, or moody apartment corner with warm table lamps and natural shadows. Choose one striking accessory, such as a silver pendant or antique-style ring, to complete the character. The finished look feels confident, contemporary, mysterious, and easy to personalize.

    Parisian Film Star

    • Choose a fitted black dress, striped top, or tailored monochrome outfit.
    • Add a beret, delicate scarf, and small structured handbag.
    • Keep the palette black, cream, burgundy, and soft gold.
    • Use simple ballet flats or low heels for an effortless finish.

    Bring effortless Parisian style into your Halloween plans with a costume inspired by a sophisticated European film star. Start with a black midi dress, striped top, or tailored monochrome outfit, then add a beret, silk scarf, and compact handbag. The restrained palette keeps the costume elegant while the accessories make the inspiration recognizable. Black, cream, burgundy, and soft gold work beautifully together without feeling overly seasonal. In my experience, understated French-inspired styling looks especially polished when the clothing fits well and the accessories are limited to two or three carefully selected pieces.

    Finish the outfit with delicate gold jewelry, ballet flats, or low heels and a softly defined makeup look. A red or berry lip can provide one dramatic accent without overwhelming the neutral clothing. For photographs, choose a small sidewalk café, wrought-iron balcony, or elegant apartment entrance with stone walls and warm window light. A relaxed posture will make the costume feel more natural than a heavily posed portrait. The finished look is sophisticated enough for dinner, parties, or evening events while still giving you a clear Halloween-inspired character through the carefully chosen Parisian details.

    Gilded Greek Muse

    • Use a flowing ivory, cream, or pale-gold dress with draped fabric.
    • Add metallic sandals, sculptural earrings, and a simple gold headpiece.
    • Keep the makeup luminous and the hairstyle softly gathered.
    • Use bronze or antique-gold accents instead of excessive glitter.

    Create a statuesque Halloween look with the timeless elegance of a gilded Greek muse. A flowing ivory or cream dress with draped fabric establishes the silhouette, while metallic sandals, sculptural earrings, and a restrained gold headpiece add the mythological reference. Instead of a literal costume, focus on graceful proportions and luxurious textures. Pale gold, warm ivory, and subtle bronze create a refined palette that photographs beautifully. I’ve noticed that draped clothing naturally creates movement in photographs, especially when the fabric is lightweight and allowed to fall freely rather than being heavily structured.

    The accessories should reinforce the theme without turning the outfit into a stage costume. Choose one delicate headpiece, sculptural bracelet, or pair of statement earrings, then keep the remaining jewelry minimal. A softly gathered hairstyle and luminous makeup can complete the look without requiring complicated styling. For photographs, use a marble entryway, classical staircase, courtyard, or sunlit stone terrace. Warm natural light emphasizes the folds and metallic accents beautifully. This costume feels artistic and elegant while remaining comfortable enough for an evening celebration, making it an excellent alternative to more familiar mythology-inspired Halloween outfits.

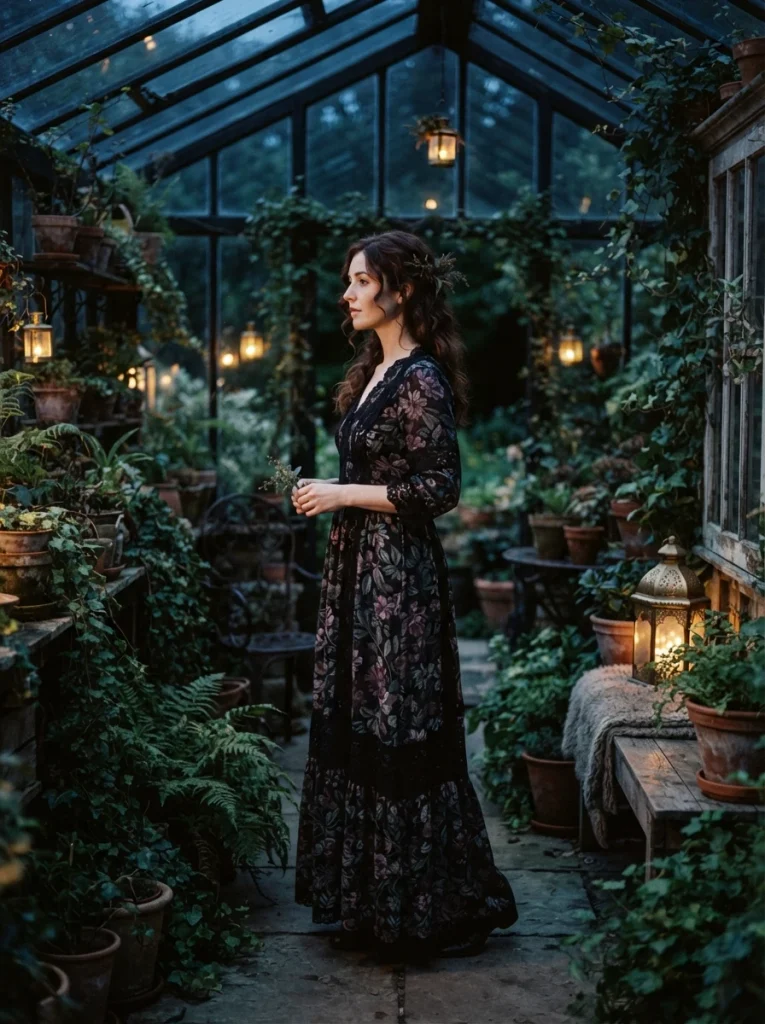
    Midnight Garden Muse

    • Choose a dark floral dress with botanical or embroidered details.
    • Layer velvet, chiffon, or lace for a richer evening texture.
    • Add botanical jewelry and a small floral hair accessory.
    • Use deep green, charcoal, plum, and muted rose for sophistication.

    Make florals feel mysterious for Halloween with a midnight garden-inspired costume. Choose a dark floral midi or maxi dress featuring botanical prints, embroidered details, or subtle lace, then build the palette around charcoal, deep green, plum, and muted rose. Velvet or chiffon layers can add depth without making the outfit feel heavy. Rather than adding obvious spooky accessories, let the darker color scheme create the seasonal mood. I’ve seen this approach work beautifully for people who want a costume that still looks like something they could genuinely wear to an evening event.

    Small botanical details can make the concept feel more intentional. Try a pressed-flower pendant, dark floral hair clip, antique-style brooch, or small bouquet of dried stems. Keep shoes simple with black ankle boots or elegant flats. For photographs, use a conservatory, greenhouse, or shadowy garden path surrounded by foliage and stone textures. Evening light or subtle garden lanterns can create a romantic atmosphere without making the scene too dark. The result feels feminine, sophisticated, and slightly mysterious, offering a Halloween look that relies on atmosphere rather than obvious costume props.

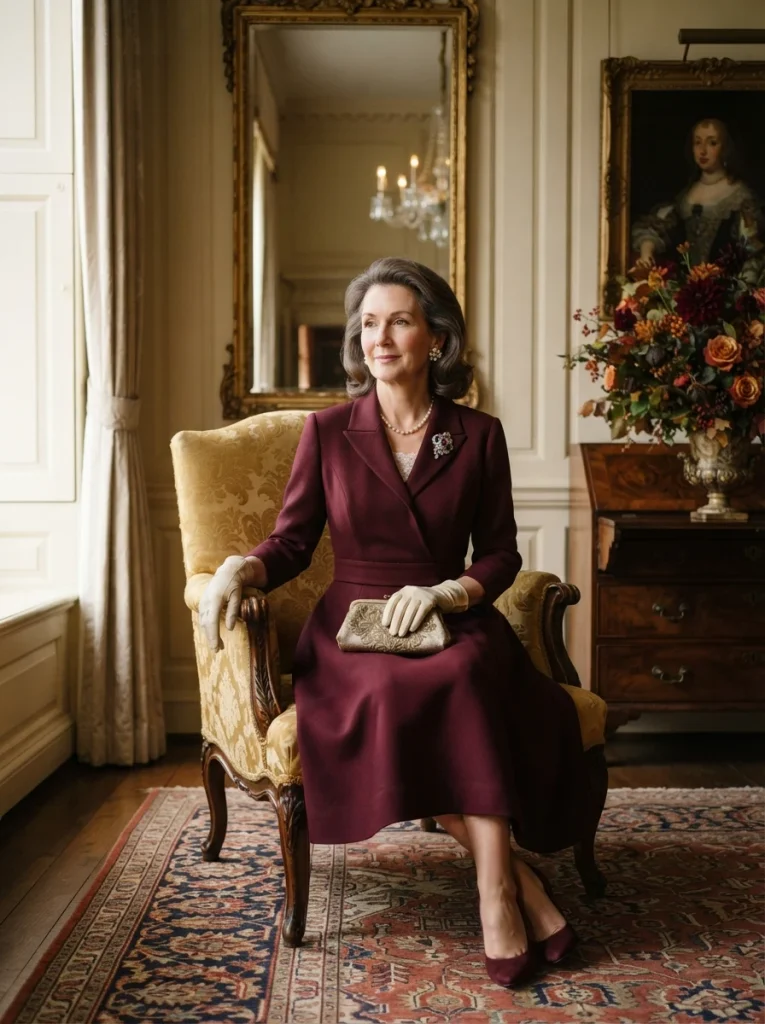
    Royal Portrait

    • Build the outfit around a structured midi or floor-length dress.
    • Choose burgundy, emerald, navy, or cream for a regal palette.
    • Add a small tiara, jeweled brooch, or elegant gloves.
    • Use classic hair styling and minimal, polished makeup.

    Give your Halloween outfit a regal finish by dressing like the subject of a formal royal portrait. A structured midi or floor-length dress creates the foundation, while rich burgundy, emerald, navy, or cream establishes the luxurious palette. Add a small tiara, jeweled brooch, or elegant gloves rather than piling on accessories. The goal is polished royalty, not theatrical pageantry. In my experience, structured garments photograph particularly well because defined shoulders, fitted waists, and clean hems create a strong silhouette even when the overall costume remains surprisingly simple.

    Choose accessories that look refined enough to belong in a formal portrait. Pearl earrings, a vintage-inspired brooch, or a compact embellished clutch can add character without distracting from the dress. Style the hair in a polished bun or smooth waves and keep the makeup classic. For photographs, use an ornate staircase, upholstered armchair, paneled wall, or elegant foyer with warm directional lighting. A slightly formal posture can reinforce the portrait concept. The finished look feels luxurious and distinctive while allowing you to create a recognizable royal-inspired costume without relying on a specific celebrity or fictional character.

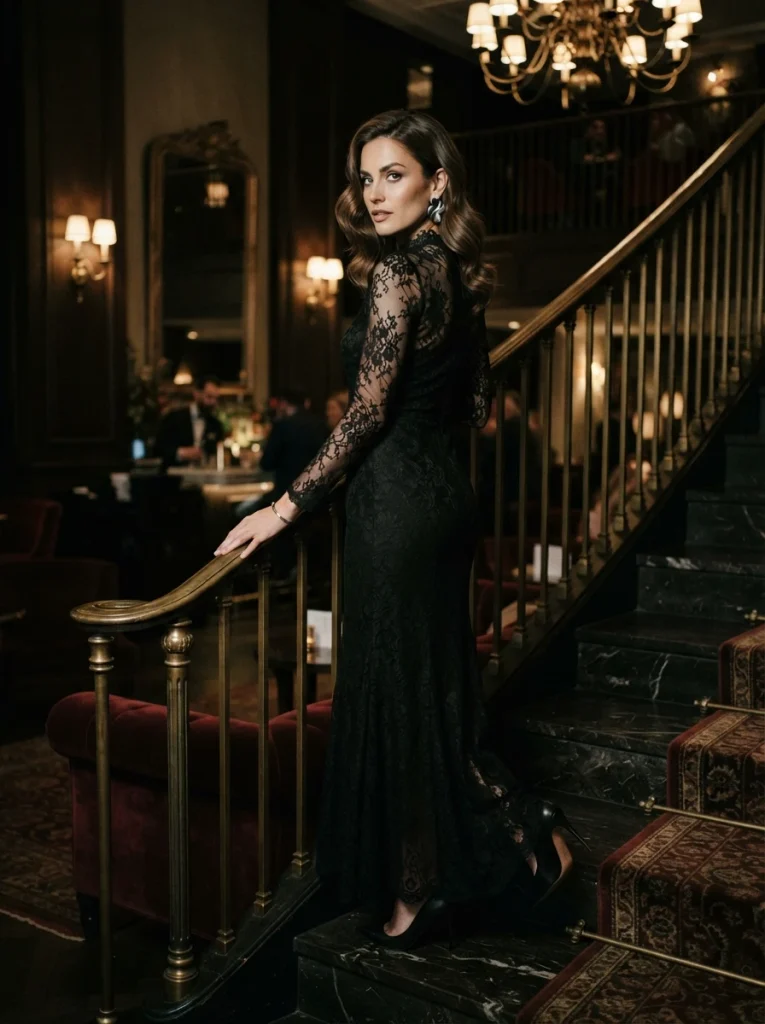
    Black Lace Siren

    • Start with a fitted black dress featuring subtle lace or sheer panels.
    • Add silver jewelry and sleek pointed shoes.
    • Keep the color palette almost entirely black with metallic accents.
    • Use glossy hair and softly dramatic makeup for balance.

    Create an alluring Halloween look with a black lace siren aesthetic that feels sophisticated rather than costume-like. Start with a fitted black midi or maxi dress featuring lace sleeves, a sheer neckline, or delicate embroidered details. Add pointed shoes and silver jewelry for a cool metallic contrast. The simplicity of the palette makes the texture of the lace more important, so choose one garment with visible detail rather than layering several dramatic pieces. I’ve noticed that monochrome outfits often look more expensive when different fabric finishes—matte, satin, lace, and velvet—are carefully combined.

    Keep the accessories sleek so the lace remains the main feature. A silver pendant, sculptural earrings, or slim cuff bracelet can provide enough contrast without competing with the dress. Glossy waves, a low ponytail, or a smooth bun all work well with this aesthetic. For photographs, choose a dark stone staircase, candlelit dining room, or sophisticated hotel corridor with warm pools of light. Avoid excessive Halloween props; the atmosphere should come from shadows, texture, and styling. The result feels dramatic, elegant, and slightly mysterious while remaining practical for an evening celebration.

    Golden Disco Diva

    • Choose a metallic gold or champagne mini or midi dress.
    • Add sculptural earrings and sleek platform shoes.
    • Use warm bronze makeup and softly polished hair.
    • Keep additional accessories minimal because the fabric is already the statement.

    Bring glamorous nightlife energy to Halloween with a golden disco-inspired look. A metallic gold, champagne, or bronze mini or midi dress immediately creates the visual impact, while sculptural earrings and polished platform shoes complete the silhouette. The costume works best when the dress remains the hero, so avoid adding too many competing accessories. The result feels festive without looking like a generic party outfit. I’ve noticed metallic fabrics photograph especially well under directional lighting because small movements create changing reflections, giving the costume energy even when the pose itself is simple.

    For a refined finish, choose warm bronze makeup, softly glowing skin, and polished waves or a sleek ponytail. A small metallic clutch can provide practical storage without interrupting the silhouette. For photographs, use a retro lounge, polished dance floor, or hotel bar with warm pendant lights and reflective surfaces. Position the subject slightly off-center so the surrounding reflections add depth. Comfortable platform shoes are worth considering if you plan to dance or stand for several hours. This costume combines glamour and Halloween drama while remaining stylish enough to feel intentionally fashion-led.

    Velvet Royalty

    • Select a deep emerald, sapphire, or burgundy velvet dress.
    • Add pearl jewelry and one understated jeweled accessory.
    • Use a fitted or column silhouette for a sophisticated finish.
    • Choose dark polished footwear that blends into the overall palette.

    Make velvet the centerpiece of a luxurious Halloween look with a rich, jewel-toned royal aesthetic. Choose a deep emerald, sapphire, burgundy, or midnight-blue dress with a fitted or column silhouette. Velvet naturally adds visual depth, so you can keep the accessories restrained with pearls, a jeweled hair clip, or one elegant brooch. The heavy texture feels especially appropriate for cooler autumn evenings while still looking refined. In my experience, velvet costumes need very little decoration because the fabric itself creates the richness and drama that makes the outfit photograph beautifully.

    Finish the look with understated makeup, polished hair, and dark shoes that allow the velvet to remain the focus. A pearl bracelet or small crystal earrings can add brightness against the deeper color without making the outfit overly ornate. For photographs, choose a dark wood library, velvet seating area, or historic hotel interior with warm lamps and brass accents. Soft side lighting will emphasize the texture of the fabric. The finished costume feels elegant, mature, and luxurious, making it ideal for anyone who wants Halloween styling with a distinctly sophisticated edge.

    Silver Screen Director

    • Wear a tailored black suit, tuxedo-inspired outfit, or sleek jumpsuit.
    • Add a vintage camera, director’s clapperboard, or slim notebook.
    • Keep the palette black, white, charcoal, and metallic silver.
    • Use polished loafers or pointed shoes for a professional finish.

    Step behind the camera for a sophisticated Halloween costume inspired by classic film directors. A tailored black suit, tuxedo-inspired outfit, or sleek jumpsuit provides an instantly polished foundation. Add one recognizable prop, such as a vintage camera, director’s clapperboard, or slim production notebook. The monochrome palette of black, white, charcoal, and silver keeps everything cohesive without relying on a specific movie character. I’ve noticed that profession-inspired costumes can feel particularly classy because the clothing remains practical while one or two props provide the Halloween transformation.

    The styling can be kept sharp with polished loafers, pointed shoes, a structured bag, or a simple watch. Hair should remain neat, while makeup can be understated and professional. For photographs, use an old theater entrance, film studio hallway, backstage area, or dark cinema lobby with framed movie posters and warm sconces. Hold the clapperboard naturally rather than posing with several props at once. This concept feels creative and recognizable without being overdone, making it a strong option for anyone who prefers a fashion-forward costume with a subtle entertainment-industry reference.

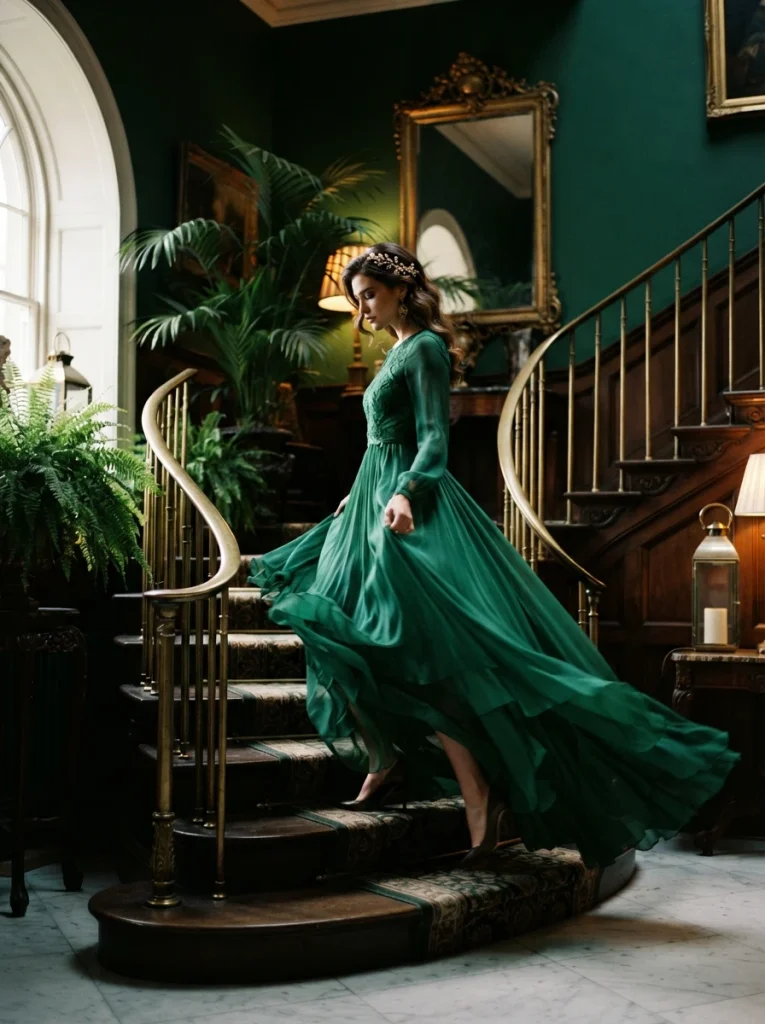
    Emerald Enchantress

    • Choose a flowing emerald dress with a refined silhouette.
    • Add antique-gold jewelry and a subtle jeweled hairpiece.
    • Use deep green, black, and warm gold as the main palette.
    • Keep makeup luminous with a softly defined eye.

    Make a jewel-toned statement with an emerald enchantress costume that feels elegant and slightly mysterious. Choose a flowing green dress with a clean silhouette, then add antique-gold jewelry and one subtle jeweled hairpiece. Deep emerald works beautifully with black and warm gold because the combination feels luxurious without becoming overly theatrical. The costume can suggest fantasy through its color and styling rather than relying on wings, oversized props, or elaborate accessories. I’ve noticed that a single saturated color often creates stronger photographs than several competing shades, especially against a neutral background.

    Keep the styling polished with luminous makeup, a softly defined eye, and either loose waves or a low bun. Gold earrings, a delicate cuff, or an embellished clutch can complete the outfit without adding unnecessary visual weight. For photographs, use an elegant conservatory, dark green library, or candlelit dining room with brass details and warm side lighting. Position the subject near a doorway or architectural feature to create depth. The result feels sophisticated, magical, and distinctly seasonal while remaining comfortable enough for an evening party or dinner.

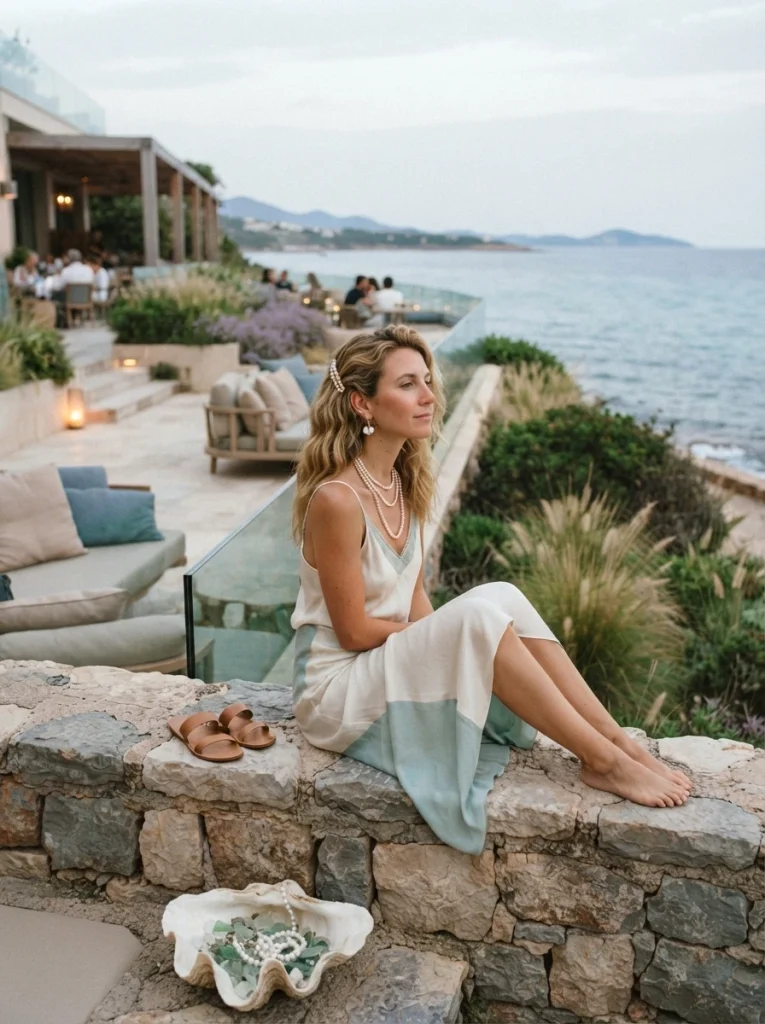
    Pearl Mermaid

    • Use a flowing ivory, champagne, or seafoam dress with subtle shimmer.
    • Add layered pearl jewelry and shell-inspired accessories.
    • Choose soft blue, cream, pearl, and silver for a refined palette.
    • Avoid literal tails in favor of an elegant flowing silhouette.

    Bring a sophisticated ocean-inspired twist to Halloween with a pearl mermaid look. Instead of using a literal tail, choose a flowing ivory, champagne, or seafoam dress with subtle shimmer and a graceful silhouette. Layer pearl jewelry with shell-inspired earrings or a delicate hair accessory to suggest the theme without becoming overly literal. Soft blue, cream, pearl, and silver create an elegant palette that feels fresh and feminine. In my experience, translating a fantasy character into fashion rather than a full costume often creates a much more wearable result.

    Let the accessories provide the strongest ocean references. Try layered pearls, iridescent earrings, a shell-shaped clutch, or a small crystal hairpiece, then keep shoes simple and comfortable. Soft waves or a loosely pinned hairstyle can reinforce the coastal influence. For photographs, choose a bright coastal hotel, glass conservatory, pool terrace, or pale stone patio with cool natural light. Reflections from water or glass can add subtle shimmer to the scene. The finished costume feels dreamy and luxurious while avoiding the bulky or restrictive elements often associated with traditional mermaid costumes.

    Vintage Opera Star

    • Choose a dramatic satin gown in black, burgundy, or ivory.
    • Add long gloves and a compact jeweled clutch.
    • Use statement earrings instead of multiple competing jewelry pieces.
    • Style the hair in polished waves or an elegant updo.

    Channel the drama of a vintage opera star with a costume built around a luxurious gown and carefully selected accessories. Choose black, burgundy, ivory, or deep plum satin with a long, elegant silhouette, then add opera gloves and a compact jeweled clutch. The costume feels theatrical through its proportions rather than through excessive decorations. Statement earrings can provide the final touch while keeping the neckline uncluttered. I’ve noticed that dramatic eveningwear becomes instantly costume-ready when paired with one historically inspired accessory, making this approach both practical and visually convincing.

    For the beauty styling, choose polished waves or an elegant updo with softly defined eyes and a rich berry or red lip. Keep the footwear simple and stable if you will be moving between locations. For photographs, use a theater balcony, velvet-curtained room, grand staircase, or old concert hall with warm chandelier lighting. A slightly elevated camera angle can emphasize the gown’s length and flowing fabric. The finished look feels glamorous, artistic, and memorable while giving you a refined alternative to more predictable Halloween character costumes.

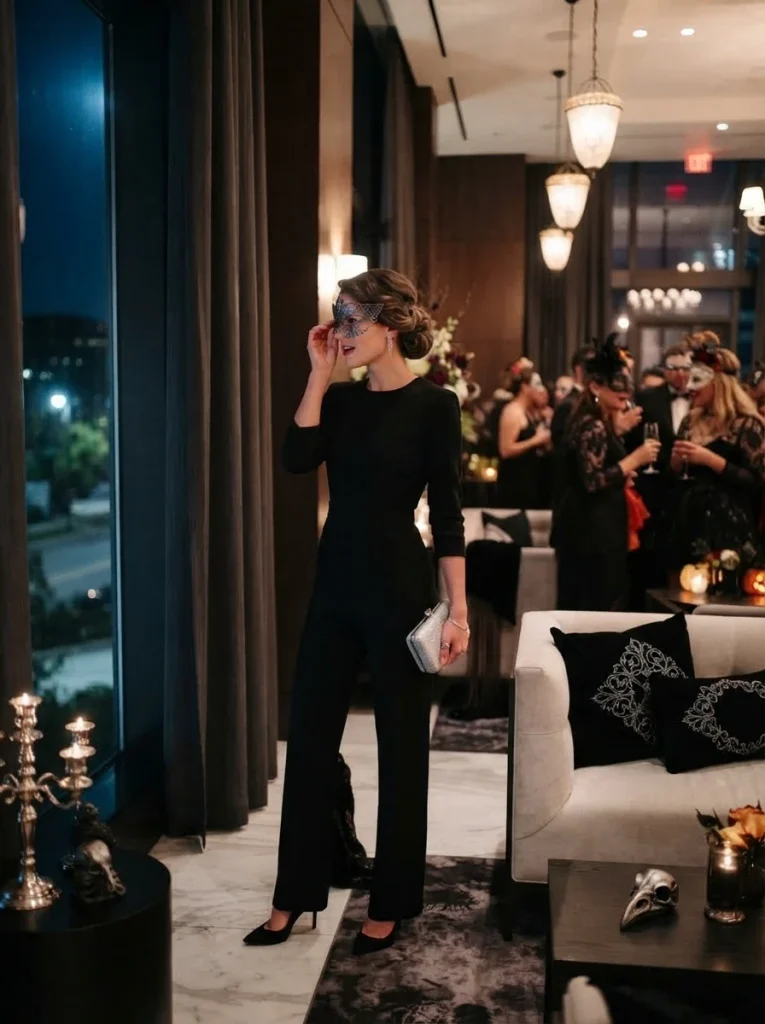
    Midnight Masquerade

    • Select a sleek black gown or tailored jumpsuit as the foundation.
    • Add a black or gunmetal mask with clean geometric detailing.
    • Use silver, charcoal, and black for a modern palette.
    • Choose one statement accessory rather than several dramatic pieces.

    Create a sleek evening look with a midnight masquerade costume built around clean lines and restrained drama. Start with a black gown or tailored jumpsuit, then introduce a gunmetal or black mask with simple geometric detailing. Silver and charcoal accents can add dimension while keeping the palette sophisticated. The mask should remain the visual focal point, so avoid combining it with oversized jewelry, elaborate headwear, and dramatic props. In my experience, masquerade costumes look most elegant when the outfit underneath feels like genuine eveningwear rather than a traditional costume.

    Finish the look with pointed shoes, a small metallic clutch, and one understated piece of jewelry. Hair can be styled smoothly away from the face so the mask remains visible and balanced. For photographs, use a dark marble foyer, grand hotel staircase, or candlelit event space with reflective surfaces and warm sconces. A three-quarter portrait angle can capture both the mask and the silhouette without making the image feel stiff. The result is mysterious, polished, and distinctly Halloween-inspired while remaining sophisticated enough for upscale parties.

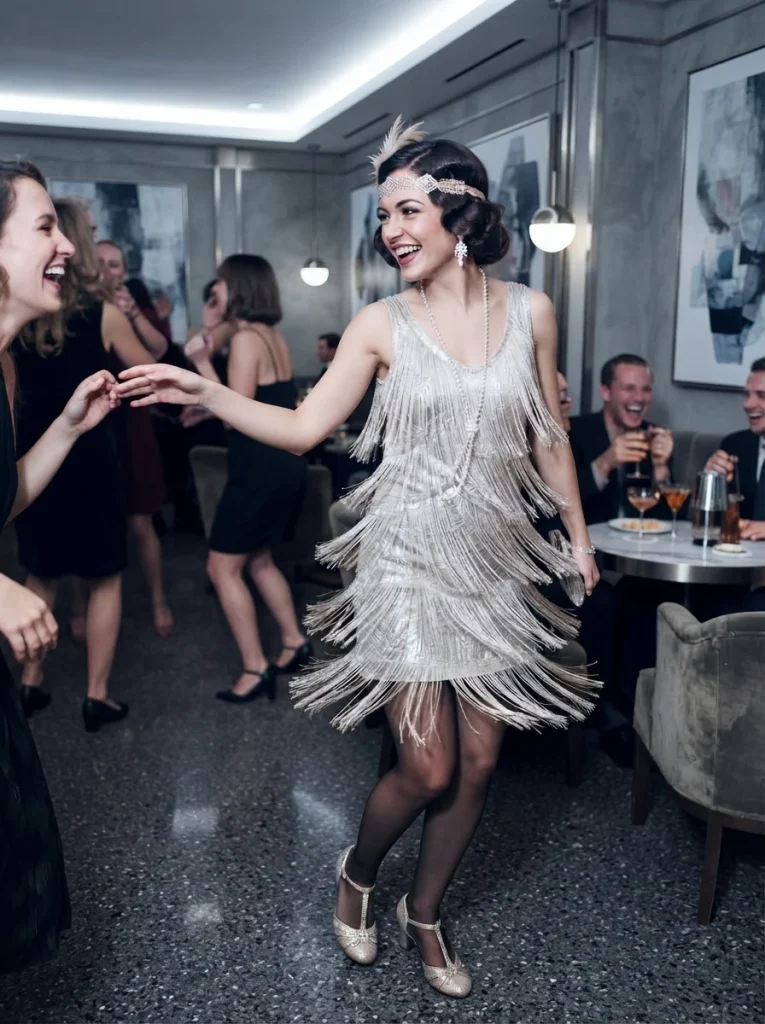
    Champagne Flapper

    • Choose a champagne or black fringe dress with a streamlined silhouette.
    • Add a delicate headband and geometric earrings.
    • Use short gloves or a compact clutch as subtle accessories.
    • Keep the palette limited to champagne, black, and antique gold.

    Give the classic flapper aesthetic a polished update with a champagne-and-black evening look. Choose a streamlined fringe or beaded dress in champagne, black, or soft gold, then add geometric earrings and a delicate headband. Short gloves or a compact clutch can reinforce the vintage influence without making the outfit feel like a theatrical costume. The movement of the fringe creates natural visual interest, especially when walking or dancing. I’ve noticed that costumes with movement photograph more dynamically because the fabric adds energy without requiring exaggerated poses.

    Keep the hairstyle neat with a smooth bob-inspired shape, low waves, or a decorative headband over polished hair. Choose comfortable low heels or embellished flats if dancing is part of the evening. For photographs, use an Art Deco-inspired lounge, hotel bar, or dining room with brass details, dark wood, and warm pendant lighting. Avoid adding too many feathers or oversized props; the dress and accessories already establish the period. The finished look feels glamorous, festive, and sophisticated while remaining easy to recognize as a vintage-inspired Halloween costume.

    Botanical Duchess

    • Wear a refined floral midi or floor-length dress with a structured waist.
    • Add a botanical fascinator or delicate floral hairpiece.
    • Choose sage, dusty rose, cream, or muted lavender.
    • Use pearls and a small handbag to complete the polished look.

    Blend aristocratic styling with garden elegance through a botanical duchess costume. Choose a floral midi or floor-length dress with a structured waist, then add a delicate fascinator or floral hairpiece. Sage, dusty rose, cream, and muted lavender create a softer alternative to typical dark Halloween colors while still feeling seasonal. Pearls and a small structured handbag provide the finishing details. The concept feels polished because the clothing remains believable as formal daywear rather than looking like a costume. In my experience, subtle botanical accessories can make a floral outfit feel far more intentional without adding visual clutter.

    Choose shoes that complement the dress without competing with its pattern, such as nude flats, low heels, or polished loafers. Keep the jewelry delicate with pearls or a slim bracelet. For photographs, use a formal garden, conservatory, country-house entrance, or elegant terrace with clipped greenery and stone details. Soft late-afternoon light will emphasize the floral colors naturally. The finished costume feels graceful, feminine, and refined, offering a classy option for someone who wants Halloween inspiration that leans toward fashion and garden-party elegance rather than traditional spooky styling.

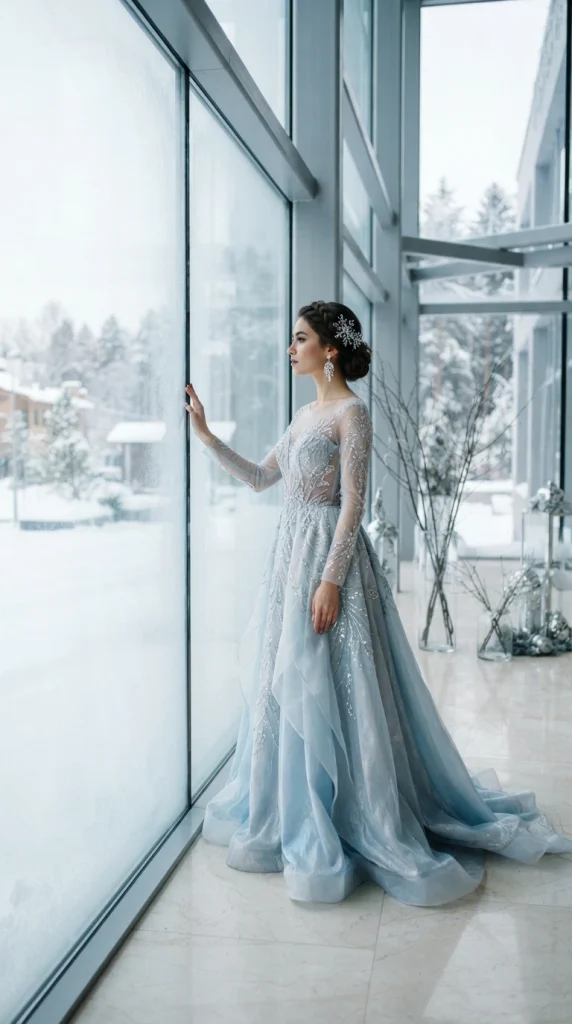
    Crystal Ice Queen

    • Choose a silver, icy blue, or pale-gray gown with reflective fabric.
    • Add crystal earrings and a delicate snowflake-inspired hairpiece.
    • Use cool neutrals with restrained shimmer for sophistication.
    • Keep the silhouette flowing instead of heavily embellished.

    Create an elegant winter-fantasy costume with a crystal ice queen aesthetic built around cool tones and subtle sparkle. Choose a flowing gown in silver, icy blue, pale gray, or frosted white, then add crystal earrings and a delicate snowflake-inspired hairpiece. Reflective fabric provides enough drama without covering the outfit in glitter. The cool palette feels especially striking against darker surroundings, making this an excellent evening costume. I’ve noticed that metallic and icy fabrics look more sophisticated when the sparkle is concentrated in one or two areas rather than distributed across every surface.

    Keep the beauty styling luminous and restrained with cool-toned eyeshadow, softly highlighted skin, and a sleek bun or polished waves. Silver shoes can reinforce the theme, but neutral footwear works equally well if comfort is important. For photographs, use a modern glass atrium, pale marble staircase, or winter-inspired event space with cool architectural lighting. A slightly low camera angle can make the silhouette feel regal without exaggeration. The finished look feels ethereal, polished, and dramatic while remaining elegant enough for sophisticated Halloween celebrations.

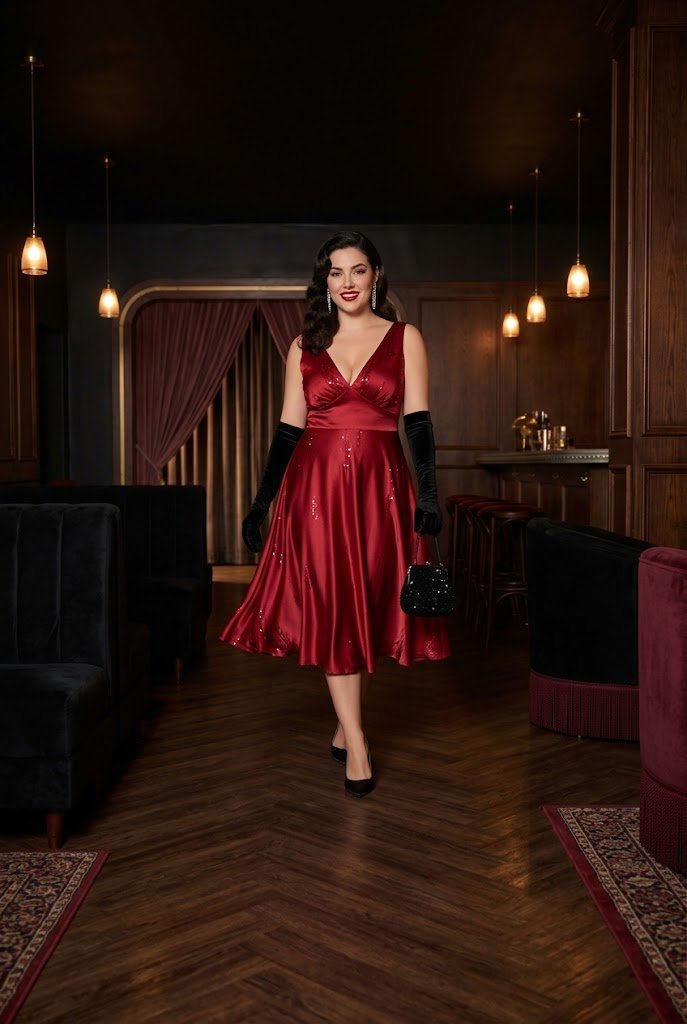
    Ruby Cabaret Star

    • Start with a rich ruby-red dress featuring satin or subtle sequins.
    • Add black gloves, crystal earrings, and a compact evening bag.
    • Keep the makeup classic with a matching red lip.
    • Use black and ruby as the dominant color combination.

    Make a confident entrance with a ruby-red cabaret-inspired costume that balances glamour and sophistication. Choose a satin or subtly sequined red dress, then pair it with black gloves, crystal earrings, and a compact evening bag. The combination of ruby and black creates immediate visual drama without needing elaborate costume pieces. A classic red lip can echo the dress while keeping the makeup cohesive. In my experience, a strong monochromatic color story makes evening costumes look more intentional because every accessory feels connected to the central shade.

    Choose a silhouette that allows comfortable movement, especially if the event involves dancing. Black heels, pointed flats, or elegant ankle boots can complete the look depending on the dress length. For photographs, use a vintage theater lounge, dark velvet room, or sophisticated cocktail bar with warm pendant lights and polished surfaces. Keep the background slightly subdued so the red dress remains the focal point. The finished costume feels glamorous, confident, and distinctly festive, making it a strong choice for anyone who wants a sophisticated Halloween look with a little theatrical energy.

    Monochrome Muse

    • Build the entire costume from different shades of one neutral color.
    • Combine tailored pieces with one dramatic flowing layer.
    • Add sculptural jewelry or a minimalist statement accessory.
    • Use texture differences to keep the monochrome outfit visually interesting.

    For a costume that feels modern and editorial, create a monochrome muse look using different shades of one sophisticated color. Black is the easiest choice, but cream, charcoal, chocolate, or deep navy can work beautifully too. Combine tailored trousers or a fitted dress with one flowing layer, then add sculptural jewelry or a minimalist statement accessory. The concept feels intentional because the entire outfit follows one visual language. I’ve noticed monochrome styling often looks especially polished in photographs because there is less color competition, allowing the silhouette, texture, and accessories to become the focus.

    Texture is the secret to keeping a single-color costume from looking flat. Combine satin with matte tailoring, lace with velvet, or leather with soft knitwear to create subtle contrast. Keep the shoes and bag within the same tonal family. For photographs, use a contemporary art gallery, modern staircase, or minimalist architectural interior with strong lines and directional lighting. A clean background allows the outfit to look almost editorial. The finished costume feels fashionable, confident, and sophisticated while giving you plenty of freedom to choose pieces already sitting in your wardrobe.

    Find Your Perfect Halloween Look

    Choosing a costume becomes much easier when you focus on the feeling you want to create rather than simply searching for something recognizable. These ideas offer plenty of inspiration, from glamorous evening looks to mysterious, artistic, and fantasy-inspired outfits that still feel sophisticated.

    A classy halloween costume can be created with pieces you already own, thoughtful accessories, and a cohesive color palette. I’ve noticed that even small details—such as pearl earrings, velvet textures, elegant gloves, or a statement hairpiece—can completely change an outfit. Save your favorite ideas to Pinterest, try one that matches your personal style, and share this collection with a friend who is still looking for Halloween inspiration. Your perfect look may be simpler than you think.

  • 17 Best Friend Halloween Costume Ideas for a Fun Halloween!!

    17 Best Friend Halloween Costume Ideas for a Fun Halloween!!

    Halloween is more fun when you and your best friend show up as an unforgettable duo! 🎃✨
    These best friend halloween costume ideas are perfect for anyone who wants a creative pair costume without looking like you simply bought matching outfits. From clever character pairings and nostalgic themes to funny concepts and stylish looks, this collection is packed with inspiration for different personalities. The goal is to find costumes that feel connected while still allowing each friend to have their own style. I’ve noticed that the best duo costumes usually have one or two instantly recognizable details—such as a signature color, accessory, hairstyle, or prop—rather than requiring a complicated full costume. Whether you’re heading to a party, college event, trick-or-treat gathering, or Halloween night out, these ideas make choosing your look much easier.

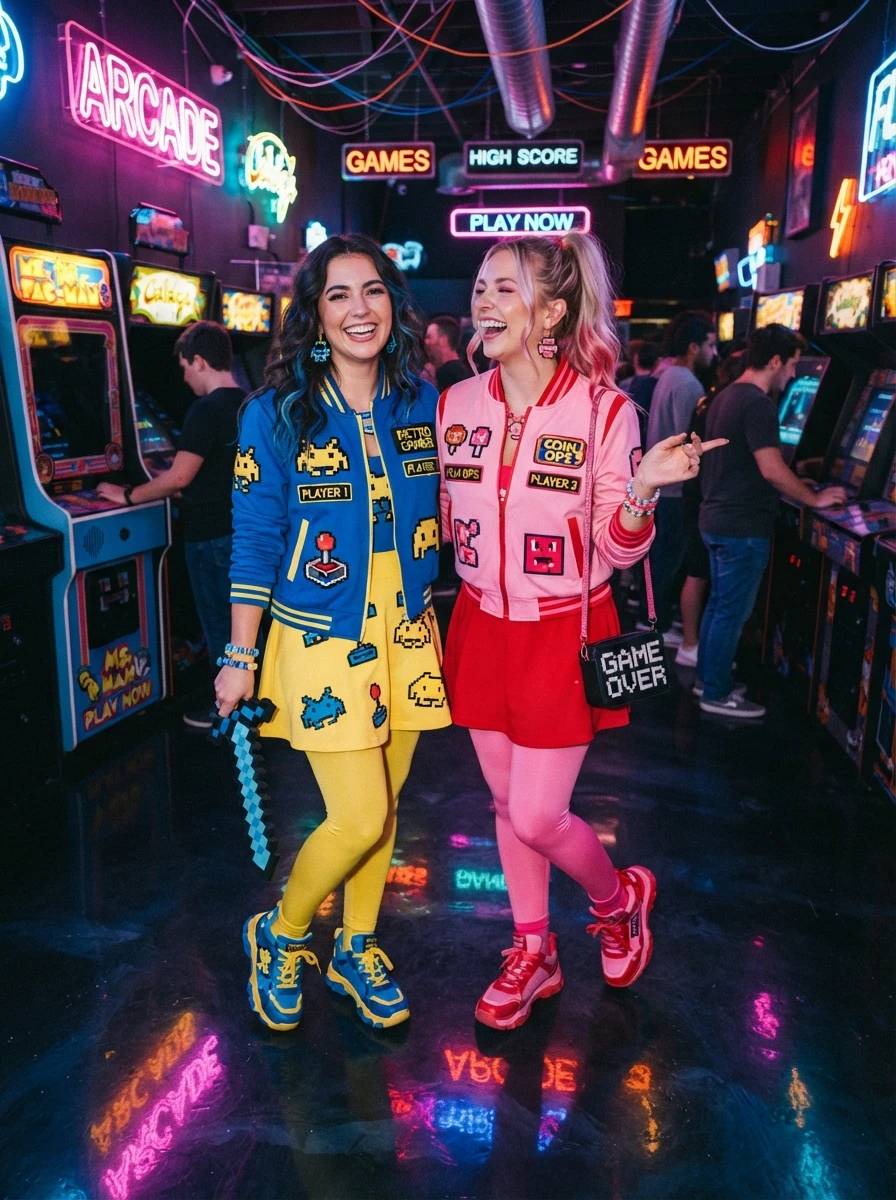
    Retro Arcade Duo

    • Pair contrasting neon colors for an instantly recognizable gaming-inspired look.
    • Use everyday skirts, graphic tops, sneakers, or jeans as the base.
    • Add pixel-style props, oversized coins, or simple handmade accessories.
    • Keep one repeated detail, such as matching shoes, to visually connect both outfits.

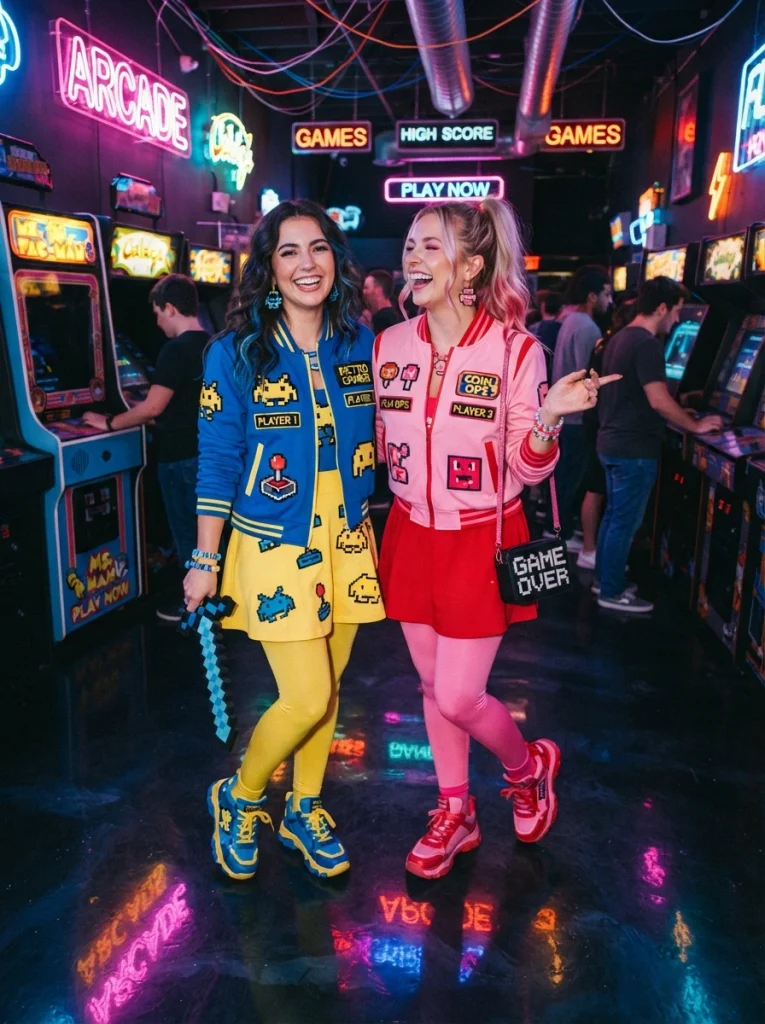
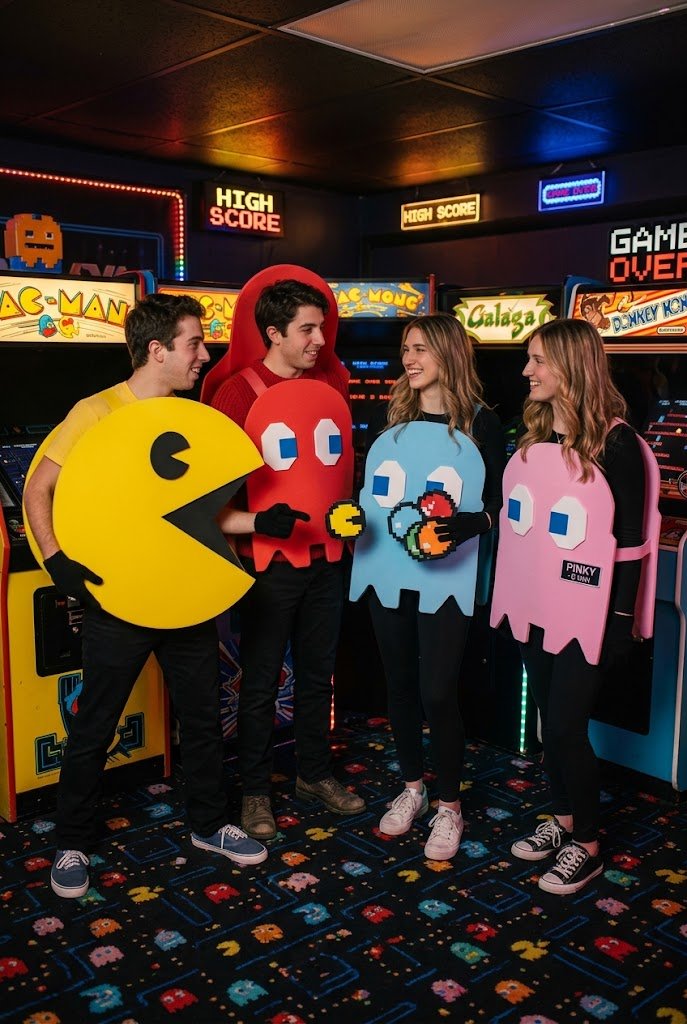
    Want a duo costume that feels clever without looking like two identical outfits? These best friend halloween costume ideas can start with a retro arcade pairing, bringing personality through bold colors, playful props, and a nostalgic theme. One friend can dress as a classic arcade heroine while the other becomes a pixel-inspired game character, using bright skirts, graphic tops, sneakers, and handmade details. The contrast makes photos lively while keeping costumes comfortable for walking, parties, or events. I’ve noticed recognizable accessories often do more work than elaborate clothing, so focus on one strong prop or color cue for each character.

    A retro gaming theme is especially easy to personalize because you can choose characters that match your friendship dynamic. Try one outfit in electric blue and yellow while the other uses hot pink, red, or neon green, then add pixel-style sunglasses, cardboard coins, joystick props, or simple foam accessories. Keep the silhouettes different so each friend has a distinct look, but repeat one visual detail, such as matching sneakers or hair clips, to connect everything. The result feels coordinated rather than costume-shop generic, and it gives you plenty of playful poses for party photos and social posts.

    Vintage Detective Pair

    • Build both outfits from classic coats, button-downs, trousers, or skirts.
    • Choose different neutral colors so each friend has an individual look.
    • Add magnifying glasses, notebooks, flashlights, or faux evidence folders.
    • Use vintage accessories to make the theme recognizable without overcomplicating it.

    Ready for a costume that looks polished but still has a playful Halloween twist? A detective duo gives two friends a recognizable theme without forcing them into identical clothing. Build the looks around contrasting trench coats, button-down shirts, trousers or skirts, and simple investigative props such as magnifying glasses, notebooks, or faux evidence folders. One friend can choose a classic beige palette while the other wears charcoal or olive, creating visual contrast in photos. In my experience, this kind of outfit works particularly well for last-minute plans because many of the clothing pieces can come straight from an everyday wardrobe.

    The detective concept becomes more convincing when the accessories feel intentional rather than excessive. Add a felt fedora, vintage-style notebook, dark loafers, or a small flashlight, then keep the makeup and hair polished so the outfits still feel fashionable. You can also create matching “case file” badges with funny fictional mysteries for a party-ready detail. For stronger photos, choose a brick wall, library corner, old staircase, or café setting that naturally supports the theme. This pairing is flexible enough for different budgets and personal styles while still giving both friends a clear visual connection throughout the night

    Retro Soda Shop

    • Use vintage diner silhouettes with stripes, skirts, tops, or simple uniforms.
    • Give each friend a different color while keeping the overall styling coordinated.
    • Add milkshake cups, soda bottles, paper hats, or diner-style accessories.
    • Choose comfortable shoes because this look works well for parties and photos.

    If you want something colorful, playful, and instantly recognizable, a matching soda-shop duo can turn ordinary retro outfits into a fun Halloween pairing. Start with vintage diner uniforms, striped tops, full skirts, sneakers, and paper hats in two coordinated color schemes. One friend might wear cherry red while the other chooses turquoise, keeping the silhouettes similar but the colors distinct. Add simple milkshake cups or takeaway soda props for an extra visual cue. I’ve seen themed outfits like this photograph beautifully because the colors create a strong focal point without requiring complicated costumes or uncomfortable accessories.

    Toy Box Duo

    • Mix a doll-inspired outfit with a playful wind-up toy look.
    • Choose bright colors like bubblegum pink, mint, yellow, or red.
    • Add oversized bows, striped socks, chunky shoes, or toy-inspired props.
    • Keep each silhouette different so both friends have individual personalities.

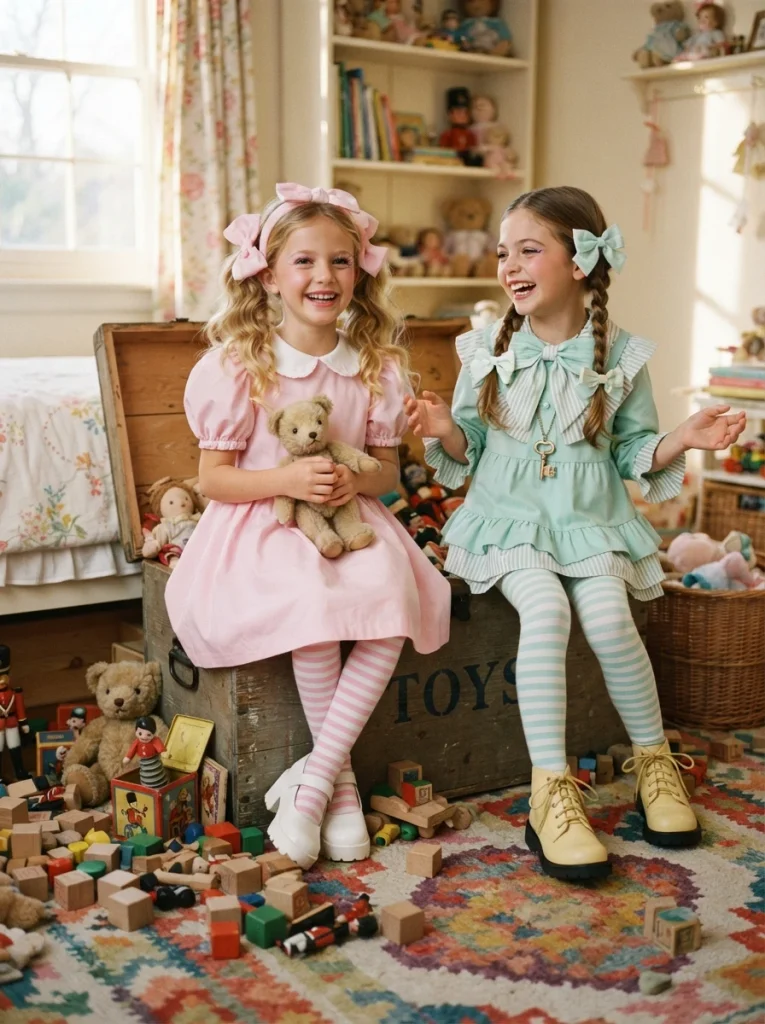
    Make your Halloween photos instantly more playful with a mismatched toy-box duo inspired by childhood favorites. One friend can dress as a classic doll while the other takes on a wind-up toy, using bright clothing, exaggerated accessories, and slightly theatrical makeup. The key is choosing characters that share a playful visual world without looking identical. Use coordinated colors, such as bubblegum pink with mint green, then add oversized bows, striped socks, chunky shoes, or painted cardboard details. I’ve noticed that mixing polished outfits with one intentionally quirky accessory makes this concept feel creative rather than overly costume-like.

    For the strongest result, give each outfit its own silhouette and signature feature. A doll-inspired look might use a pleated skirt and cardigan, while the wind-up character could wear shorts, suspenders, and a graphic top. Add simple cardboard gears, toy labels, or a painted key as recognizable details. Keep makeup expressive but wearable, especially if you’ll be out for several hours. A pastel bedroom, colorful party room, or vintage toy-store-inspired backdrop can make photographs feel cohesive. This pairing also leaves plenty of room for personality, letting each friend choose pieces that fit her usual style and comfort level.

    Moon and Stars

    • Dress one friend in luminous moon-inspired neutrals and metallic accents.
    • Use midnight blue, silver, or deep purple for the star-inspired outfit.
    • Add celestial jewelry, pearl clips, crescent earrings, or subtle shimmer.
    • Keep the details refined rather than covering both costumes in glitter.

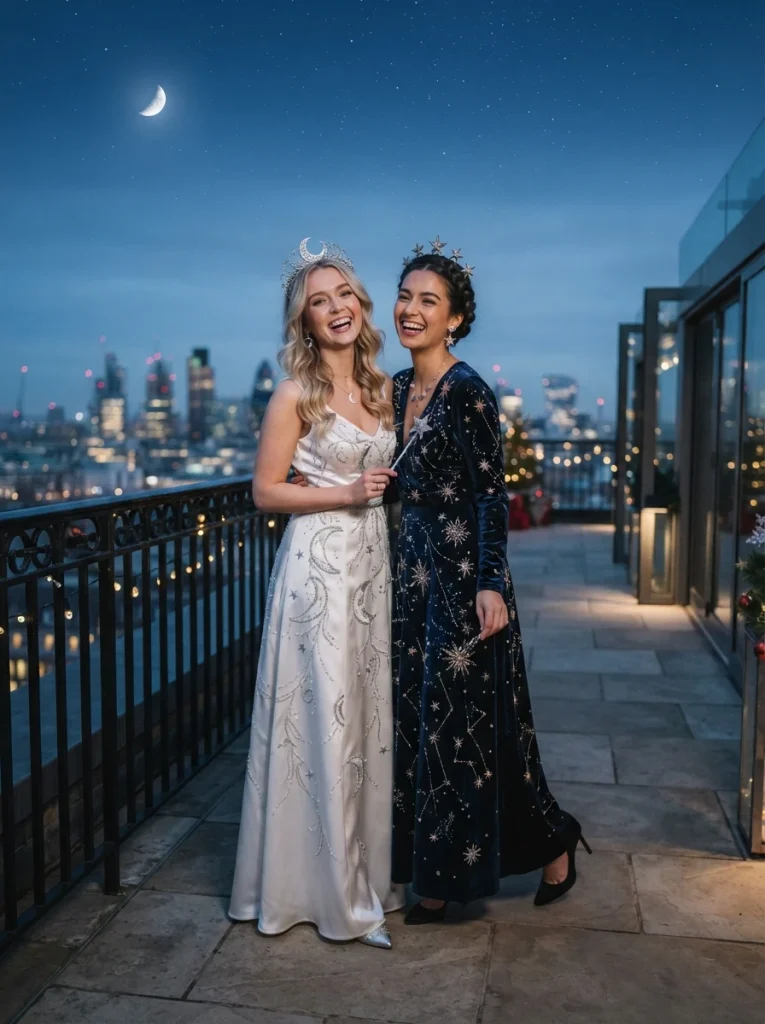
    Bring a little mystery to Halloween with a moon-and-stars pairing that feels stylish instead of overly themed. One friend can wear silver, cream, and pearl details, while the other wears midnight blue with scattered star accents. Flowing skirts, satin tops, metallic jewelry, and subtle celestial makeup create the connection. The contrast looks especially beautiful under evening lighting, making the costumes feel intentional without requiring elaborate construction. In my experience, color contrast is often enough to make a duo concept read clearly, especially when both outfits share a few carefully chosen textures or accessories.

    You can build this celestial pairing from ordinary clothes and a handful of inexpensive details. Try a silver belt, pearl hair clips, crescent earrings, metallic shoes, or small star stickers on a jacket or bag. Keep the moon outfit lighter and reflective, while the star look uses deeper tones with tiny points of shimmer. For photos, choose a rooftop, garden, or softly lit outdoor walkway where evening shadows add atmosphere. Avoid covering every surface with glitter; a restrained approach usually looks more sophisticated. The finished costumes feel connected, photogenic, and comfortable enough for parties or casual Halloween outings.

    Sun and Moon

    • Give one friend a warm golden sun-inspired outfit.
    • Contrast it with a cool silver, navy, or lavender moon look.
    • Use rays, crescent shapes, metallic jewelry, or celestial hair accessories.
    • Let the contrasting palettes create the main visual connection.

    Turn a simple color contrast into a memorable Halloween pairing with a sun-and-moon theme. One friend can embrace warm golden tones with a flowing yellow dress, radiant accessories, or subtle sun-ray details, while the other uses navy, silver, and lavender for a cooler lunar look. The beauty comes from the contrast rather than complicated costumes. Both outfits can remain fashionable and comfortable while still communicating the concept clearly. I’ve noticed that paired costumes photograph especially well when the colors tell the story, so letting one outfit feel warm and radiant and the other mysterious creates an effortless visual connection.

    Small accessories can make the theme recognizable without making either costume feel like a theatrical outfit. Add a delicate sunburst necklace, gold hair clips, crescent earrings, metallic shoes, or a simple celestial headband. For a polished finish, keep makeup relatively soft and let the clothing colors do most of the visual work. A rooftop, garden, or outdoor walkway at twilight creates an especially beautiful backdrop. The two looks can stand apart individually but become more striking when photographed together. This approach works for friends with different fashion preferences because each person can interpret her celestial side differently.

    Disco Cowgirls

    • Combine western pieces with sparkly disco-inspired details.
    • Give each friend a different metallic color for contrast.
    • Add cowboy hats, boots, fringe, rhinestones, or statement belts.
    • Keep the outfits coordinated through matching western accessories.

    Bring together two party-ready styles with a disco cowgirl pairing that feels energetic, colorful, and easy to personalize. Start with familiar western pieces such as cowboy boots, denim, fringe, or wide-brim hats, then add sequins, metallic fabrics, or rhinestone accessories for the disco influence. Let each friend choose her own statement color so the outfits feel coordinated without becoming identical. Silver and white can work beautifully beside purple or hot pink, for example. I’ve noticed that mixing one recognizable costume element with one unexpected detail often makes a duo look much more memorable in photographs.

    You do not need a complete themed wardrobe to make this pairing convincing. One friend might wear a sparkly fringe top with white jeans, while the other chooses a sequined skirt with a denim jacket and western boots. Matching cowboy hats, star-shaped earrings, or statement belts can tie the outfits together. For photos, a dance floor, barn-style venue, or outdoor string-light setting gives the costumes plenty of energy. Choose comfortable boots if you expect to walk or dance throughout the night. The result feels festive and fashionable while giving both friends plenty of freedom to express their individual personalities.

    Breakfast Duo

    • Choose two complementary breakfast foods with instantly recognizable shapes.
    • Use simple clothing bases in warm, appetizing colors.
    • Add lightweight food-shaped signs, hats, or wearable props.
    • Keep the humor obvious without making the outfits bulky.

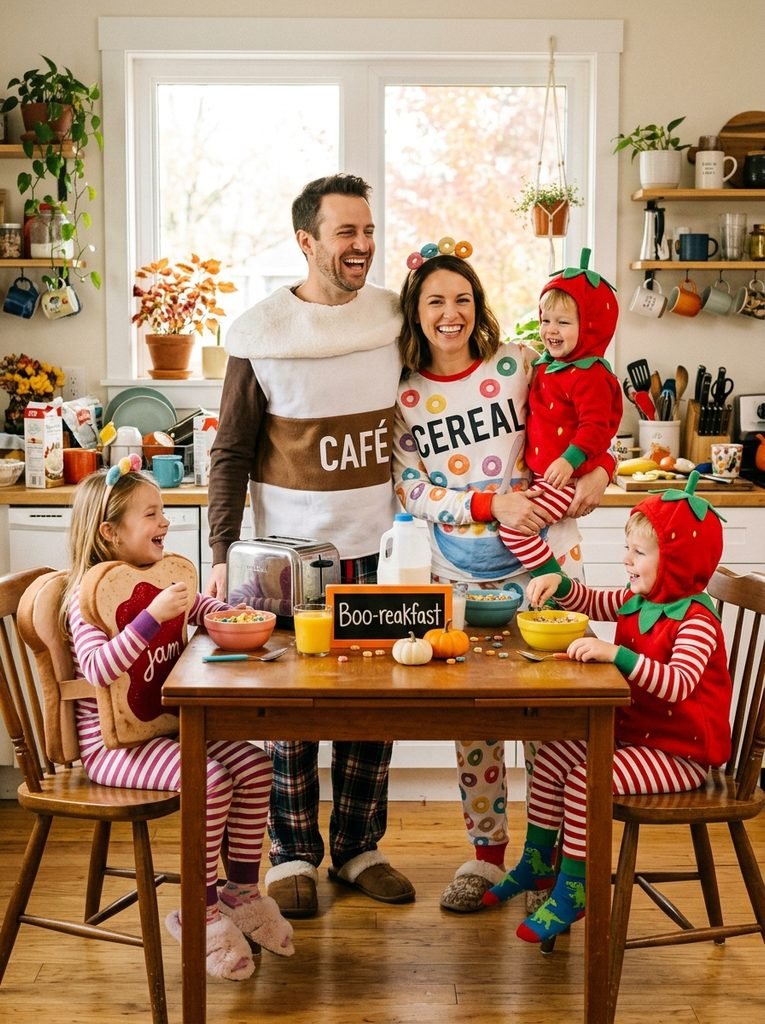
    Nothing gets a party conversation started quite like turning breakfast favorites into a playful costume duo. Choose two foods that naturally belong together, such as pancakes and syrup or toast and jam, then translate their recognizable colors and shapes into wearable outfits. The concept works because the visual joke is immediately understandable while still leaving plenty of room for creativity. One friend can use a tan, cream, or golden palette while the other chooses maple brown, berry red, or deep purple. In my experience, food-themed pairings work best when the silhouettes remain simple and comfortable.

    Keep the costumes lightweight by using regular clothing as the foundation and adding only a few exaggerated details. A tan sweatshirt can become toast with a simple felt border, while a brown outfit can represent syrup through a glossy-looking prop or apron detail. Add playful food labels, oversized forks, or small breakfast-themed accessories if desired. For photographs, a bright kitchen, café-style breakfast table, or sunny dining nook creates an instantly fitting backdrop. This idea is especially useful for friends who want something funny and original without spending hours making elaborate costumes or carrying large props.

    Garden Gnomes

    • Use contrasting red, green, blue, or earthy colors for each outfit.
    • Add pointed hats and simple apron-style layers to define the theme.
    • Use oversized gardening tools as playful photographic props.
    • Choose comfortable shoes suitable for outdoor Halloween events.

    Add a whimsical garden twist to your Halloween plans with a coordinated gnome duo. Each friend can create her own interpretation using an oversized pointed hat, layered clothing, an apron, and earthy accessories. Instead of matching completely, choose contrasting colors such as forest green and burgundy or cobalt blue and rust. This keeps the costumes visually connected while allowing each friend to have a distinct personality. A small faux beard can add humor if you want a more traditional gnome reference, while colorful socks or patterned scarves can make the outfits feel more youthful and fashion-forward.

    The garden theme gives you plenty of opportunities to make photographs feel playful and natural. Carry miniature watering cans, wooden gardening tools, baskets, or faux flowers as props, then pose beside planters, a backyard shed, or a leafy garden path. Keep the clothing comfortable because the costume already has a strong identity through its hat and accessories. For a polished finish, use layered textures such as knit sweaters, canvas aprons, wool socks, and sturdy shoes. The combination feels charmingly unexpected and works particularly well for friends who prefer humorous costumes over glamorous or character-based looks.

    Bubble Tea Pair

    • Turn favorite bubble tea flavors into colorful wearable costumes.
    • Give each friend a different drink color and topping combination.
    • Use clear cups, straw props, or boba-inspired accessories for recognition.
    • Keep the clothing comfortable while letting the accessories carry the theme.

    Who says your Halloween costumes have to come from movies or television? A bubble tea duo offers a fresh, colorful alternative that is playful without feeling overdone. One friend can represent strawberry milk tea in pink and cream, while the other chooses matcha in green and ivory. Add oversized cup graphics, faux tapioca pearls, or giant reusable straws as lightweight accessories. The concept works particularly well because the colors immediately distinguish the two drinks while still creating a unified pair. I’ve noticed food-inspired costumes become much more wearable when everyday clothing forms the foundation.

    For an easy DIY approach, start with solid-color dresses, sweatshirts, or skirts and add a large circular cup label to the front. A transparent prop cup filled with lightweight black pom-poms can represent boba without making the costume cumbersome. Coordinate hairstyles and shoes loosely rather than matching them exactly. For photographs, choose a bright café, colorful kitchen, or outdoor city setting that complements the playful theme. This pairing feels especially suitable for close friends who want something unusual and conversation-starting. It also allows each person to choose her favorite drink, making the costume feel personalized rather than randomly coordinated.

    Chess Queens

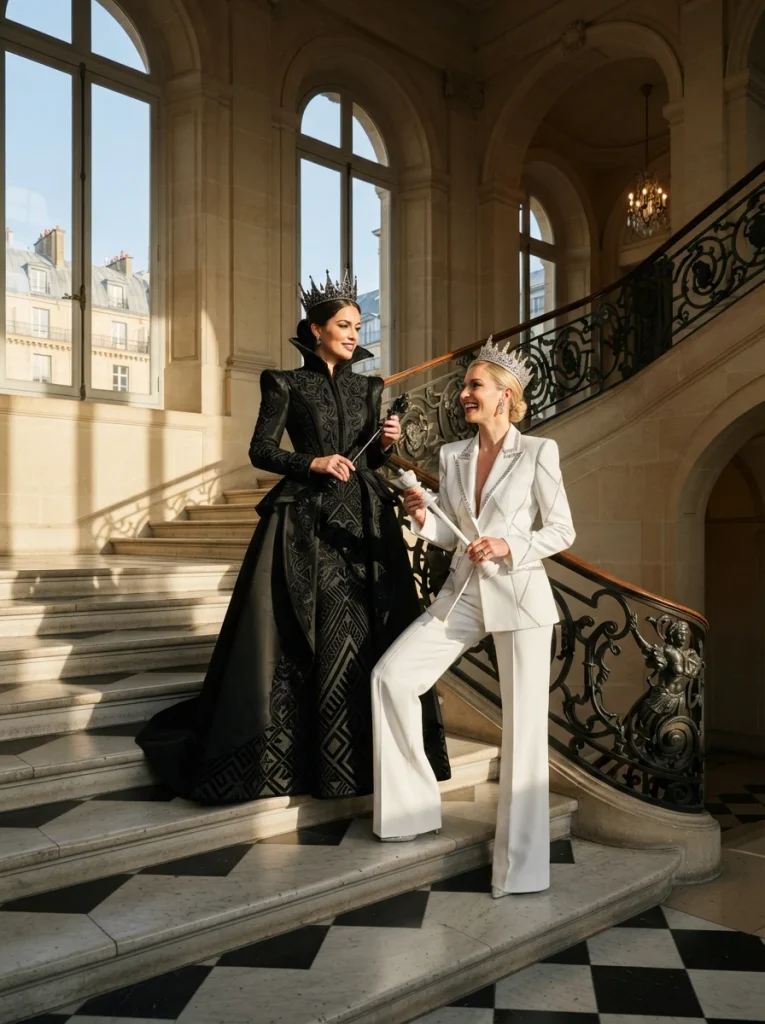
    • Use black-and-white outfits with dramatic queen-inspired styling.
    • Add simple crown or chess-piece accessories for instant recognition.
    • Choose contrasting silhouettes while keeping the monochrome palette consistent.
    • Use bold poses and clean backgrounds to emphasize the visual concept.

    Make a bold statement with a sophisticated chess-inspired duo featuring two queen looks. Build the costumes around black and white clothing, structured silhouettes, dramatic collars, gloves, or flowing skirts, then add simple crown accessories to establish the theme. One friend can wear predominantly black while the other chooses crisp white, creating a strong visual contrast in photographs. The idea feels polished enough for a party while remaining recognizable as a playful Halloween concept. That balance is useful when you want something more fashionable than a traditional character costume but still clearly connected to the holiday.

    The strongest version keeps the styling dramatic without becoming difficult to wear. Try a black blazer with a pleated skirt for one friend and a white tailored dress or trousers for the other. Add crown-shaped hair accessories, chess-piece necklaces, or small checkerboard details rather than covering everything in symbols. A minimalist staircase, grand room, or black-and-white tiled floor makes an excellent setting for photographs. Pose facing each other like opposing pieces or stand back-to-back for a stronger editorial feel. The result gives friends plenty of personality while maintaining one clear visual theme throughout their costumes.

    Sushi and Sake

    • Pair a colorful sushi-inspired look with a sleek sake-inspired outfit.
    • Use black, white, salmon, red, and muted green as the main palette.
    • Add lightweight food or bottle-shaped props for instant recognition.
    • Keep the styling playful rather than overly literal.

    Give your duo costume an unexpected food-inspired twist with sushi and sake. One friend can dress around the colors and shapes of a sushi roll, using black, white, salmon pink, and green accents, while the other creates a sake-inspired look with a simple cream or white outfit and a decorative bottle prop. The contrast keeps the costumes interesting while making the pairing easy to understand. In my experience, unusual food combinations can be more memorable at parties because guests immediately have something fun to ask about, especially when the outfits use recognizable colors and a few carefully chosen accessories.

    You can keep the costumes stylish by avoiding bulky food shapes and relying on clever visual details instead. A black dress with a white sash and colorful circular accents can suggest sushi, while the sake look might use a cream jumpsuit, red obi-style belt, and small bottle-shaped purse. Add chopstick hairpins, simple labels, or themed earrings if desired. For photos, a dining room, restaurant-style setting, or clean kitchen backdrop reinforces the concept without distracting from the outfits. Choose lightweight accessories so both friends can comfortably move, dance, and socialize throughout the Halloween celebration.

    Fairy and Mushroom

    • Pair a delicate woodland fairy look with a playful mushroom-inspired outfit.
    • Use lavender, moss green, cream, rust, and soft brown for an earthy palette.
    • Add wings, flower clips, mushroom caps, or botanical accessories.
    • Use layered textures to make both costumes feel connected and dimensional.

    Create a whimsical woodland duo by pairing a graceful fairy costume with a charming mushroom-inspired look. One friend can wear lavender, sage, or dusty pink with delicate wings and floral accessories, while the other uses cream, rust, and brown with a rounded mushroom cap. The contrasting silhouettes make each outfit distinctive while the earthy colors create a natural connection. This pairing feels especially fresh for friends who want something softer and more imaginative than traditional spooky costumes. I’ve noticed woodland themes photograph beautifully because natural textures and muted colors create visual depth without requiring complicated styling.

    The costumes can be assembled with comfortable clothing and a few statement accessories. Try a flowing skirt, cardigan, or dress for the fairy, adding translucent wings and botanical hair clips. For the mushroom look, use a cream dress or trousers with a red, rust, or tan cape and a lightweight spotted hat. Choose a garden, forest trail, greenhouse, or rustic outdoor setting for photographs. Natural greenery becomes part of the costume palette, making the final images feel cohesive. The result is playful enough for Halloween while remaining comfortable, creative, and easy for each friend to personalize.

    Pirate and Mermaid

    • Combine nautical textures with contrasting ocean-inspired colors.
    • Give the pirate outfit darker tones and the mermaid a luminous palette.
    • Add shells, ropes, bandanas, treasure props, or sea-inspired jewelry.
    • Choose comfortable footwear and lightweight accessories for easy movement.

    Dive into a coordinated costume pairing with a pirate-and-mermaid theme that gives both friends completely different personalities. The pirate can lean into black, burgundy, brown, and weathered textures, while the mermaid uses turquoise, seafoam, lavender, or shimmering silver. This contrast makes the duo immediately interesting without requiring matching clothing. Add a bandana, rope belt, treasure map, shell necklace, or ocean-inspired hair accessories to strengthen the connection. In my experience, costumes with contrasting characters often create better photos because each friend has a distinct visual identity while still contributing to one recognizable theme.

    For a comfortable version, build the pirate look from a loose blouse, dark trousers or skirt, boots, and a waist belt. The mermaid can use a fitted or flowing dress with iridescent accessories instead of a restrictive tail. Add faux pearls, shell clips, layered necklaces, or a small treasure chest as finishing touches. A beachside location, wooden deck, pool area, or blue-lit party space can reinforce the ocean theme. Keep props compact enough to carry easily throughout the evening. The finished pairing feels adventurous, colorful, and photogenic without requiring professional costume pieces or extensive DIY work.

    Cloud and Rainbow

    • Use soft white and pastel colors for a cheerful weather-inspired pairing.
    • Give the cloud outfit fluffy textures and the rainbow look colorful layers.
    • Add translucent umbrellas, colorful ribbons, or small raindrop accessories.
    • Keep the palette bright but balanced so the costumes photograph naturally.

    Turn a simple weather theme into a cheerful Halloween duo with cloud and rainbow costumes. One friend can wear soft white, ivory, or pale gray with fluffy textures representing a cloud, while the other brings color through layered rainbow shades. The contrast is instantly recognizable and creates a bright visual pairing without relying on traditional Halloween characters. Use pastel ribbons, colorful accessories, or subtle raindrop details to connect the two looks. I’ve noticed that weather-inspired costumes are particularly effective for daytime parties because their light colors photograph clearly and give friends an easy way to coordinate without wearing identical outfits.

    For the cloud costume, a white sweater, tulle skirt, or textured dress can provide the foundation, with lightweight cotton-like trim used sparingly for dimension. The rainbow look can combine a colorful dress, striped top, or layered skirt with matching hair ribbons. Add a transparent umbrella for an especially recognizable prop, or carry a small rainbow-colored bag. For photographs, use a bright bedroom, rooftop, garden, or open outdoor space with plenty of natural light. The finished pairing feels playful and uplifting while remaining simple enough to assemble from clothing and accessories you may already have.

    Astronaut and Alien

    • Give one friend a sleek astronaut-inspired outfit and the other an imaginative alien look.
    • Use white, silver, metallic gray, and vivid green or purple accents.
    • Add helmets, futuristic sunglasses, antennae, or space-themed patches.
    • Keep accessories lightweight so both costumes remain comfortable throughout the night.

    Take your friendship into outer space with an astronaut-and-alien pairing that feels playful, recognizable, and different from typical Halloween duos. One friend can create a clean astronaut look using white clothing, silver details, and space-themed patches, while the other embraces vivid green, purple, or metallic accents for an alien-inspired outfit. The contrast makes the concept easy to understand while giving both friends plenty of room to experiment. I’ve noticed that futuristic accessories can instantly elevate simple clothing, so you do not need elaborate costumes to make this pairing look intentional and photograph-ready.

    Start with comfortable basics, then build the characters through accessories. A white jumpsuit, utility-style vest, or matching sneakers can establish the astronaut look, while the alien outfit might use a metallic dress, colorful makeup, or futuristic sunglasses. Add cardboard mission badges, small antennae, or silver gloves for extra detail. For photographs, choose a modern building, dark room with projected stars, or open nighttime setting. Keep the props manageable so they do not become a burden at the party. This duo works particularly well when one friend prefers a classic costume while the other wants something more imaginative and unconventional.

    Soda and Popcorn

    • Create a playful movie-snack pairing using bold red, white, and yellow tones.
    • Use striped clothing to suggest classic cinema packaging.
    • Add lightweight popcorn boxes or reusable drink cups as props.
    • Keep the outfits casual so the theme feels fun rather than overly theatrical.

    Bring a movie-night favorite to life with a soda-and-popcorn costume pairing that is simple, funny, and instantly recognizable. One friend can dress in red-and-white inspired styling with a striped top or skirt, representing a classic soda cup, while the other uses yellow, cream, and white to create a popcorn-inspired look. The colors naturally belong together, making the duo feel coordinated without requiring identical clothing. In my experience, everyday outfits become much more effective costumes when one strong prop completes the visual joke, so a striped cup or popcorn box can do most of the work.

    Keep the costumes practical by using clothing you already own and adding lightweight accessories. A red dress with a white belt can suggest a soda cup, while a yellow cardigan and cream skirt can create the popcorn look. Add oversized reusable cups, striped paper straws, or a small popcorn bucket for photographs. A home movie room, cinema entrance, or cozy living-room setup can reinforce the theme beautifully. Choose comfortable shoes and avoid carrying large containers for long periods. The finished costumes are cheerful, affordable, and especially fun for friends who want a recognizable concept without dressing as specific fictional characters.

    Garden Party Ladies

    • Style each friend in a different floral color palette.
    • Use vintage-inspired dresses, gloves, hats, or decorative handbags.
    • Add artificial flowers and delicate accessories for a polished finish.
    • Keep the styling coordinated through similar silhouettes rather than identical outfits.

    Turn a classic garden-party aesthetic into a surprisingly charming Halloween duo with two vintage-inspired ladies’ looks. One friend can choose a dusty rose or lavender dress, while the other wears sage green, mustard, or deep burgundy. Add gloves, decorative hats, pearl jewelry, or small handbags to create the polished connection. The outfits do not need to match exactly; similar silhouettes and coordinated accessories are enough to make the pairing feel intentional. I’ve noticed that vintage-inspired costumes photograph especially well because structured accessories and layered fabrics add visual interest without requiring elaborate costume construction.

    For a stronger finish, choose dresses with different floral patterns but keep their overall style similar. One friend might carry a small wicker handbag with flowers, while the other wears a ribboned hat or carries a vintage-style clutch. Comfortable flats or low heels make the costumes easier to wear throughout the evening. A garden, conservatory, floral café, or elegant porch provides a natural backdrop for photographs. Soft daylight highlights the fabrics and accessories beautifully, while warm evening lights can create a more sophisticated mood. The result feels feminine, creative, and distinctive without looking like two identical costumes.

    Find Your Perfect Halloween Duo

    The right best-friend costume should feel fun to wear, easy enough to pull together, and distinctive enough to make your photos memorable. These ideas give you plenty of ways to coordinate without sacrificing your individual personalities. You can recreate many looks with clothes you already own, then add a few well-chosen accessories to make the theme instantly recognizable. I’ve seen how a simple color combination or clever prop can completely transform an ordinary outfit into a great Halloween look. Save this collection to Pinterest before costume planning begins, try the idea that best matches your friendship, and share it with your favorite costume partner so you can start planning together.

  • 18 Halloween Gift Basket Ideas That Feel Thoughtful

    18 Halloween Gift Basket Ideas That Feel Thoughtful

    Halloween gifts do not have to be a pile of candy and plastic decorations. The best ideas usually have one simple theme behind them, whether that is baking, crafting, tea, gardening, or a small hobby the recipient already enjoys.

    I like starting with the person before choosing the Halloween theme. Think about what they actually use, eat, collect, or enjoy, then add a few seasonal details around it. This makes the gift feel personal instead of like a random collection of Halloween products.

    The ideas below include a mix of edible gifts, practical treats, creative activities, and seasonal surprises, so there is something for kids, adults, friends, coworkers, neighbors, and family members.

    What to Put Inside

    • Favorite candy, chocolate, cookies, or seasonal snacks
    • Coffee, tea, cocoa, or another favorite drink
    • A useful mug, tumbler, tray, or serving piece
    • Baking or cooking ingredients
    • Small craft or hobby supplies
    • Self-care products and cozy accessories
    • Gardening or outdoor items
    • Reusable boxes, crates, totes, and trays
    • Small Halloween accents such as pumpkins, leaves, ribbons, or tags

    Start with one main item rather than buying lots of tiny things. A ceramic mug, wooden crate, craft box, baking kit, or reusable tote can become the anchor, while smaller gifts fill the spaces around it.

    You also do not need every item to look spooky. A few Halloween colors or one seasonal decoration can be enough. This is especially helpful when making a gift for someone who prefers autumn style over traditional black-and-orange Halloween decor.

    Quick Styling Tips

    Use filler paper, fabric, towels, or a blanket to create height before adding the smaller gifts. Put the tallest pieces toward the back and keep the smallest items toward the front so everything can be seen.

    For a more polished look, repeat two or three colors throughout the arrangement. Natural materials such as rattan, wood, canvas, kraft paper, and linen can also make a simple collection feel more finished.

    Most importantly, leave a little breathing room. A basket does not have to be stuffed from edge to edge to look generous. A few well-chosen pieces arranged at different heights usually create a better result.

    Before You Make One

    Choose the recipient before choosing the theme. A teacher, neighbor, child, coworker, close friend, or family member will each appreciate different things.

    If you know their favorite snack, hobby, drink, or color, use that as your starting point. Then add Halloween details around it instead of making the entire gift depend on seasonal products.

    That approach also makes the gift more useful after October. A reusable crate, mug, tote, tray, or hobby box can continue to be used long after the candy is gone.

    Halloween Gift Basket Checklist

    • One larger anchor item
    • Two or three smaller useful gifts
    • A favorite snack or drink
    • One or two seasonal accents
    • Filler material for height
    • Coordinating ribbon or tag
    • A reusable container when possible

    How to Make It Look Full

    Start with filler before placing the actual gifts. Tissue paper, shredded kraft paper, a folded towel, or a small blanket can raise everything so the contents are easier to see.

    Then place the largest piece toward the back, medium-sized items in the middle, and smaller treats near the front. This simple layering technique makes even a small collection look more substantial without buying unnecessary extras.

    Mini Baking Kit

    • Combine ingredients and tools so the recipient can actually make something.
    • Use a wooden crate instead of a traditional basket for a fresh look.
    • Add colorful sprinkles or cupcake liners for visual interest.
    • Include a reusable kitchen towel for extra practicality.

    A mini baking kit makes a fun Halloween gift because the recipient gets both useful supplies and something to do. Fill a small wooden crate with cookie cutters, cupcake liners, sprinkles, frosting, baking mix, and a kitchen towel. You could also add a small recipe card featuring cookies, cupcakes, or brownies. Keep the colors coordinated with burnt orange, cream, chocolate brown, and muted purple. This works especially well for families, children, teachers, or friends who enjoy baking during the fall. The crate can also be reused for kitchen storage after the treats are finished.

    The arrangement should look organized rather than packed. Put the baking mix or larger package toward the back, then layer smaller decorating supplies around it. Use the towel as a soft base to create extra height while keeping everything stable. I’ve noticed that food-related gifts feel more thoughtful when the recipient can immediately understand how the items work together. A few wrapped chocolates can fill empty spaces, but avoid adding too many unrelated products. The goal is to create a small baking experience rather than simply collecting Halloween-themed kitchen items.

    Self-Care Treats

    • Choose calming colors instead of relying only on bright Halloween shades.
    • Mix soft, ceramic, and natural textures for visual contrast.
    • Include practical products that can be used immediately.
    • Use a shallow container so smaller items stay visible.

    A self-care collection gives Halloween gifting a softer direction, especially for adults. Use a shallow wooden tray, ceramic bowl, or fabric-lined container as the base, then add hand cream, bath salts, herbal tea, a candle, cozy socks, and a sleep mask. Rust, cream, plum, and warm beige create an autumn feel without making the arrangement look childish. This works beautifully for friends, coworkers, hosts, or anyone who enjoys a quiet evening at home. The individual products are useful on their own, while the coordinated presentation makes them feel like one complete gift.

    Small sensory details can make this arrangement feel much more polished. Fold the socks neatly, place the candle toward the back, and group smaller skincare products toward the front. A few dried leaves or eucalyptus stems can add natural texture without competing with the main gifts. If you want a subtle Halloween connection, use a dark ribbon, seasonal label, or small pumpkin accent rather than filling the entire tray with spooky decorations. The finished arrangement works well on a bathroom counter, bedroom dresser, or bedside table where the recipient can easily use everything.

    Candy Color Mix

    • Group treats by color instead of mixing every package together.
    • Use dark containers to make colorful candy stand out.
    • Add paper filler to raise smaller sweets.
    • Include one reusable item to balance the edible treats.

    A candy-focused gift can still look thoughtfully designed when the colors are controlled. Choose sweets in three or four shades, such as orange, purple, yellow, and black, then arrange them in small groups. A matte black basket or dark wooden box creates strong contrast against bright wrappers. Add shredded paper underneath to raise smaller pieces and prevent them from disappearing. This idea is especially fun for children, teenagers, party hosts, or anyone with a serious sweet tooth. The abundance becomes part of the visual appeal, so you do not need many additional decorations.

    The key is to create height without making the basket messy. Place larger candy boxes at the back, medium-sized packages in the middle, and individually wrapped sweets near the front. If you want one non-food item, add a reusable tumbler, water bottle, or small storage jar. Keep decorative elements simple because the colorful packaging already creates plenty of energy. A small black-and-white ribbon or kraft tag is enough to finish the arrangement. Display it on a kitchen island, dessert table, or party buffet where the colors can become part of the Halloween setup.

    Pumpkin Breakfast Box

    • Build the collection around foods that can be enjoyed together.
    • Use natural wood and cream for a softer seasonal appearance.
    • Make one ceramic mug the visual centerpiece.
    • Add small autumn accents without overcrowding the box.

    A pumpkin-inspired breakfast box is a practical alternative to a candy-heavy present. Fill a pale wooden box with pancake mix, maple syrup, pumpkin-spiced tea, coffee, mini pastries, and a ceramic mug. Add cinnamon sticks or a small jar of honey for extra flavor and texture. The combination works particularly well for families, parents, hosts, or friends who enjoy relaxed weekend breakfasts. Instead of making every item Halloween-themed, let the flavors and warm autumn colors carry the seasonal feeling. It becomes a useful gift that can be enjoyed the morning after Halloween or throughout the fall.

    For a polished arrangement, position the mug toward the back and place the food packages around it at different heights. Use a folded kitchen towel or kraft paper as the base to keep everything stable. A few dried leaves can add seasonal texture without covering the products. Natural wood, terracotta, cream, and muted green create an inviting palette that feels more sophisticated than bright orange alone. I’ve noticed that breakfast gifts look more appealing when the contents feel like they belong to one meal. Finish with a simple fabric ribbon around the box.

    Cozy Cocoa Set

    • Pair cocoa with toppings and small treats instead of unrelated products.
    • Use a mug as the central visual piece.
    • Add cinnamon or chocolate spoons for texture.
    • Choose natural containers that can be reused afterward.

    A hot cocoa collection is an easy way to create a comforting seasonal gift without relying on traditional Halloween decorations. Start with a rattan basket or small wooden box and add cocoa packets, marshmallows, chocolate spoons, cinnamon sticks, cookies, and a ceramic mug. You can also include caramel pieces or flavored syrups for extra variety. Cream, cocoa brown, terracotta, and soft pink create a warm palette that feels appropriate for autumn. This idea works for families, neighbors, teachers, coworkers, or friends and is simple enough to customize around someone’s favorite flavors.

    Layering is what makes a cocoa collection look abundant without becoming cluttered. Place the mug in the center or toward the back, then arrange the packets and treats around it. Use a folded knitted cloth underneath everything to create height and introduce softness. Cinnamon sticks can fill small gaps while also adding a natural decorative detail. If the basket will be photographed, place it beside a reading chair, fireplace, or kitchen coffee station. A simple ribbon and handwritten tag can finish the arrangement without taking attention away from the edible treats.

    Spooky Game Night

    • Combine entertainment with snacks to create a complete activity.
    • Use a box or crate for a modern presentation.
    • Add drinks to introduce height and color.
    • Choose compact games that are easy to start.

    A game-night collection turns a seasonal gift into an activity that can be enjoyed immediately. Use a sturdy wooden crate or charcoal gift box as the base, then add playing cards, dice, a compact puzzle, popcorn, chocolate, pretzels, and drinks. Choose simple games that work for the intended age group rather than filling the container with complicated options. This concept works especially well for families, siblings, teenagers, or groups of friends. It also feels more personal because the recipient receives something to do rather than only a collection of decorative or edible items.

    Keep the game box upright at the back and arrange snacks around its base. Use filler paper to prevent smaller products from moving, then place drinks or boxed treats toward the back to create additional height. You can introduce Halloween character with patterned napkins, a small paper bat, or seasonal packaging. There is no need to cover the entire crate in spooky decorations. A controlled palette of charcoal, cream, mustard, and burnt orange keeps the arrangement attractive. Place it on a dining table before a planned game night for an inviting presentation.

    Crafty Halloween Box

    • Turn the gift into a hands-on activity.
    • Choose supplies that can be used together.
    • Use small containers to organize loose materials.
    • A reusable box makes the gift useful afterward.

    A craft-focused box is a great choice for someone who prefers making things to receiving finished decorations. Fill a fabric-covered box with watercolor cards, paint pots, wooden shapes, washi tape, markers, stickers, brushes, and a small sketchbook. The supplies could be used to create Halloween cards, painted decorations, gift tags, or simple seasonal artwork. Terracotta, olive, mustard, and cream create a coordinated color palette. This makes a thoughtful option for creative children, teachers, crafty friends, or anyone who enjoys spending an afternoon working on a small project.

    Keep the arrangement organized so it feels like a curated craft kit rather than an overflowing stationery drawer. Place paper products flat underneath and group smaller supplies into little containers or pouches. Larger tools can stand toward the back while colorful materials fill the front. In my experience, craft gifts feel more useful when there is an obvious project in mind, so consider adding a small instruction card or a few example ideas. Use kraft paper or fabric as filler and let the actual materials provide most of the visual interest.

    Pumpkin Spice Pairing

    • Focus on one strong seasonal flavor.
    • Pair drinks with snacks that naturally complement them.
    • Use a tray for a cleaner presentation.
    • Warm brown and copper create an elevated autumn palette.

    A focused pumpkin-spice collection can feel more sophisticated than a large assortment of unrelated seasonal products. Start with pumpkin-spice coffee or tea, then add maple syrup, cinnamon sticks, biscotti, pumpkin butter, and a textured ceramic cup. A slim black tray or shallow wooden box works well because every item stays visible. The warm combination of espresso brown, cream, copper, and muted orange gives the arrangement a refined autumn appearance. This is a good choice for adult friends, coworkers, hosts, or anyone who enjoys seasonal drinks and simple treats.

    Treat the arrangement like a small tasting collection. Place the cup toward the back, position the main drink beside it, and use smaller jars and wrapped treats to create different heights. Cinnamon sticks or dried wheat stems can fill small spaces while adding natural texture. Avoid adding too many Halloween ornaments because the food and drink packaging already establish the theme. A tray also makes the gift easy to carry and display. This idea is especially useful when you want something that feels generous and stylish without purchasing a large number of individual items.

    Spooky Spa Tray

    • Use a tray for a cleaner alternative to a traditional basket.
    • Combine bath, skincare, and soft textile items.
    • Keep Halloween details subtle.
    • Add greenery to balance darker colors.

    A spa-inspired tray gives seasonal gifting a more grown-up feel. Start with a matte black rectangular tray, then arrange bath salts, body oil, lavender soap, hand cream, a candle, and soft face towels. Instead of using only orange and black, introduce ivory, plum, muted lavender, and charcoal for a calmer palette. This works especially well for adult friends, coworkers, sisters, hosts, or anyone who enjoys relaxing at home. Since every item has a practical purpose, the gift feels useful rather than like a collection of seasonal decorations.

    Keep the styling clean by grouping similar products together and leaving some of the tray visible. Fold the towels so they create height without hiding the skincare products. A small candle can act as the focal point while eucalyptus or dried greenery softens the darker colors. You can add Halloween character through black-and-white packaging, a tiny spider detail, or a seasonal ribbon. The finished tray looks particularly elegant on a bathroom counter or bedroom dresser. It is also easy to wrap in clear cellophane without disturbing the arrangement.

    Movie Ticket Treats

    • Make the experience the main gift rather than filling the container.
    • Add snacks that are easy to take along.
    • Use an envelope to present the tickets.
    • Keep the container compact and portable.

    Instead of creating another movie-night basket, make the actual outing the centerpiece. Place cinema tickets or a movie voucher inside a small envelope, then build around them with popcorn, chocolate, gummy sweets, and bottled drinks. Use a compact lidded box so the entire gift is easy to carry. This works especially well for couples, teenagers, siblings, or friends because the gift creates a reason to spend time together. The seasonal connection can come from Halloween movie tickets, spooky snacks, or simple autumn-colored packaging rather than filling the box with decorations.

    Position the ticket envelope upright at the back so it immediately catches attention. Arrange the snacks around it using kraft paper or striped filler for additional height. Burgundy, charcoal, cream, and muted red create a cinematic appearance without looking overly themed. You can also add a small handwritten note suggesting a movie date or Halloween film. The compact size makes this particularly useful when you are giving several gifts at once. It is an experience-led alternative that feels personal without requiring a large basket.

    Autumn Picnic Pack

    • Use a reusable canvas tote instead of a traditional basket.
    • Include foods that travel well.
    • Add a blanket to make the gift ready for an outing.
    • Natural materials suit the relaxed autumn theme.

    An autumn picnic pack brings a completely different direction to seasonal gifting. Start with a sturdy canvas tote and fill it with apple cider, caramel popcorn, cookies, sandwiches, napkins, reusable cups, and a small plaid blanket. Choose foods that are easy to transport and do not require complicated preparation. Burnt orange, forest green, cream, and warm brown create a natural fall palette. This idea works especially well for couples, families, or friends who enjoy outdoor walks, park visits, or relaxed afternoons during cooler October weather.

    The tote should look practical rather than simply decorative. Roll the blanket and secure it along one side, place bottles upright, and tuck wrapped snacks into the remaining spaces. Keep heavier products near the bottom so the bag remains comfortable to carry. A small wooden utensil set can add another useful element without taking up much room. If you are photographing the gift, place it on a wooden picnic table with fallen leaves nearby. The reusable tote also gives the recipient something useful after the seasonal outing is finished.

    Halloween Cookie Box

    • Let decorated cookies become the main feature.
    • Use parchment to protect delicate designs.
    • Mix several cookie shapes for visual variety.
    • A kraft box creates a homemade bakery feel.

    A cookie box is a simple way to make a seasonal gift feel homemade and personal. Fill a sturdy kraft box with decorated sugar cookies shaped like pumpkins, moons, leaves, bats, or stars. Use restrained shades of burnt orange, ivory, chocolate brown, and muted sage rather than covering every cookie with bright icing. Parchment sheets can separate the layers and protect the designs. This makes an especially thoughtful gift for neighbors, teachers, coworkers, hosts, friends, or family members. The box can be enjoyed together or shared throughout the week.

    Arrange the cookies by size and shape so the decoration remains visible. Larger pieces can sit toward the back while smaller cookies fill the front and sides. Avoid stacking everything too tightly because the designs are part of the presentation. A linen cloth underneath the box can add texture when displaying the gift. I’ve noticed that small handmade imperfections often make baked gifts feel more authentic because they show that the treats were not simply taken from a supermarket shelf. Finish with parchment paper and a simple ribbon.

    Fall Tea Collection

    • Pair several tea flavors with complementary treats.
    • Use dried citrus for natural seasonal color.
    • Add a ceramic cup or tea infuser.
    • Keep the palette earthy and understated.

    A fall tea collection is a calm alternative to candy-heavy seasonal gifts. Use a deep olive or natural woven basket and fill it with several tea varieties, honey, lemon biscuits, dried orange slices, a ceramic teacup, and a small wooden spoon or tea infuser. Amber, cream, olive, and copper create an understated autumn palette. This makes a lovely gift for adult friends, coworkers, hosts, family members, or anyone who enjoys slow afternoons with a warm drink. It also works well when you want a seasonal gift that does not feel overly Halloween-themed.

    Place the tea tins toward the back and make the cup the visual focal point. Tuck biscuits and honey around the base, then use dried orange slices to introduce color and texture. A linen runner or folded cloth can act as a soft liner. Keep Halloween decorations minimal because the natural ingredients already communicate the season. The finished basket can sit on a kitchen counter, reading table, or sideboard. If you know the recipient’s favorite tea, make that variety the centerpiece and build the remaining items around it.

    Custom Hobby Box

    • Choose the contents around one specific interest.
    • Personalized supplies make the gift feel intentional.
    • Use compartments to keep everything organized.
    • Let seasonal colors support the hobby instead of dominating it.

    A custom hobby box can be one of the most personal ways to create a seasonal gift. Build it around something the recipient already enjoys, such as sketching, journaling, puzzles, knitting, gardening, photography, or another creative pastime. Use a reusable canvas box or wooden organizer, then add three to five practical supplies connected to that hobby. Include one small seasonal detail, such as an orange notebook, autumn-patterned pouch, or leaf-shaped tag. This approach works because the Halloween theme becomes a thoughtful accent rather than the entire reason for the gift.

    Keep the contents focused instead of trying to include everything someone might need. Organize small supplies into pouches or compartments and place the larger items toward the back. A limited palette of rust, forest green, cream, and mustard can give the box a seasonal appearance without distracting from the hobby. That’s why personalization often works better than quantity: a smaller collection chosen specifically for one person can feel much more meaningful. Place the finished box on their desk, craft table, or hobby shelf.

    Garden Harvest Tote

    • Choose useful gardening items rather than novelty decorations.
    • Use a canvas tote that can be reused outdoors.
    • Add seasonal seeds or small harvest-inspired treats.
    • Natural greens and terracotta complement the autumn theme.

    For someone who enjoys gardening, skip the traditional sweets and create a useful harvest-inspired tote instead. Fill a sturdy canvas bag with gardening gloves, seed packets, plant markers, a small hand trowel, and a packet of herb or flower seeds. You could add apple cider packets, pumpkin seeds, or a small jar of honey as edible extras. Forest green, terracotta, cream, and natural brown create a subtle autumn palette. This idea is especially suitable for gardeners, neighbors, parents, grandparents, or friends who spend time growing plants at home.

    Arrange the tools upright so they are easy to see, then tuck smaller seed packets and accessories around them. A folded gardening cloth can act as filler while adding another useful item. Instead of obvious Halloween decorations, use a few dried leaves or a small pumpkin-shaped tag to connect the gift with the season. The canvas tote makes the arrangement practical because it can later carry gardening supplies. This type of gift feels particularly thoughtful when you choose seeds or tools based on the recipient’s actual garden and interests.

    Hot Sauce Halloween Box

    • Build the gift around bold flavors instead of sweets.
    • Combine several sauce varieties for visual interest.
    • Add crackers or savory snacks to complement the sauces.
    • Use a compact wooden box for a stronger presentation.

    A hot-sauce collection is a fun option for someone who prefers savory gifts and enjoys trying new flavors. Choose three or four sauces with different heat levels, then add crackers, pretzels, spicy nuts, or a small jar of salsa. Place everything inside a compact wooden box or dark metal container. Red, orange, black, and cream naturally create a Halloween-friendly palette without requiring additional decorations. This idea works particularly well for food lovers, coworkers, siblings, friends, or hosts who enjoy experimenting with different flavors.

    Make the sauce bottles the visual focus by arranging them from tallest to shortest. Fill the spaces around them with individually wrapped snacks and use kraft paper underneath to keep everything stable. A small handwritten heat-level guide can make the collection more useful, especially when the sauces vary considerably. You can add a black ribbon or simple Halloween tag for seasonal character. Because the container is reusable, the recipient can later store spices, condiments, or kitchen accessories inside it, giving the gift a practical second purpose.

    Breakfast Brunch Basket

    • Choose foods that naturally belong together.
    • Add one serving piece for a more complete presentation.
    • Use muted autumn shades for a sophisticated look.
    • Keep the arrangement useful beyond Halloween morning.

    A brunch basket is another way to create a seasonal gift around food without relying on candy. Fill an oval basket with mini pancake mix, berry jam, honey, croissants, tea, coffee, and a ceramic breakfast plate. Add a patterned linen napkin or orange kitchen towel for a small seasonal accent. The combination works well for hosts, families, couples, or friends because the contents can become part of a shared morning meal. Choose complementary flavors so the basket feels intentionally planned rather than like several unrelated breakfast products.

    For the best arrangement, position the pancake mix and coffee toward the back while placing pastries and smaller jars toward the front. Use a folded linen cloth underneath to create height and prevent items from shifting. A few dried flowers or wheat stems can introduce texture without making the basket overly decorative. I’ve noticed that food gifts look more generous when the recipient can immediately imagine using everything together. Display the finished basket on a kitchen island or breakfast table, where the warm colors can work naturally with wood and neutral surfaces.

    Personalized Treat Jar

    • Use one reusable jar as the centerpiece instead of a large basket.
    • Fill it with the recipient’s favorite small treats.
    • Add a handwritten label for a personal touch.
    • Keep the surrounding presentation simple.

    A large basket is not always necessary to make a thoughtful seasonal gift. Use a wide glass jar, ceramic canister, or reusable storage container as the main piece, then fill it with the recipient’s favorite wrapped chocolates, cookies, gummies, or savory snacks. Add a personalized label with their name, a simple Halloween message, or the type of treats inside. Place the jar alongside a small mug, tea packet, or seasonal napkin if you want to expand the gift. This compact approach is useful for coworkers, neighbors, teachers, or small gift exchanges.

    The jar itself becomes part of the presentation, so keep the surrounding pieces minimal. Choose one or two supporting colors from the treats and repeat them in the ribbon or tag. A small wooden scoop can be attached to the jar if the contents are individually packaged or suitable for serving. Because the container can be reused for pantry storage, craft supplies, or future treats, it has value beyond the holiday. Place it on a kitchen counter, office desk, or entry table for an easy seasonal surprise.

    Custom Coffee Corner

    • Build the collection around the recipient’s favorite coffee style.
    • Add one useful coffee accessory rather than many decorations.
    • Use a reusable mug or storage jar as the anchor.
    • Keep the palette warm and neutral for a polished finish.

    Create a small coffee-themed gift for someone who would choose a warm drink over candy any day. Start with their favorite coffee beans or pods, then add a reusable mug, flavored syrup, biscotti, chocolate-covered coffee beans, and a small spoon. A wooden tray or compact storage box works well as the base. Use cream, espresso brown, copper, and muted orange to create a warm seasonal palette. This makes a thoughtful gift for coworkers, friends, parents, hosts, or anyone who has a favorite morning coffee routine.

    Arrange the mug toward the back and place the coffee package beside it, then use the smaller treats to fill the front. If the recipient already owns a favorite brewing method, choose accessories that match it rather than buying something unnecessary. A small Halloween-inspired tag or orange ribbon is enough to establish the season. The tray can later become part of their coffee station, making the gift practical after October. Keep the styling simple and let the coffee packaging, ceramic mug, and natural wood create most of the visual interest.

    Handmade Treat Bundle

    • Combine homemade-style foods with simple packaging.
    • Use several small portions instead of one oversized item.
    • Choose kraft paper and linen for a handcrafted appearance.
    • Add a handwritten note to make the gift more personal.

    A handmade treat bundle works beautifully when you want the gift to feel personal without creating a large themed arrangement. Combine individually wrapped cookies, caramel popcorn, homemade granola, chocolate bark, spiced nuts, or other favorite treats inside a shallow kraft box. Use parchment paper, linen, or small paper bags to separate the foods. The natural packaging creates a warm autumn appearance while allowing the actual treats to remain the focus. This idea works well for neighbors, teachers, coworkers, hosts, and friends because it feels thoughtful without needing expensive products.

    Keep the food portions relatively small so you can offer several different flavors. Arrange the larger packages toward the back and use smaller wrapped portions to fill the front. A handwritten note can explain what each treat is or simply add a personal message. Use burnt orange, cream, kraft brown, and muted green for the packaging rather than relying on novelty Halloween prints. The finished box can be tied with twine or a simple ribbon. This makes a charming seasonal gift that feels more personal than a store-bought assortment.

    Mini Party Host Set

    • Focus on useful entertaining pieces rather than decorative clutter.
    • Add snacks that can be served immediately.
    • Include reusable serving accessories.
    • Choose a container the host can use afterward.

    For someone hosting Halloween guests, create a small entertaining set filled with practical party essentials. Start with a reusable wooden crate or serving tray, then add napkins, small serving bowls, cocktail picks, popcorn, chocolate, crackers, and a seasonal beverage mixer. A few reusable serving pieces make the collection feel more substantial without adding unnecessary clutter. Use black, cream, copper, and burnt orange for a polished palette. This is particularly useful for friends, neighbors, family members, or hosts who enjoy having people over during the Halloween season.

    Arrange the serving pieces at the back and use packaged snacks to fill the front. Keep the products accessible so the recipient can take everything directly to a party table. A small handwritten card can suggest how the pieces might be used together, but the contents should remain flexible enough for different occasions. I’ve noticed that host gifts feel more useful when they contain things people can actually put out for guests. The reusable tray or crate then becomes an additional gift that can be used for future gatherings.

    Trick-or-Treat Tote

    • Use a reusable tote instead of a disposable candy container.
    • Fill it with a balanced mix of treats and useful extras.
    • Choose one playful Halloween detail as the focal point.
    • Make the tote practical enough to reuse after October.

    A reusable trick-or-treat tote can turn a familiar Halloween concept into a more useful gift. Choose a sturdy canvas or fabric tote and fill it with individually wrapped candy, chocolate, small snacks, glow accessories, and a reusable water bottle. Add one playful seasonal item, such as a pumpkin keychain, Halloween socks, or a small plush, rather than filling the entire tote with decorations. This works particularly well for children, teenagers, siblings, or families preparing for Halloween night. The tote itself becomes part of the gift and can be reused for school, shopping, or outings.

    Start by placing the largest reusable item at the bottom or back, then layer snacks around it. Keep heavier products low so the tote remains comfortable to carry. Use tissue paper or a lightweight scarf as filler if you want more height. A personalized name tag can make the tote feel special without adding much cost. Choose orange, purple, black, or green accents depending on the recipient’s style. The finished tote can be displayed near the front door before trick-or-treating begins, ready to grab when it is time to head outside.

    Make Halloween Gifting Feel Extra Special

    A great Halloween basket doesn’t need to be overflowing to feel special. The right combination of colors, treats, useful gifts, and seasonal details can make even a small arrangement look beautifully planned. These ideas can help you avoid random filler and create a gift with a clear personality and purpose. I’ve noticed that adding one practical item alongside a few fun treats often makes a basket feel much more useful and memorable. Save this collection on Pinterest for your next Halloween gifting project, try an idea that matches someone you love, and share it with anyone looking for creative seasonal gift inspiration.

  • 33 Halloween Crafts for Children to Make and Enjoy 

    33 Halloween Crafts for Children to Make and Enjoy 

    Ready to turn an ordinary afternoon into a Halloween adventure? 🎃 A few simple supplies can become spooky, silly, and surprisingly creative projects!

    These halloween crafts for children are designed for kids who love making things with their hands, without needing complicated materials or hard-to-follow steps. From playful monsters and friendly ghosts to pumpkins, spiders, bats, and colorful seasonal decorations, this collection offers plenty of inspiration for different ages and skill levels. Whether you’re planning a classroom activity, a rainy-day project, or a cozy crafting session at home, you’ll find ideas that are easy to adapt. In my experience, children often enjoy crafts even more when they can choose their own colors and add funny little details. Pick a favorite, gather a few supplies, and let the creativity begin!

    Pumpkin Paper Lanterns

    Use orange cardstock or paper bags to create simple lantern shapes.

    Let children add friendly faces with black paper shapes instead of cutting intricate designs.

    Place battery tea lights inside for a safe Halloween glow.

    Hang several at different heights for a more decorative finish.

    This works especially well as a group craft because every child can create a different expression.

    Nothing catches a child’s attention faster than seeing a simple piece of paper turn into something that actually glows. Pumpkin paper lanterns are an easy project that gives children both a creative activity and a finished decoration they can proudly display. Start with orange cardstock or lightweight paper and shape it into a simple lantern, leaving enough space for a battery tea light. Children can personalize the faces with triangles, circles, zigzags, or silly expressions. In my experience, giving kids several face options keeps younger crafters engaged while still leaving plenty of room for their own ideas.

    Once the lanterns are finished, line several along a shelf, windowsill, or craft table to create an instant Halloween display. Different expressions and slightly uneven shapes make the arrangement feel handmade rather than overly polished. For younger children, adults can handle any cutting that requires more precision, while kids focus on decorating and assembling the pieces. Battery-operated lights are the safest choice for a child-focused craft. You can also punch small holes near the top and hang individual lanterns with string. The finished display adds warm seasonal character without requiring expensive supplies or complicated techniques.

    Monster Paper Bags

    Turn ordinary paper lunch bags into colorful Halloween characters.

    Use yarn, cardstock, pom-poms, and paper shapes for hair, eyes, teeth, and ears.

    Let each child invent a different monster rather than following one template.

    Add a handle or ribbon so finished characters can become small treat bags.

    Bright colors make this idea playful enough for younger children.

    A plain paper lunch bag can become surprisingly fun when children are allowed to turn it into their own imaginary monster. This craft works because the basic shape is already finished, so most of the activity involves decorating rather than complicated construction. Provide colorful paper, yarn, pom-poms, washable markers, and glue, then let children decide whether their character has three eyes, giant teeth, floppy ears, or wild hair. The freedom makes each finished bag different. I’ve noticed that open-ended crafts often keep children interested longer because there is no pressure to make theirs look exactly like a sample.

    These monster bags can also serve a practical purpose after the crafting is finished. Add a simple paper handle or ribbon and use them as small Halloween treat holders, party favors, or containers for crayons and craft supplies. For a classroom activity, prepare the basic bags beforehand and let children concentrate on decorating them. A mix of purple, lime green, orange, turquoise, and pink creates a cheerful display that feels more playful than frightening. Line the finished monsters across a shelf or table, and they become part of the seasonal decoration rather than disposable art work.

    Witch Hat Treat Cones

    Roll black cardstock into small cone shapes for easy Halloween treat holders.

    Decorate each cone with colorful paper bands, stars, moons, or buckle shapes.

    Let children choose unusual colors instead of making every hat black and orange.

    Fill finished cones with wrapped treats or small non-food surprises.

    Display several together in a bowl or hang them around a party table.

    Witch hats become much more exciting when children can turn them into tiny treat containers. This craft combines simple paper construction with decorating, making it suitable for a range of ages with a little adult preparation. Roll black or colored cardstock into cone shapes, secure the edges, and let children add paper stars, moons, stripes, ribbons, or buckles. Instead of requiring every hat to look traditional, offer purple, teal, metallic gold, and orange materials so each child can create a different version. The finished cones feel festive while still being simple enough for a busy afternoon craft session.

    After decorating, fill the cones with wrapped candy, stickers, pencils, erasers, or other small surprises. They work especially well for classroom parties, Halloween playdates, or a small family gathering. If you want to use them as decorations, attach a loop of ribbon near the top and hang several together like a colorful garland. Younger children can decorate pre-assembled cones, while older kids can help with measuring and shaping the paper. A group of mismatched hats usually looks more charming than identical ones, giving the finished display an unmistakably handmade character.

    Paper Plate Spiders

    Paint paper plates black, purple, or deep blue for a simple spider base.

    Add eight pipe-cleaner legs and oversized paper eyes.

    Let children experiment with different eye sizes and facial expressions.

    Hang finished spiders from ceilings, doors, or bedroom walls.

    Use lightweight materials so younger children can handle the project easily.

    A paper plate becomes a surprisingly convincing spider with just a few simple additions. Children can paint or color the plate, attach eight pipe-cleaner legs, and finish the face with oversized paper or googly eyes. The project is flexible enough for different ages because younger children can concentrate on coloring while older kids help shape the legs. Try mixing black with purple, navy, or even metallic shades for more personality. The slightly uneven shapes created by little hands actually make these spiders more charming. They are inexpensive, quick to prepare, and easy to complete during an afternoon craft session.

    Finished spiders can become decorations throughout the house instead of being packed away immediately after crafting. Attach string to the top and hang them at different heights near a doorway, bedroom wall, or playroom corner. You can also place smaller versions across a bookshelf or windowsill for a playful Halloween display. If children are making several, encourage them to create different eye combinations so each spider has its own character. In my experience, simple crafts like this are especially useful for group activities because everyone can work with the same basic materials while still producing something completely individual and colorful.

    Ghost Tissue Paper Collage

    Use white tissue paper to create soft, layered ghost shapes.

    Add black paper eyes and mouths for simple facial details.

    Choose colored construction paper for the background instead of plain white.

    Encourage children to overlap pieces for a textured effect.

    Frame finished collages or display several together as seasonal artwork.

    Soft tissue paper gives this Halloween project a completely different look from traditional cut-and-paste crafts. Children can tear white tissue into uneven pieces and layer them into simple ghost shapes on colored construction paper. Black paper eyes and mouths add recognizable details without requiring complicated drawing skills. A dark navy or purple background makes the white ghosts stand out especially well, while small paper stars, moons, or pumpkins can fill empty spaces. The texture created by overlapping tissue adds dimension, so the finished artwork looks more interesting than a single flat paper shape.

    This activity is particularly useful when you want a craft that can double as seasonal wall art. Once the collages dry, arrange several together on a refrigerator, playroom wall, or classroom bulletin board. Encourage children to make ghosts with different shapes and expressions rather than copying one design. For younger kids, pre-cut the background paper and demonstrate how to layer the tissue gently. Older children can experiment with torn edges and additional colors. The finished collection creates a cheerful Halloween display while preserving something children made themselves, making it more meaningful than store-bought decorations.

    Popsicle Stick Monsters

    Arrange craft sticks into simple square or rectangular monster faces.

    Paint each character a different bright Halloween color.

    Add yarn, felt, paper teeth, and oversized eyes for texture.

    Create magnets from finished monsters for refrigerators or metal boards.

    Mix friendly and silly expressions instead of making every character scary.

    Popsicle sticks are perfect for children who enjoy building as much as decorating. Arrange several sticks side by side to create a small rectangular monster face, then let children paint the surface in colors such as lime green, turquoise, purple, orange, or blue. Once dry, add paper teeth, yarn hair, felt shapes, and oversized eyes. The basic construction stays simple, but the decorating possibilities are almost endless. That makes this one of those Halloween crafts for children that can work equally well as a quick afternoon project or a longer creative activity.

    Give each monster a different personality by changing the number of eyes, shape of the mouth, or style of hair. Finished characters can be displayed on a shelf, attached to magnets for the refrigerator, or used as small signs around a playroom. If children are working together, place all the completed monsters side by side to create a colorful little character collection. Adults can prepare the stick bases beforehand when working with younger kids. The combination of painting, gluing, and assembling also gives children several different hands-on activities within one manageable craft.

    Bat Hanging Garland

    Cut simple bat silhouettes from black cardstock for an easy hanging decoration.

    Use different bat sizes to create a more natural layered look.

    Add thin silver or purple details for subtle contrast.

    Hang the garland across a window, bookshelf, or children’s party table.

    Let older children help with spacing and arranging the finished bats.

    A row of flying bats can transform an ordinary wall or window into a simple Halloween display without requiring complicated crafting skills. Cut bat silhouettes from black cardstock, then vary their sizes so the finished garland feels more dynamic. Children can add tiny purple, silver, or orange details if they want extra color. For younger crafters, adults can prepare the bat shapes beforehand and let children decorate and arrange them. This keeps the activity accessible while still giving kids creative control. The lightweight pieces are also easy to move when you want to refresh the decoration elsewhere.

    To create the garland, attach each bat to a length of string with small pieces of tape or clothespins. Space them unevenly rather than making every gap identical, which gives the display a more playful handmade appearance. Hang the finished strand across a window, above a bookshelf, or along a party table. You can make several shorter garlands instead of one long piece for easier decorating. I’ve seen this approach work particularly well for classrooms and playrooms because children can contribute individual bats to one larger decoration.

    Pumpkin Handprint Art

    Trace children’s handprints to create playful pumpkin or jack-o’-lantern shapes.

    Use washable orange paint for an easy cleanup-friendly activity.

    Add paper stems, leaves, and simple facial details after the paint dries.

    Write each child’s name and date on the artwork for a keepsake.

    Combine several prints into a colorful seasonal wall display.

    Few Halloween projects feel as personal as turning a child’s handprint into seasonal artwork. Paint a hand with washable orange paint, press it firmly onto paper, and allow the print to dry before adding a green stem and simple jack-o’-lantern details. Children can draw different expressions, add leaves around the pumpkin, or decorate the background with tiny stars. The process is simple enough for younger kids, while older children can take more responsibility for designing the finished picture. Because every handprint is naturally different, the artwork becomes a small snapshot of the child’s age.

    This craft is especially useful when you want something that can be displayed now and saved later. Arrange several finished prints across a refrigerator, hallway, or classroom wall to create a colorful seasonal gallery. Add the child’s name and date discreetly in one corner if you want to preserve it as a keepsake. Cover the work surface before painting and keep wipes nearby for quick cleanup. A combination of orange, green, purple, and black gives the artwork recognizable Halloween character without making the activity overly complicated or messy.

    Cardboard Tube Bats

    Recycle empty cardboard tubes into simple hanging Halloween bats.

    Paint the tubes black, purple, or dark blue before decorating them.

    Cut folded cardstock wings and attach them to both sides.

    Add paper eyes and tiny fangs for playful character details.

    Hang several bats together for an inexpensive seasonal display.

    Empty cardboard tubes become useful craft materials when children turn them into little flying bats. Start by painting the tubes black, navy, purple, or another dark shade, then allow them to dry completely. Fold the top edges inward to create pointed ears and attach simple cardstock wings to both sides. Paper eyes and tiny white fangs can finish the character without adding much complexity. This is a good project for children who enjoy transforming recycled materials because they get to see an everyday household object become something decorative and recognizable.

    Once the bats are finished, attach string to the top and hang them at different heights near a window, doorway, or reading corner. You can also arrange several along a shelf with small paper pumpkins between them. Encourage children to vary the wing shapes and facial expressions so the collection feels handmade rather than identical. Adults should handle any cutting that may be difficult for younger children, especially when preparing multiple wing shapes. The finished bats are lightweight, inexpensive, and easy to store, making them a practical addition to seasonal decorations.

    Paper Cup Ghosts

    Turn lightweight paper cups into simple hanging ghost decorations.

    Cover the cups with white tissue or thin paper for a soft finish.

    Add small black eyes and uneven mouths for individual expressions.

    Hang them together at different heights for a floating effect.

    Use battery-friendly craft lighting nearby to make the display more visible.

    Sometimes the simplest materials create the most recognizable Halloween decorations. Paper cups can quickly become little ghosts when children cover them with white tissue paper and add simple black eyes and mouths. The lightweight construction makes them easy for small hands to decorate, while the loose paper creates natural folds that make every ghost look slightly different. Give children several face options and let them choose their expressions rather than providing one exact template. The activity stays inexpensive and approachable, yet the finished characters can become a charming part of the seasonal display.

    After decorating, punch a small hole through the top of each cup and thread string through it for hanging. Suspend the ghosts from a wooden branch, curtain rod, shelf, or doorway at different heights to create the appearance of a floating group. A few extra paper stars or orange leaves can fill the surrounding space without overwhelming the ghosts. Younger children can concentrate on decorating the faces while adults handle the hanging step. In my experience, displaying several handmade characters together makes the craft feel much more impressive than presenting a single finished piece.

    Egg Carton Pumpkins

    Reuse cardboard egg cartons to create small pumpkin shapes.

    Paint the individual cups orange and add green paper stems.

    Use black markers for simple jack-o’-lantern expressions.

    Connect several finished pieces into a tabletop pumpkin cluster.

    Choose washable paint and protect the work surface before starting.

    An empty cardboard egg carton can become a collection of tiny pumpkins with surprisingly little effort. Cut individual sections from the carton, then let children paint each one orange before adding a small green paper stem. Once dry, simple black marker details can turn them into jack-o’-lanterns. The slightly irregular cardboard shapes give the pumpkins a natural handmade texture that is difficult to recreate with perfectly uniform materials. This project also introduces children to the idea of reusing household items creatively, turning something normally discarded into seasonal artwork they can actually display.

    Arrange the finished pumpkins together on a tray, bookshelf, or children’s craft table to create a miniature Halloween harvest. For extra variety, let children use several shades of orange or add tiny painted leaves around the stems. If working with younger kids, an adult should handle cutting the carton sections and preparing the materials. Keep the faces simple so children can comfortably draw their own designs. A cluster of different-sized pumpkins looks especially effective because the uneven shapes create visual interest while still keeping the finished display cohesive and festive.

    Monster Rock Painting

    Choose smooth, clean stones that are comfortable for children to paint.

    Use bright colors such as turquoise, yellow, purple, and green.

    Add oversized eyes, teeth, spots, or funny eyebrows after the base dries.

    Seal finished stones if you plan to display them outdoors.

    Arrange several characters together in a garden, entryway, or windowsill.

    Smooth stones make an excellent canvas for children who enjoy painting small characters and experimenting with color. Wash and dry several stones first, then let children choose their base colors before adding monster features. Oversized eyes, crooked teeth, spots, horns, and funny eyebrows can transform simple rocks into a playful collection of characters. There is no need for precise artwork, which makes this activity particularly welcoming for younger children. I’ve noticed that giving kids a broad selection of colors often produces more creative results than limiting them to traditional Halloween shades.

    Once the paint has dried, arrange the finished monster stones together on a windowsill, bookshelf, garden border, or front entryway. If they will be exposed to outdoor weather, apply an appropriate clear sealer with adult supervision to help protect the artwork. Children can also write tiny names or silly character labels on the backs. Mixing different shapes and expressions creates a miniature monster community that feels personal and fun. Because the stones are durable and reusable, this project can become a decoration children bring out every Halloween instead of a craft that gets discarded after one season.

    Paper Plate Pumpkins

    Turn ordinary paper plates into bright, lightweight pumpkin decorations.

    Paint the plates orange and add green paper stems for definition.

    Use black cardstock shapes to create simple jack-o’-lantern faces.

    Add yarn or ribbon at the top for easy hanging.

    Display several different expressions together for a playful seasonal wall.

    A plain paper plate can become a cheerful pumpkin with just a little paint and imagination. Children can cover the plate with orange paint, wait for it to dry, and then add a green paper stem and simple black facial shapes. Try giving them several face options, including surprised, sleepy, silly, or traditional expressions. The flat surface is easy to decorate, making this project suitable for younger children who may struggle with smaller craft pieces. It also gives them enough room to experiment with patterns, extra colors, or decorative borders around their pumpkins.

    Finished plates can be displayed individually or grouped together to create a colorful Halloween wall. Punch a small hole near the top and add ribbon or string if you want to hang them around a bedroom, classroom, or party area. You can also attach several to a long strip of paper for a simple pumpkin banner. In my experience, displaying children’s artwork at their eye level makes the finished craft feel more special because they can easily see and show off what they created.

    Halloween Window Clings

    Create reusable window decorations with clear plastic sheets and washable paint.

    Use simple pumpkins, ghosts, bats, and stars as beginner-friendly shapes.

    Keep designs bold so they remain visible from both sides of the glass.

    Let children create several small decorations instead of one large design.

    Remove and store finished pieces carefully for future Halloween use.

    Windows become a fun creative canvas when children make colorful Halloween clings they can arrange themselves. Use clear plastic sheets designed for craft projects and washable or suitable window-safe paints, then create simple outlines of pumpkins, ghosts, bats, moons, and stars. Bold shapes work particularly well because they remain easy to recognize once attached to glass. Children can experiment with combinations of orange, purple, yellow, green, and white instead of relying on the usual black-and-orange palette. The result feels decorative while giving kids plenty of freedom to create their own designs.

    Once the pieces are completely dry, carefully place them on a clean window and arrange them at different heights. A mixture of small shapes often looks more natural than lining everything up evenly. This craft can brighten a playroom, bedroom, classroom, or kitchen window without taking up shelf or table space. Make sure materials are appropriate for the intended surface and supervise younger children during preparation and removal. If stored flat between sheets of protective paper, many finished pieces can become reusable seasonal decorations for another year.

    Yarn-Wrapped Pumpkins

    Use orange yarn and lightweight cardboard rings to create textured pumpkin shapes.

    Choose multiple orange shades for a more dimensional finished display.

    Add green felt leaves and short stems for extra detail.

    Keep the yarn loose enough for children to handle comfortably.

    Place completed pumpkins in a bowl, basket, or seasonal centerpiece.

    Yarn adds a soft, tactile texture that makes simple pumpkin crafts feel more substantial. Start with lightweight cardboard pumpkin shapes or sturdy rings, then let children wrap orange yarn around the surface until the cardboard is mostly covered. Different shades such as coral, golden yellow, and traditional orange can create a more interesting collection. Add a small cardboard stem and green felt leaf once the wrapping is complete. The repetitive motion of winding yarn can also make the activity calming for children who enjoy hands-on projects that involve concentration and coordination.

    Arrange the finished pumpkins inside a shallow bowl, colorful basket, or wooden tray to create a small seasonal centerpiece. You can also attach loops of string and hang them individually from a branch or decorative hook. Avoid making the yarn too tight or complicated, especially for younger children, so they can participate without becoming frustrated. Older kids can experiment with stripes or two-tone patterns. The finished pieces have a cozy handmade appearance that works particularly well in bedrooms, playrooms, or family spaces where children’s artwork can become part of the Halloween decor.

    Popsicle Stick Pumpkins

      Arrange craft sticks into simple pumpkin shapes for an easy building activity.

      Paint the sticks orange and add green stems after they dry.

      Use black marker or cardstock pieces for jack-o’-lantern faces.

      Let children create different expressions rather than copying one template.

      Display finished pumpkins on shelves, doors, or bedroom walls.

      Building with popsicle sticks gives children a chance to create Halloween decorations while practicing simple arranging and gluing skills. Place several craft sticks side by side to form a small pumpkin shape, then let children paint the surface orange, yellow, or coral. Once dry, add a green paper stem and a simple jack-o’-lantern face using markers or cardstock. The basic structure is easy to understand, but children can still personalize each pumpkin. I’ve noticed that offering several paint shades makes the activity feel more creative without adding much extra preparation.

      Finished pumpkins can become small decorations for bedrooms, playrooms, or family spaces. Attach a ribbon loop if you want to hang them from a wall hook, door handle, or seasonal branch. You can also glue a magnet to the back and turn them into refrigerator decorations. Encourage children to make surprised, sleepy, silly, or traditional faces so the collection feels varied. If younger children are participating, prepare the sticks and help with glue placement. A group of handmade pumpkins creates a colorful seasonal display while keeping the finished pieces lightweight and easy to store.

      Paper Bag Bats

      Transform black paper lunch bags into simple bat decorations or puppets.

      Fold the top section to create recognizable pointed ears.

      Attach large paper wings for an easy silhouette.

      Add colorful eyes or small paper details for personality.

      Use finished bags for pretend play, party favors, or decoration.

      Paper lunch bags can become playful bats with only a few simple additions, making this a useful project when you want something children can decorate and use afterward. Fold the top edge to form pointed ears, then attach large cardstock wings to the sides. Children can add oversized eyes, tiny fangs, colorful eyebrows, or other silly details to create their own characters. Black works well as the base, but purple or dark blue bags can make the collection more colorful. The project encourages imagination without requiring children to master complicated cutting or construction.

      Once finished, the bat bags can be used as simple puppets during Halloween pretend play. They can also hold small wrapped treats, stickers, pencils, or other lightweight surprises for a party. If you want to use them as decorations, place several across a shelf or hang them with string. Older children can help design different wing shapes, while younger ones can focus on decorating pre-cut pieces. Because paper bags are inexpensive and widely available, this activity is easy to repeat for a classroom, sibling group, or Halloween gathering.

      Pom-Pom Spiders

      Use black and purple pom-poms to create soft, colorful spider bodies.

      Add eight pipe-cleaner legs in contrasting colors.

      Choose large googly eyes for an especially playful appearance.

      Place finished spiders on bookshelves, tables, or craft displays.

      Use different pom-pom sizes to create a varied spider family.

      Soft pom-poms make spiders feel playful rather than intimidating, which is especially useful for younger children who prefer friendly Halloween characters. Choose black, purple, orange, or even bright blue pom-poms and attach eight pipe-cleaner legs around each body. Oversized googly eyes finish the faces, while different leg colors can give every spider its own personality. The project is quick enough for a short activity but still involves several hands-on steps. Children can practice counting the legs, choosing colors, and assembling the pieces while creating something recognizable.

      Display the finished spiders across a bookshelf, craft table, windowsill, or Halloween party area. Mixing large and small pom-poms creates the appearance of a little spider family and makes the arrangement more visually interesting. Younger children may need help attaching the legs securely, especially if using strong craft adhesive. For a group activity, prepare small trays of materials so each child can select their own colors. A collection of colorful handmade spiders adds texture and personality to seasonal decorations while keeping the overall look cheerful and child-friendly.

      Pinecone Pumpkin Faces

      Paint small pinecones orange to create textured miniature pumpkins.

      Add tiny cardstock stems and leaves for a finished pumpkin shape.

      Use black paint or paper pieces for simple jack-o’-lantern faces.

      Place finished pieces in a bowl or along a seasonal shelf.

      Let children collect and choose pinecones of different sizes for variety.

      There is something especially satisfying about turning a natural object into a tiny Halloween decoration. Pinecones already have a layered texture that works surprisingly well as miniature pumpkins once children cover them with orange paint. After the base dries, add small green paper stems and simple black faces using paint or cardstock. Children can choose different pinecone sizes and create expressions ranging from traditional jack-o’-lanterns to silly characters. This project also gives them an opportunity to work with natural materials, making it feel different from crafts built entirely from paper or packaged supplies.

      Display the finished pinecone pumpkins together in a wooden bowl, shallow tray, or along a seasonal shelf. Mixing several orange shades can make the collection look more dimensional without requiring additional decoration. If collecting pinecones outdoors, choose clean, dry pieces and have an adult inspect them before crafting. Younger children can focus on painting while adults handle any small attachments that require stronger adhesive. The finished pumpkins are compact enough to fit almost anywhere, making them a practical little decoration for a bedroom, playroom, classroom, or family Halloween display.

      Toilet Paper Roll Mummies

      Reuse cardboard toilet paper rolls as simple mummy characters.

      Wrap white yarn, gauze, or narrow paper strips around each tube.

      Add oversized eyes between the wrapped layers for a playful effect.

      Leave small gaps so the darker cardboard shows through naturally.

      Arrange several mummies together as a tabletop Halloween display.

      Empty cardboard tubes become funny little mummies when children wrap them with strips of white gauze, yarn, or paper. The process is wonderfully forgiving because the wrapping does not need to be neat or perfectly aligned. Leave a few spaces between the layers so the cardboard underneath creates natural contrast, then add oversized eyes peeking through the openings. Children can make each mummy tightly wrapped, loosely tangled, or completely covered. This is a particularly approachable project because even imperfect wrapping contributes to the character rather than making the craft look unfinished.

      Place the finished mummies together on a shelf, windowsill, or Halloween craft table to create a small character display. Add paper hats, tiny bows, or different eye sizes if children want to give their creations more personality. For younger kids, prepare the materials in advance and demonstrate how to wrap the strips around the tube. Avoid using materials that can easily unravel or become frustrating. In my experience, recycled crafts like this are especially enjoyable because children recognize the original object and get to see how dramatically a few simple materials can transform it.

      Paper Bag Pumpkin Puppets

      Turn orange paper lunch bags into simple pumpkin hand puppets.

      Add cardstock stems, leaves, and expressive jack-o’-lantern faces.

      Use markers for details that are easier for younger children.

      Keep the bottom flap clear so children can operate the puppet.

      Encourage children to create short pretend-play characters after crafting.

      Paper lunch bags can become entertaining pumpkin puppets with very little construction, giving children a craft they can continue playing with afterward. Start with orange bags and use the bottom flap as the puppet’s face. Children can attach green cardstock stems and leaves, then draw or glue on different jack-o’-lantern expressions. Encourage silly eyebrows, surprised mouths, crooked teeth, or sleepy eyes so each puppet feels like a separate character. Because most of the design happens on a flat surface, younger children can participate comfortably without needing complicated folding or detailed cutting.

      Once the pumpkins are decorated and dry, invite children to use them for simple Halloween pretend play. They can create conversations between different pumpkin characters, perform a short puppet show, or simply use them during imaginative play. Arrange several puppets upright in a basket when they are not being used, turning them into part of the room’s seasonal decoration. For group activities, give each child their own bag and a selection of materials. The combination of crafting and storytelling keeps the project useful beyond the decorating stage and gives children another reason to interact with what they created.

      Halloween Paper Crowns

      Cut simple crown shapes from sturdy cardstock for comfortable wear.

      Let children decorate with pumpkins, bats, stars, and colorful paper shapes.

      Use elastic or adjustable tabs so crowns fit different children.

      Add metallic accents for a fun party-ready finish.

      Keep decorations lightweight so the crowns remain comfortable during play.

      Nothing turns a simple craft session into pretend play quite like a wearable creation. Halloween paper crowns give children an easy project they can decorate before immediately using it during games or a party. Cut sturdy cardstock into basic crown shapes, then provide paper pumpkins, bats, stars, stickers, markers, and lightweight embellishments. Children can choose their own combinations rather than following one design. In my experience, wearable crafts often keep kids engaged because the finished project becomes part of their play instead of simply sitting on a shelf after the activity is finished.

      Once decorated, adjust each crown so it fits comfortably without pressing against the child’s head. Elastic, folded tabs, or simple adjustable strips can make sizing easier when several children are participating. Metallic paper and colorful stickers can add extra sparkle without making the crowns heavy. These accessories work well for Halloween parties, classroom activities, sibling craft sessions, or dress-up games at home. Encourage children to create different themes, such as pumpkin crowns or bat crowns, for more variety. The finished group can create a lively photo opportunity while giving every child something personal to wear.

      Leaf Monster Faces

      Collect large, clean leaves with interesting natural shapes.

      Paint eyes, mouths, teeth, and eyebrows directly onto the leaves.

      Use bright colors to create funny rather than frightening characters.

      Allow painted leaves to dry completely before displaying them.

      Arrange several finished faces on a tray or seasonal table.

      Autumn leaves can become tiny monster canvases when children add colorful faces to their natural shapes. Choose large, dry leaves with different outlines, then let kids paint eyes, mouths, eyebrows, spots, or funny teeth directly onto the surface. The natural veins and irregular edges become part of each character, making every finished piece unique. Bright colors such as purple, turquoise, yellow, green, and orange keep the activity playful. This is also a useful way to connect a Halloween project with the changing season, especially when children enjoy collecting interesting leaves before beginning their artwork.

      After painting, allow the leaves to dry completely on a protected surface before moving them. Arrange several finished characters together on a tray, tabletop, or windowsill, mixing different sizes and expressions for a more interesting display. If you want to preserve them temporarily, adults can use an appropriate craft sealant according to the product instructions. Keep the activity simple for younger children by providing broad brushes and basic face shapes. A collection of painted leaves creates colorful seasonal artwork without needing many purchased materials, and the natural textures make the finished display feel especially handmade.

      Spider Web Plates

      Create web patterns on paper plates using white yarn or string.

      Paint the plate background black, navy, or purple for contrast.

      Add a small paper or pom-pom spider in the center.

      Encourage children to weave the yarn loosely through punched holes.

      Hang finished webs near windows, doors, or bedroom walls.

      A simple paper plate can become an eye-catching spider web when children combine paint, string, and a little weaving. Start by coloring the plate black, navy, or purple, then create evenly spaced holes around the edge for the yarn. Children can thread white string between the openings to build their own web pattern. The lines do not need to be perfectly symmetrical, which makes this activity accessible and naturally handmade. Add a small pom-pom or paper spider in the center to complete the design and give children another element to assemble.

      Finished web plates make lightweight decorations that can brighten a bedroom, playroom, classroom, or party space. Attach string through one of the edge holes and hang several together, using different background colors for contrast. Younger children may need help with the hole-punching stage, while older kids can handle more of the weaving independently. Keep the yarn long enough to manipulate comfortably but not so long that it becomes tangled. The combination of threading and decorating gives children two different creative tasks, while the finished webs create a recognizable Halloween display with inexpensive materials.

      Egg Carton Spiders

      Reuse cardboard egg-carton sections to create lightweight spider bodies.

      Paint them black, purple, or bright Halloween colors.

      Add pipe-cleaner legs and oversized eyes for character.

      Let children decorate each spider with different patterns or spots.

      Hang or display finished spiders around a playroom or craft area.

      Recycling an empty egg carton into a spider gives children a satisfying transformation project with very basic materials. Cut individual sections from the carton, then let children paint each piece black, purple, orange, or another favorite color. Once the paint dries, attach eight pipe-cleaner legs and oversized eyes. Kids can add dots, stripes, or tiny paper shapes to make their spiders different. The uneven texture of cardboard makes each body look slightly unique, which works perfectly for a handmade craft. Adults should handle cutting the carton, especially when younger children are involved.

      Finished spiders can become decorations rather than simply staying on the craft table. Place several along a bookshelf, windowsill, or children’s desk, or attach string to the top and hang them from a doorway. Mixing colors and sizes creates a lively display that feels more playful than frightening. You can also use the activity to practice counting by asking children to check that each spider has eight legs. I’ve noticed that recycled-material projects often encourage more imagination because children begin thinking about how ordinary household objects can become completely different things.

      Ghost Popsicle Stick Frames

      Build simple rectangular frames from wooden craft sticks.

      Paint the frame white, purple, or dark blue before decorating.

      Add a ghost shape using cardstock or lightweight fabric.

      Include small stars, moons, or pumpkins around the edges.

      Display finished frames on shelves or attach them to bedroom walls.

      A simple craft-stick frame becomes a fun Halloween keepsake when children decorate it around a handmade ghost. Arrange four wooden sticks into a square or rectangle, secure the corners, and let the frame dry before adding decorations. Children can paint the sticks white, purple, blue, or even bright orange, then attach a cardstock ghost in the center. Small paper stars, moons, pumpkins, or bats can fill the remaining space. This project combines basic construction with creative decorating, giving children more than one way to participate regardless of their age or crafting experience.

      The finished frames can hold a small drawing, printed photograph, or another piece of children’s artwork, making them more useful than temporary decorations. Display them on a bedroom shelf, craft station, or family photo area throughout October. Younger children can decorate pre-assembled frames, while older kids can help measure and glue the corners. Keep embellishments lightweight so the frame remains easy to handle. A collection of individually decorated frames can create a colorful seasonal gallery, and each one can become a small reminder of the child’s creativity from that particular Halloween.

      Halloween Suncatcher Shapes

      Use translucent craft paper to create colorful Halloween window art.

      Choose simple silhouettes such as pumpkins, ghosts, bats, and moons.

      Layer tissue paper pieces to create stained-glass effects.

      Attach finished shapes to windows where sunlight can shine through.

      Mix several colors for a brighter daytime display.

      Sunlight can turn a simple Halloween craft into something that changes throughout the day. Children can create suncatcher shapes using translucent craft paper, tissue paper, or suitable window-safe materials, arranging colors inside outlines of pumpkins, ghosts, bats, moons, and stars. Ruby red, turquoise, violet, amber, and orange pieces create beautiful color when light passes through them. The shapes do not need to be perfectly symmetrical, which makes the project accessible for children who are still developing cutting skills. An adult can prepare the outlines while kids choose and arrange the translucent pieces.

      Place the finished decorations directly on a clean window where natural sunlight can illuminate them. A group of different shapes looks especially attractive when spaced across the glass rather than clustered into one area. Encourage children to experiment with overlapping translucent colors to see how the shades change when light passes through them. Use materials specifically intended for the chosen window surface and supervise younger children during preparation. The result is both artwork and decoration, giving children the satisfaction of seeing their creations become part of the room’s everyday Halloween atmosphere.

      Pumpkin Seed Art

      Use cleaned pumpkin seeds as natural pieces for Halloween artwork.

      Paint the seeds orange, green, purple, or metallic shades before crafting.

      Arrange them into pumpkins, leaves, bats, or simple patterns.

      Use sturdy cardstock as the base for easier handling.

      Let children combine painted and natural seeds for extra texture.

      Pumpkin seeds can become colorful building pieces for Halloween artwork when children arrange them into simple shapes. Clean and dry the seeds first, then let kids paint some orange, green, purple, or metallic gold while leaving others natural. Once dry, arrange the seeds into pumpkins, leaves, bats, or abstract patterns on sturdy cardstock. The small pieces encourage children to think about shape and placement while adding a naturally textured finish. For younger children, prepare the painted seeds ahead of time so they can focus on arranging and gluing their designs.

      Finished seed artwork can become colorful wall decorations, greeting cards, or small seasonal displays. Use dark purple, navy, or bright yellow cardstock underneath to make the lighter seeds stand out clearly. Children can create several small pictures rather than one large project, making it easier to display their work together. Keep the seeds away from very young children who may put small objects in their mouths, and supervise the gluing process. A mixture of painted and natural seeds gives the artwork an interesting handmade texture while making good use of a seasonal material.

      Halloween Nature Collage

      Collect safe natural materials such as leaves, twigs, and small pinecones.

      Arrange the pieces into pumpkins, bats, monsters, or Halloween scenes.

      Use colored paper as a bold background for stronger contrast.

      Add washable paint details where natural materials need extra definition.

      Let children choose and arrange materials independently for an open-ended activity.

      Natural materials can give Halloween artwork a completely different texture from ordinary paper crafts. Collect clean leaves, small twigs, pinecones, and acorns, then let children arrange them into recognizable shapes such as pumpkins, bats, monsters, or simple Halloween landscapes. A sheet of colored construction paper can provide the background, while washable paint or paper details can add eyes, stems, or other features. There is no need for a perfect arrangement because the irregular shapes are part of the charm. Children can explore texture, shape, and composition while creating a seasonal picture from materials they find around them.

      Once the collage is complete, allow the glue to dry thoroughly before moving the artwork. Display finished pieces on a refrigerator, classroom board, or bedroom wall where children can easily see the natural textures. If collecting materials outdoors, choose clean items and avoid anything sharp, moldy, or unfamiliar. Adults can help prepare the materials while children handle the creative arrangement. In my experience, open-ended nature crafts work especially well when kids are encouraged to make their own decisions, because every finished collage develops a different combination of colors, shapes, and seasonal details.

      Halloween Pencil Toppers

      Transform paper and craft foam into small Halloween character toppers.

      Create pumpkins, ghosts, bats, monsters, or witches.

      Attach designs securely around the top of ordinary pencils.

      Use bright colors so characters remain easy to recognize.

      Make several designs so children can switch characters during homework or drawing.

      Ordinary pencils become much more fun when children can give them tiny Halloween characters to wear. Cut simple shapes from cardstock or craft foam, creating pumpkins, ghosts, bats, monsters, or witches, then attach them securely around the top of each pencil. Bright colors such as lime green, purple, blue, orange, and pink help the characters stand out. Children can draw faces and small details themselves, making each topper different. This is a particularly useful project for kids who enjoy crafts that become part of their everyday activities instead of remaining purely decorative.

      Create several toppers so children can switch between characters while drawing, coloring, or doing homework. They can also make a set as small gifts for classmates or party favors, provided the materials and small pieces are age appropriate. Keep attachments secure and supervise younger children when working with small craft components. Store finished pencils upright in a cup so the toppers remain visible and easy to choose. A colorful collection can brighten a child’s desk during October while giving them a simple creative project they can continue using after the crafting session ends.

      Halloween Bookmark Monsters

      Turn cardstock into colorful monster-shaped bookmarks.

      Add googly eyes, paper teeth, yarn hair, or funny eyebrows.

      Use different colors to create a collection of unique characters.

      Keep the design flat enough to slide easily between book pages.

      Let children personalize bookmarks with their names or small Halloween details.

      A handmade bookmark becomes much more exciting when it looks like a tiny Halloween character waiting inside a favorite book. Cut sturdy cardstock into narrow strips, then let children decorate the top with monster features such as oversized eyes, paper teeth, yarn hair, or crooked eyebrows. Bright colors make each character easy to recognize, while small patterns can add extra personality. Keep the lower portion relatively flat so it slides comfortably between pages. This project is especially appealing for children who enjoy reading because the finished craft becomes something they can immediately use.

      Once the bookmarks are complete, write each child’s name on the back or add a small Halloween message. Create several different characters so children can choose one for each book they are reading. They also make inexpensive handmade gifts for classmates, siblings, or family members. If younger children participate, adults can prepare the basic strips while kids handle the decorating. A small collection of colorful monster bookmarks on a reading desk adds seasonal personality without creating clutter. The craft combines creativity with a useful everyday object, giving children a finished piece they can enjoy long after October.

      Paper Plate Witch Faces

      Transform paper plates into colorful witch character portraits.

      Use yarn for hair and cardstock for hats, noses, and collars.

      Let children choose unusual skin, hair, and hat colors.

      Add washable marker details for expressive faces.

      Hang finished portraits together for a playful Halloween gallery.

      Paper plates provide a large, simple surface for children to create their own colorful Halloween witch characters. Paint or color the plate first, then add yarn hair, a crooked cardstock hat, a paper nose, and a simple collar. Children can experiment with purple, green, orange, blue, or even pink instead of using traditional witch colors. Encourage different facial expressions so every character feels distinct. Because the design is built from basic shapes, younger children can participate by choosing colors and attaching prepared pieces while older kids can draw and cut more details themselves.

      After the portraits dry, hang them together to create a playful Halloween gallery in a playroom, classroom, hallway, or bedroom. Vary the hat shapes and hair colors to keep the arrangement visually interesting. You can also write each child’s name beneath their character so the display feels personal. Keep heavier embellishments minimal so the paper plates remain easy to hang. This project works particularly well for groups because everyone starts with the same basic material but ends with a completely different character. The finished gallery becomes both seasonal decoration and a celebration of children’s individual creativity.

      Halloween Cardboard Castles

      Build small haunted houses from recycled cardboard boxes.

      Use paint, paper, and markers to add windows, doors, and rooftops.

      Create towers, crooked fences, or tiny paper bats around the structure.

      Let children design their own imaginary haunted-house layouts.

      Display completed buildings together as a miniature Halloween village.

      A few recycled cardboard boxes can become the foundation for an entire miniature Halloween village. Children can paint or cover the boxes, then add paper windows, doors, crooked rooftops, tiny fences, and other architectural details. Instead of giving everyone an identical template, let each child decide whether their building becomes a tall haunted house, a tiny cottage, or a strange little tower. Black, purple, orange, gray, and deep blue create a recognizable Halloween palette. The larger surface area also allows children to combine several techniques, including painting, drawing, cutting, and gluing.

      Once the buildings are complete, arrange them together on a large table or low shelf to create a miniature neighborhood. Add paper bats, small trees, cardboard pathways, or painted stones to connect the structures and make the village feel more complete. Adults can help with cutting thicker cardboard pieces, while children handle the decorating and layout. I’ve seen this type of open-ended project work especially well with siblings or groups because everyone contributes a building to one shared display. The finished village can remain on view throughout Halloween and become a centerpiece for imaginative play.

      Make Halloween More Creative With These Fun Ideas

      Halloween crafting can be much more than keeping kids busy—it can become a chance to create decorations, practice simple skills, and make memories together. These ideas give children plenty of room to experiment while turning everyday materials into festive creations. From paper projects to nature-inspired crafts, there is something for almost every little maker. I’ve noticed that the simplest projects are often the ones children want to personalize most. Save this collection on Pinterest so you can come back whenever you need an easy activity, try a few ideas with your family, and share the post with another parent, teacher, or caregiver looking for fresh Halloween inspiration.

    • 12 Halloween Boo Basket Ideas for Her She’ll Love

      12 Halloween Boo Basket Ideas for Her She’ll Love

      The perfect surprise doesn’t have to be expensive—it just needs to feel thoughtful. These halloween boo basket ideas for her make it easy to create a gift that feels personal, cozy, and genuinely fun.

      Whether you’re surprising your girlfriend, sister, best friend, daughter, or someone special, a well-planned boo basket can turn ordinary treats into a memorable Halloween moment. The trick is choosing a simple theme and filling it with useful little things she’ll actually enjoy, from coffee and self-care treats to books, candles, cozy accessories, and sweet snacks. In my experience, baskets feel much more special when every item works together visually while still reflecting the recipient’s personality. Keep reading for easy combinations you can recreate, customize, and make completely your own.

      Cozy Coffee Basket

      • Make a reusable mug or tumbler the main anchor.
      • Add coffee, hot chocolate, or flavored syrup she actually enjoys.
      • Include fuzzy socks or a small fall blanket for extra comfort.
      • Use brown, cream, caramel, and muted orange for a warm palette.
      • Add one small ghost or pumpkin detail to keep the Halloween theme visible.

      The easiest way to make a thoughtful gift basket feel personal is to build it around something she already enjoys. A cozy coffee theme gives you a clear starting point: choose a pretty mug or tumbler, then add her favorite coffee, hot chocolate, syrup, or tea. Soft socks and a few chocolates make the basket feel generous without filling it with unnecessary seasonal items. Use warm neutrals such as cream, caramel, brown, and muted orange instead of bright Halloween colors. This approach feels cozy and useful, especially for someone who loves slow mornings or relaxing with a warm drink.

      You can make the arrangement look fuller by placing crinkle paper underneath the gifts and positioning the mug slightly toward the back. Let smaller treats and accessories sit around the front so everything remains visible. A tiny ghost charm, pumpkin decoration, or Halloween-patterned napkin can provide enough seasonal detail without overwhelming the coffee theme. I’ve noticed that baskets built around one everyday ritual often feel more thoughtful because the recipient can continue enjoying them after Halloween. Choose items she would genuinely use rather than buying several random spooky fillers just to make the basket look full.

      Self-Care Night

      • Choose one quality skincare or bath item as the basket centerpiece.
      • Add a face mask, lip balm, hand cream, or claw clip.
      • Include a calming candle or small bath accessory.
      • Use lavender, dusty pink, cream, and soft gray for a relaxed palette.
      • Finish with one subtle Halloween item such as a ghost-shaped treat.

      A self-care basket works beautifully when the goal is to create a small moment of relaxation rather than simply giving her Halloween-themed products. Start with one useful item, such as bath salts, a skincare set, a candle, or a soft robe accessory, then layer in smaller treats she can enjoy during a quiet evening. Keep the color palette calm with lavender, dusty pink, cream, and soft gray. A single Halloween detail, like a ghost-shaped chocolate or tiny pumpkin, keeps the basket seasonal while allowing the overall gift to feel sophisticated and usable beyond October.

      Think of the basket as a complete evening rather than a collection of unrelated products. Add a face mask, lip balm, hand cream, claw clip, or small candle to create a simple routine she can enjoy at home. Arrange taller products toward the back and place flatter items in front so everything can be seen immediately. In my experience, this type of gift feels especially thoughtful when you choose products based on her actual preferences instead of buying whatever has the most obvious Halloween packaging. The result is cute, practical, and relaxing without becoming overly themed or cluttered.

      Book Lover Box

      • Make a fall or mystery book the main gift.
      • Add a soft bookmark and a small reading light.
      • Include tea, coffee, or hot chocolate for a cozy reading break.
      • Tuck in one favorite candy or chocolate treat.
      • Use a wooden crate or deep basket to support the book upright.

      A book lover deserves a basket that feels like a complete evening waiting to happen. Start with a mystery, romance, fantasy, or autumn-themed book that matches her taste, then build around it with a soft bookmark, compact reading light, and favorite drink. A few chocolates add an easy treat without taking attention away from the book. Instead of a traditional basket, use a small wooden crate that lets the book stand upright and creates a more substantial presentation. This combination feels thoughtful because every item supports the simple pleasure of settling down with a good story.

      Pay attention to the little details when arranging everything. Place the book toward the back, then layer the bookmark and reading light across the front where they remain visible. Tuck tea bags, chocolate, or individually wrapped snacks into the open spaces so the crate looks abundant without becoming cluttered. A tiny black cat decoration or subtle Halloween bookmark can bring in the seasonal theme. I’ve noticed that themed gifts feel more personal when they reflect an actual hobby instead of relying entirely on holiday packaging. Choose quality over quantity, and let the book remain the visual centerpiece.

      Pumpkin Spice Treats

      • Build the basket around pumpkin spice flavors she already loves.
      • Add cookies, chocolates, coffee, or seasonal snack mixes.
      • Include a reusable autumn-themed tumbler or travel cup.
      • Use cinnamon, rust, cream, and deep brown for a rich palette.
      • Add a small cinnamon-scented item for an extra sensory touch.

      Nothing says fall quite like opening a basket filled with pumpkin spice favorites. Build this gift around flavors she genuinely enjoys, using pumpkin cookies, cinnamon chocolates, caramel coffee, seasonal tea, or a favorite snack mix. A reusable tumbler can become the centerpiece while smaller treats fill the surrounding spaces. Choose warm colors such as burnt orange, cinnamon, cream, and deep brown to create a rich autumn look. This idea works especially well when you want something festive without relying heavily on traditional Halloween decorations. The finished basket feels delicious, cozy, useful, and unmistakably seasonal.

      To make the presentation more appealing, layer crinkle paper inside a sturdy basket before arranging the taller items toward the back. Place wrapped chocolates, cookies, and cinnamon sticks around the front so the contents remain easy to see. You could add a small recipe card for homemade pumpkin bread or another favorite fall treat for a personal touch. In my experience, food-based baskets are easiest to personalize because you can build them around flavors the recipient already loves. Choose fewer, better treats rather than stuffing the container with inexpensive fillers she may never actually enjoy.

      Movie Night Basket

      • Choose a favorite movie genre instead of adding random entertainment items.
      • Include microwave popcorn, chocolate, and her favorite movie-night drink.
      • Add a soft pair of socks or a compact fleece blanket.
      • Use a popcorn bucket as the main container for a fun twist.
      • Include a handwritten movie recommendation or streaming-night card.

      Turn a simple movie night into a gift she can actually enjoy with a basket built around her favorite kind of film. Start with a reusable popcorn bucket, then add gourmet popcorn, chocolate, a favorite drink, and cozy socks or a compact blanket. You can tailor the basket around her preferred movie genre, whether she loves classic horror, romantic comedies, or nostalgic favorites. The Halloween connection can stay subtle through one pumpkin-shaped treat or seasonal snack. This makes the gift feel more like an experience than a collection of unrelated products, which is especially appealing for someone who values relaxing evenings at home.

      Arrange the popcorn bucket toward the back and layer the snacks around it so the basket has height and visual balance. A handwritten card suggesting a movie night date can make the whole gift feel more intentional. If you know her favorite film, add a small themed bookmark or printed movie-night checklist rather than buying unnecessary merchandise. I’ve noticed that experience-based baskets often create better memories because the recipient can use several items together immediately. Keep the packaging simple and coordinated, using two or three colors instead of mixing every Halloween pattern you can find.

      Mini Jewelry Box

      • Make a small jewelry organizer the practical centerpiece.
      • Add simple earrings, a delicate bracelet, or a hair accessory.
      • Include a compact mirror for an extra useful detail.
      • Choose burgundy, black, ivory, and gold for an elegant palette.
      • Use shredded paper to keep small pieces secure and visible.

      A tiny jewelry box can make a Halloween gift feel instantly more personal and polished. Choose a compact organizer in velvet, faux leather, or another attractive material, then add one or two simple accessories that suit her everyday style. Delicate hoops, a bracelet, hair clip, or compact mirror can fill the arrangement without making it feel excessive. Burgundy, ivory, black, and gold create an elegant seasonal palette without relying on obvious Halloween patterns. This approach works particularly well when you want the gift to feel feminine and useful rather than simply packed with temporary holiday treats.

      Presentation matters when your gifts are small, so use shredded paper or soft tissue to create height and keep everything visible. Place the jewelry box toward the back, then arrange the smaller accessories around it with the mirror slightly angled forward. A single wrapped chocolate or tiny pumpkin accent can provide the Halloween connection. In my experience, practical keepsakes make a basket feel more memorable because they continue being useful after the holiday ends. Choose one accessory she would genuinely wear rather than filling the box with inexpensive pieces that do not match her style.

      Fall Candle Basket

      • Choose one autumn-scented candle as the centerpiece.
      • Add matches, a candle snuffer, or a small decorative holder.
      • Include a cozy pair of socks or a soft eye mask.
      • Use amber, cream, terracotta, and dark brown for warmth.
      • Pick scents like vanilla, apple, cinnamon, or toasted pumpkin.

      A beautiful candle can turn a simple gift into a relaxing little ritual she can enjoy long after Halloween. Choose a warm autumn scent such as vanilla, cinnamon, baked apple, or toasted pumpkin, then build the basket around that cozy feeling. Add quality matches, a small candle accessory, soft socks, and one favorite sweet treat. Instead of bright Halloween colors, use amber, cream, terracotta, and brown for a sophisticated fall palette. This makes the basket feel thoughtful without becoming overly themed, especially for someone who prefers subtle seasonal gifts that blend naturally into her home.

      The arrangement can look especially polished when you place the candle in the center and layer smaller items around it. Use crinkle paper or shredded kraft paper underneath to create height, then tuck socks and treats into the open spaces. A handwritten note about enjoying a quiet evening can add warmth without requiring another purchased item. I’ve noticed that scent-based gifts often feel more memorable because they create an atmosphere as soon as they are used. Choose a fragrance that matches her preferences rather than automatically selecting the strongest pumpkin scent on the shelf.

      Pink Halloween Treats

      • Build the basket around pink and feminine Halloween treats.
      • Mix chocolate, gummies, cookies, and individually wrapped sweets.
      • Add a pink tumbler, compact mirror, or cozy accessory.
      • Use blush, hot pink, white, and black for visual contrast.
      • Add tiny bat or ghost details without making the basket childish.

      Give the traditional Halloween palette a feminine update by building a treat basket around shades of pink. Combine strawberry gummies, pink-wrapped chocolates, pastel cookies, candy, and one useful accessory such as a blush tumbler or compact mirror. Add small black details through ribbon, tissue paper, or tiny bat accents to keep the Halloween connection recognizable. The mix of blush, hot pink, white, and black creates strong visual contrast that photographs beautifully. This concept is ideal for someone who enjoys cute seasonal details but prefers a softer aesthetic than traditional orange-and-black decorations.

      Keep the arrangement playful without making it look like a child’s candy collection. Choose treats with attractive packaging, then place the tallest item toward the back and scatter smaller sweets toward the front. A simple black ribbon around the basket can balance the amount of pink without overpowering it. You could also include a handwritten note in a small pink envelope for a personal finishing touch. In my experience, using a limited color palette makes inexpensive gifts look much more coordinated. The result feels cheerful, modern, and intentionally styled while still being easy to assemble.

      Coffee Shop Kit

      • Create a mini café experience inside the gift basket.
      • Add specialty coffee, flavored syrup, and a reusable cup.
      • Include biscotti, cookies, or chocolate-covered coffee beans.
      • Add a small gift card to her favorite local coffee shop.
      • Use kraft paper, sage green, cream, and dark brown for a modern look.

      A coffee shop experience in a basket feels thoughtful because it gives her several little treats to enjoy together. Start with a quality coffee blend and reusable cup, then add flavored syrup, biscotti, cookies, or chocolate-covered coffee beans. A small gift card to a favorite café makes the idea even more useful without taking up much space. Choose sage green, cream, kraft brown, and dark chocolate tones for a modern autumn appearance. This combination works especially well for someone who enjoys her morning coffee and appreciates practical gifts that fit naturally into everyday routines.

      Arrange the reusable cup toward the back and place the coffee bag beside it so the main items immediately catch attention. Smaller treats can fill the front while the syrup sits between taller pieces for balance. Wrap the basket with a dark brown ribbon or add a tiny Halloween tag for a seasonal finishing touch. I’ve noticed that food-and-drink baskets feel more complete when they create a specific experience rather than simply collecting snacks. Keep the contents coordinated around coffee, and the final presentation will feel like a carefully planned café visit brought home.

      Cozy Movie Night

      • Choose a soft throw blanket as the main basket item.
      • Add popcorn, chocolate, and her favorite movie-night drink.
      • Include fuzzy socks or a comfortable sleep mask.
      • Use burgundy, cream, charcoal, and dusty orange for a cozy palette.
      • Add a handwritten movie recommendation or streaming-night card.

      A cozy movie night is an easy way to turn a small Halloween gift into an experience she can enjoy immediately. Start with a soft throw blanket, then add popcorn, chocolate, a favorite drink, and fuzzy socks for extra comfort. You can personalize the basket around her preferred movie genre, whether she loves classic horror, romantic comedies, or nostalgic favorites. Instead of using lots of Halloween patterns, combine burgundy, cream, charcoal, and dusty orange for a more grown-up autumn look. The finished basket feels relaxing, useful, and perfect for a quiet night at home.

      Presentation becomes much easier when the blanket provides height and volume inside the basket. Fold it loosely toward the back, then place the popcorn and drink in front with smaller snacks tucked into the gaps. A handwritten movie suggestion or simple “movie night” card adds personality without adding unnecessary clutter. In my experience, baskets built around an activity feel especially thoughtful because the recipient knows exactly how to enjoy everything together. Add one subtle Halloween detail, such as a black cat charm or pumpkin-shaped chocolate, to keep the seasonal theme visible without making the whole gift feel overly themed.

      Manicure Mini Kit

      • Make a compact manicure and set the practical centerpiece.
      • Add two or three nail polish shades she would actually wear.
      • Include cuticle oil, hand cream, or a nail file.
      • Choose burgundy, plum, nude, and metallic shades for fall.
      • Place everything in a small cosmetic pouch instead of a traditional basket.

      A manicure-themed gift gives a traditional Halloween basket a practical beauty-focused twist. Choose a small cosmetic pouch as the container, then fill it with two or three nail colors, cuticle oil, hand cream, and a quality nail file. Fall shades such as burgundy, plum, nude, and metallic gold feel seasonal without being limited to Halloween. This makes the gift especially useful for someone who enjoys doing her nails at home or likes keeping a few beauty essentials organized. The compact format also works well when you want something thoughtful without creating a large or expensive gift basket.

      Keep the selection focused rather than adding every beauty product you can find. Place the pouch toward the back and arrange the polish bottles and accessories around it so their colors remain visible. A couple of pumpkin-shaped chocolates can provide a playful seasonal detail without competing with the beauty products. Choose shades based on her usual style if you know it, rather than automatically selecting bright Halloween colors. I’ve noticed that practical beauty gifts feel more personal when the colors and products clearly match the recipient’s preferences. The finished kit can be reused as a travel pouch long after Halloween.

      Sweet Breakfast Basket

      • Build the gift around an easy weekend breakfast.
      • Add pancake or waffle mix, maple syrup, and fruit preserves.
      • Include a pretty tea towel or small ceramic serving piece.
      • Add cinnamon pastries, granola, or chocolate-covered fruit.
      • Use cream, soft orange, maple brown, and sage green for a warm finish.

      A breakfast-themed gift can make a Halloween surprise feel warm, useful, and a little unexpected. Build the basket around an easy weekend meal with pancake or waffle mix, real maple syrup, fruit preserves, and something freshly baked or sweet. Add a pretty tea towel or small ceramic bowl that she can keep using afterward. Cinnamon pastries, granola, or chocolate-covered fruit bring extra variety without overcrowding the basket. The soft combination of cream, sage, maple brown, and muted orange gives the arrangement a cozy fall appearance while keeping the Halloween influence subtle and sophisticated.

      Arrange the breakfast mix toward the back of the basket, using the syrup bottle and folded tea towel to create height. Place pastries and smaller treats toward the front so the contents are immediately visible. A tiny pumpkin tucked between the items is enough to signal the season without turning the basket into a traditional Halloween display. If you know her favorite breakfast flavors, build around those instead of choosing generic products. I’ve noticed that useful gifts often feel more special when they can become part of a relaxed weekend routine. Finish with a handwritten “Sunday breakfast” note for a personal touch.

      Make Her Halloween Extra Special

      A thoughtful boo basket can turn a few simple gifts into a warm, memorable surprise. From cozy nights and self-care treats to coffee, books, candles, and sweet breakfast goodies, these ideas give you plenty of inspiration without making the process complicated. Choose one theme, add a few personal touches, and let the presentation bring everything together. I’ve noticed that even small details, such as coordinated colors or a handwritten note, can make a basket feel much more meaningful. Save this post on Pinterest, try your favorite idea, and share it with someone who loves creating thoughtful Halloween surprises.

    • Funny Outdoor Halloween Decorations

      Funny Outdoor Halloween Decorations

      The funniest Halloween displays often give an ordinary activity a completely ridiculous twist, and a skeleton enjoying a spa day does exactly that. Place a full-size skeleton inside a black tub, cauldron, or weather-resistant basin and surround it with lightweight faux bubbles.

      Skeleton Spa Station

      • Turn a large black tub, cauldron, or outdoor basin into a skeleton bathtub.
      • Use white stuffing or clear plastic packing material to imitate foamy bubbles.
      • Add a small towel, sunglasses, and a bright plastic drink for the joke.
      • Position the setup on a porch corner or patio where it stays visible.
      • Keep surrounding decorations minimal so the skeleton remains the main attraction.

      The funniest Halloween displays often give an ordinary activity a completely ridiculous twist, and a skeleton enjoying a spa day does exactly that. Place a full-size skeleton inside a black tub, cauldron, or weather-resistant basin and surround it with lightweight faux bubbles. Add a towel wrapped around its skull, oversized sunglasses, and a colorful plastic cup to make the scene instantly recognizable. Position the setup near your porch or patio seating area so visitors can see the entire joke from the walkway. In my experience, small accessories make character-based displays feel much more intentional without requiring expensive decorations.

      You can make the scene even more convincing by adding a small side table with a rolled towel, plastic bottle, or simple plant. Avoid covering the skeleton with too many props because the humor depends on seeing its relaxed pose clearly. If your outdoor space receives rain, use materials that will not absorb water and secure the tub so wind cannot move it. A warm porch light or small outdoor spotlight can keep the scene visible after dark. The result feels playful rather than frightening, making it especially suitable for families and neighborhood trick-or-treaters.

      Flamingo Skeleton Riders

      • Pair plastic lawn flamingos with small poseable skeleton figures.
      • Secure each skeleton to its flamingo so wind cannot separate the pieces.
      • Space the riders across the lawn instead of grouping them together.
      • Use different skeleton poses to make the scene feel spontaneous.
      • Keep the surrounding grass mostly open so the unusual pairing stands out.

      A row of lawn flamingos becomes much funnier when tiny skeletons appear to be riding them across the yard. This playful setup works because the combination is completely unexpected while remaining easy to understand from a distance. Use several pink plastic flamingos and secure lightweight poseable skeletons to their backs with garden wire or discreet outdoor ties. Give each rider a different pose, such as waving, leaning forward, or holding a tiny broom. Spread them across the lawn as though they are traveling somewhere instead of placing them in a straight line.

      For the strongest visual effect, let the flamingos move toward the front door, mailbox, or sidewalk in a loose formation. You can add a few pumpkins along their route, but avoid filling the grass with unrelated decorations. The bright pink birds provide a strong contrast against green grass and traditional orange Halloween accents, so the display naturally attracts attention. I’ve noticed that funny outdoor scenes work best when viewers can understand the joke within a few seconds. This one is especially useful for homeowners who want something cheerful instead of another scary skeleton display.

      Witch Parking Lot

      • Create a miniature parking area specifically for witches’ broomsticks.
      • Use a small handmade sign labeled “Witch Parking.”
      • Push several decorated broomsticks into the lawn at different angles.
      • Add a few pumpkins around the sign without overcrowding the display.
      • Place the setup near a walkway where guests can read the joke easily.

      A few broomsticks can become a surprisingly funny Halloween display when you treat them like vehicles parked outside. Create a small “Witch Parking” area beside your walkway using several rustic broomsticks, a handmade sign, and a few pumpkins. Angle the broomsticks differently so they look casually parked rather than arranged like a formal decoration. The joke becomes especially clear when the sign sits directly beside the display. This idea takes very little lawn space, making it useful for smaller yards, townhouses, or homes where large Halloween props would block the walkway.

      For a more finished look, use broomsticks with different handles, textures, and lengths so the display feels collected rather than manufactured as one matching set. You could paint the parking sign black with orange lettering or use a small wooden board for a homemade appearance. Keep the surrounding area relatively uncluttered because the sign and broomsticks need to communicate the concept immediately. Add a warm ground light or nearby porch light for evening visibility. It is an inexpensive setup, but the unexpected parking-lot concept gives ordinary Halloween accessories an entirely different personality.

      Skeleton Construction Crew

      • Create a miniature construction scene with two or three skeleton workers.
      • Give each skeleton a hard hat, safety vest, or simple work accessory.
      • Use orange cones, caution tape, and a small wooden sign.
      • Place the scene beside a driveway, walkway, or garden bed.
      • Keep the props slightly scattered for a believable worksite appearance.

      A skeleton construction crew turns an ordinary patch of lawn into a funny little worksite that makes people stop and look twice. Position two or three skeletons around a driveway or garden area, then give them simple hard hats, safety vests, and inexpensive construction props. Orange cones and caution tape immediately establish the scene without requiring complicated decorations. One skeleton can hold a shovel while another kneels beside a small pile of dirt. The contrast between serious construction equipment and completely unqualified skeleton workers creates the humor, especially when everything looks slightly chaotic.

      You do not need professional-looking props to make this display convincing. In fact, slightly mismatched cones, weathered tools, and handmade signs can make the scene feel more naturally assembled. Add a small sign suggesting that the “project” is still underway, then leave enough open space around the figures for each pose to remain visible. This setup works particularly well near driveways because the hard surfaces naturally resemble a construction area. For evening viewing, use a simple outdoor spotlight rather than bright colored lights, keeping the display funny and realistic instead of overly theatrical.

      Yard Sale Skeletons

      • Arrange skeletons around a small outdoor table like neighborhood sellers.
      • Display harmless household objects as pretend bargain items.
      • Add a handmade “Everything Must Go” yard-sale sign.
      • Give each skeleton a different seated or standing pose.
      • Use the driveway or front lawn as the natural selling area.

      A Halloween yard sale becomes much more entertaining when the sellers themselves are skeletons. Set up a basic folding table on your driveway and place a handful of ordinary household objects on it, such as old books, baskets, lamps, picture frames, or mismatched dishes. Position two or three skeletons around the table as though they are waiting for customers. A handmade sign reading “Everything Must Go” or “Estate Sale” gives visitors the joke immediately while making the whole display feel like a familiar neighborhood scene.

      The best part is that this idea can be created almost entirely from things you already own. Use different skeleton poses to make the characters look like they are negotiating prices, organizing merchandise, or simply waiting around. Add small handwritten price tags to make the display more amusing when people walk closer. Keep the table slightly imperfect instead of arranging every object neatly, because a real yard sale should look casually organized. I’ve noticed that recognizable everyday situations tend to get more reactions than complicated Halloween scenes, and this setup works because everyone understands the joke instantly.

      Inflatable Costume Traffic Jam

      • Use several small inflatable characters as though they are stuck in traffic.
      • Arrange them along the driveway or edge of the lawn.
      • Add miniature traffic cones and a simple road-style sign.
      • Choose characters with noticeably different shapes and colors.
      • Leave plenty of space between figures so the scene stays readable.

      Inflatable Halloween characters become even funnier when they look like they have caused a traffic jam in your driveway. Instead of lining them neatly along the walkway, arrange several different characters at awkward angles as though they have stopped suddenly and blocked the road. A pumpkin, ghost, skeleton, dinosaur, or other oversized figure can create plenty of visual variety. Add a few orange traffic cones and a simple handmade sign to make the situation instantly understandable. The intentionally crowded arrangement gives the yard a playful sense of chaos without requiring elaborate construction.

      For a stronger joke, leave small gaps between the inflatables so each character remains recognizable rather than blending into one giant decoration. Vary their heights and positions, with one figure slightly turned toward another as though they are waiting for the imaginary traffic to move. This idea works best on a driveway because the paved surface naturally resembles a road. Keep the rest of the yard relatively simple, using only a few pumpkins or fallen leaves for seasonal detail. After dark, ordinary porch or driveway lighting will keep the colorful characters visible without overpowering the humorous scene.

      Giant Eyeball Bushes

      • Hide oversized eyeballs deep inside dense shrubs.
      • Use different eye sizes to create a more unexpected effect.
      • Position some eyes higher and others closer to ground level.
      • Choose weather-resistant plastic or foam props for outdoor use.
      • Keep the rest of the landscaping natural so the eyes appear unexpectedly.

      Imagine walking past an ordinary hedge and suddenly realizing it is staring back at you. Oversized eyeballs hidden throughout shrubs create that exact surprise while using the existing landscaping as part of the decoration. Place several eyes at different heights, allowing leaves and branches to partially cover them instead of displaying every piece completely. The uneven visibility makes guests discover new eyes as they approach. This setup works especially well for homes with dense bushes near the walkway because the greenery provides a natural backdrop. The result feels funny, unexpected, and much more interactive than simply placing props on the lawn.

      You can create even more personality by using eyes in several sizes and turning the pupils in slightly different directions. Avoid making the arrangement perfectly symmetrical; natural spacing makes the bushes appear as though they have developed a strange personality. A few pumpkins near the base can connect the display to the rest of your Halloween décor without distracting from the main joke. For nighttime visibility, tuck small outdoor lights behind the shrubs so the foliage remains softly illuminated. I’ve noticed that hidden decorations often get stronger reactions because visitors experience the surprise gradually rather than seeing everything at once.

      Skeleton Picnic

      • Set two skeletons around a small outdoor picnic blanket.
      • Add a simple basket, plates, cups, and pretend sandwiches.
      • Position the figures as if they are casually enjoying lunch.
      • Use a shady lawn area beneath a tree when possible.
      • Keep the props weather-resistant for outdoor display.

      A perfectly ordinary picnic becomes ridiculous when the guests are skeletons who seem completely relaxed about their unusual lunch date. Place two full-size skeletons on a picnic blanket and pose them facing each other, as though they have stopped for an afternoon meal. Add a wicker basket, plastic cups, plates, and a few fake sandwiches to make the scene instantly recognizable. A tree-shaded section of the lawn is ideal because the setting already feels like a picnic spot. The humor comes from treating the skeletons like regular neighbors enjoying an entirely normal day outdoors.

      Small details can make this display much more believable without making it complicated. Give one skeleton a cup while positioning the other with an arm resting casually on the picnic basket. Add a paperback book, sunglasses, or small portable radio if you want to suggest that they have been relaxing there for hours. Keep the surrounding lawn relatively open so people approaching the house can see the complete scene. Weather-resistant props are important if the display will stay outside for several days. This is one of those setups where a few everyday objects create most of the visual humor.

      Witch Crash Scene

      • Prop a witch mannequin beside a fallen broom as the main joke.
      • Position her near a garden border rather than blocking a walkway.
      • Add a small warning sign to make the crash scene obvious.
      • Scatter a few pumpkins and autumn leaves around the landing area.
      • Use different broom angles to make the landing look naturally chaotic.

      A crashed witch can turn a quiet corner of the yard into an instant Halloween punchline. Position a full-size witch figure beside a fallen broom, leaning awkwardly against a low garden fence as though her nighttime flight went badly. Add a small handmade warning sign near the scene and scatter a few leaves around the “landing” area. The humor works because the setup tells a simple story without needing complicated props. Choose a visible but safe location near the lawn or garden edge, leaving the walkway completely clear for guests and trick-or-treaters.

      For a more convincing scene, give the witch a slightly crooked hat, rumpled clothing, and an uneven pose instead of making her stand perfectly upright. Angle the broom across the grass and place one shoe slightly away from her, creating the impression of an unexpected landing. A few pumpkins can frame the scene while keeping the focus on the character and broom. I’ve noticed that funny yard decorations are strongest when the joke can be understood from the sidewalk without explanation. Use soft landscape lighting after dark so the silhouette and scattered props remain easy to recognize.

      Skeleton Drive-In

      • Create a miniature outdoor movie setup with two seated skeletons.
      • Use a small projector screen or white sheet as the backdrop.
      • Add folding chairs, popcorn containers, and empty drink cups.
      • Pose the skeletons facing the screen instead of looking toward visitors.
      • Keep the setup on a patio or driveway for a natural viewing area.

      The front yard becomes a hilarious movie night when two skeletons are caught sitting outside watching a film. Set up a simple white sheet or portable projector screen and place two skeletons in folding chairs facing it. Give them popcorn containers and plastic drink cups so visitors immediately understand what they are doing. A small side table can hold extra snacks, while a few pumpkins connect the scene to Halloween. This idea works particularly well on a driveway or patio because the flat surface naturally resembles an outdoor cinema, making the setup feel like a spontaneous neighborhood event.

      You can make the scene more amusing by positioning one skeleton comfortably reclined while the other leans forward as though completely absorbed in the movie. There is no need to show an actual film on the screen; leaving it blank keeps the display simple and avoids competing with the characters. Add warm string lights around the seating area for a cozy evening atmosphere, then use a subtle spotlight to illuminate the skeletons. In my experience, combining ordinary summer activities with Halloween characters creates an especially memorable visual because guests instantly recognize the familiar situation before noticing the spooky twist.

      Monster Trash Cans

      • Turn ordinary outdoor trash bins into oversized monster characters.
      • Add large removable eyes and exaggerated cardboard teeth.
      • Keep the bin lids functional so the decoration remains practical.
      • Use different expressions on multiple containers for extra personality.
      • Position them near the driveway or curb where trash cans normally sit.

      Ordinary trash cans can become surprisingly funny Halloween characters with just a few removable additions. Cover the front of each bin with oversized eyes and exaggerated cardboard teeth, turning an everyday household object into a monster waiting beside the driveway. Use different eye shapes or expressions so multiple bins look like separate characters rather than identical decorations. The setup is especially practical because the containers can still be used normally. Positioning them where trash cans already belong makes the transformation feel natural, while the unexpected faces give visitors a quick visual joke as they approach the house.

      Keep the materials lightweight and weather-resistant so they can survive changing outdoor conditions. Magnetic sheets, removable adhesive, or plastic cutouts can work better than permanent modifications, especially if you need access to the bins throughout the week. Add a few fallen leaves and one or two pumpkins around the base, but avoid covering the containers with too much decoration. Their ordinary shape is part of the humor. I’ve noticed that the funniest displays often transform something people see every day, because the familiar object becomes recognizable first and ridiculous immediately afterward.

      Skeleton Dog Walker

      • Pose a skeleton holding several leashes attached to toy dogs.
      • Use different small dog figures to create a chaotic walking scene.
      • Let the leashes cross naturally without blocking the walkway.
      • Add a poop-bag dispenser or small dog-walking accessory.
      • Place the scene beside the sidewalk for an instantly recognizable joke.

      A skeleton walking several dogs at once creates the kind of ridiculous everyday situation that works perfectly for Halloween. Position a full-size skeleton beside the sidewalk and attach several lightweight dog figures to colorful leashes. Give each “dog” a different pose, with one pulling forward, another sitting stubbornly, and another turning sideways. Add simple accessories such as a poop-bag dispenser or small water bottle to make the scene feel like an ordinary neighborhood dog walk. The contrast between the familiar activity and the skeletal walker creates the humor without needing elaborate Halloween props.
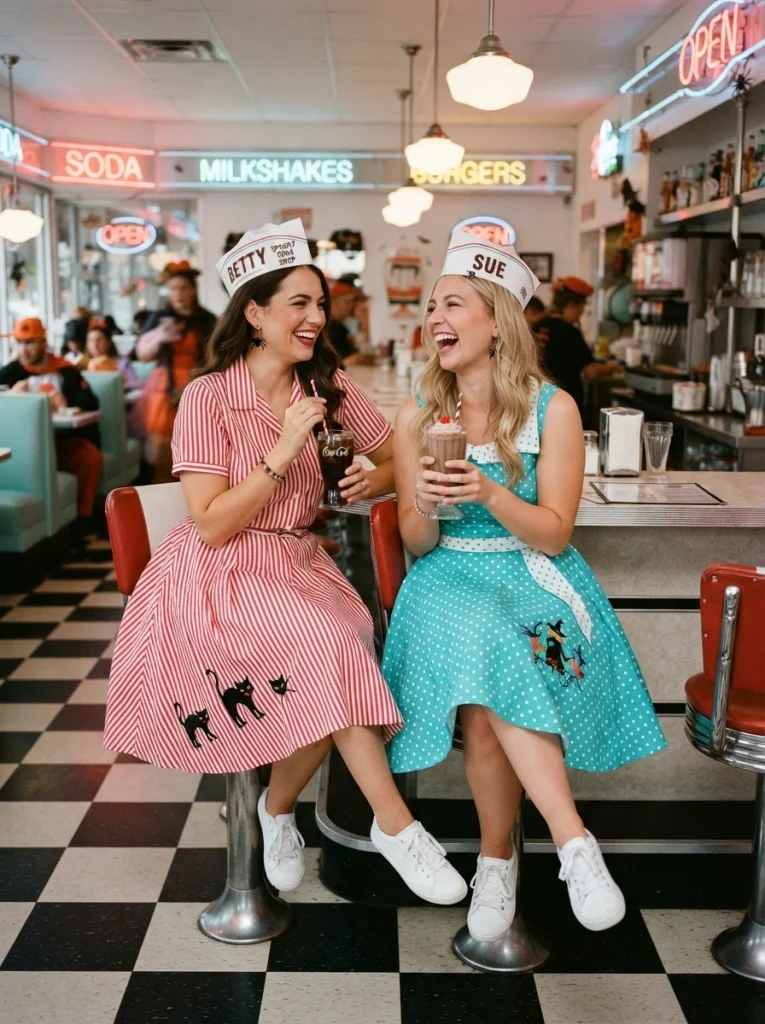
      Keep the arrangement loose and avoid placing the figures directly across the walking path. The dogs can be positioned at slightly different distances so the leashes create natural movement without becoming a tripping hazard. Use realistic lawn, sidewalk, and landscaping around the display to make it feel like an actual neighborhood moment. A few pumpkins or fallen leaves are enough to establish the season. This idea is particularly useful for homeowners who already have pet-related decorations because small changes can transform familiar accessories into a completely different and much funnier outdoor scene.

      Skeleton Car Wash

      • Pose two skeletons beside a parked car with cleaning supplies.
      • Use buckets, sponges, and a garden hose to sell the joke.
      • Add a handmade “Skeleton Car Wash” sign for instant recognition.
      • Give each skeleton a different cleaning task or awkward pose.
      • Keep the car driveway area clear and safe for visitors.

      A skeleton car wash turns an everyday driveway into a ridiculous little roadside business. Place two full-size skeletons beside a parked vehicle and give them simple cleaning supplies such as buckets, sponges, microfiber cloths, and a garden hose. Pose one skeleton reaching toward the windshield while the other carries a bucket, making their imaginary job obvious from the street. A handmade sign can complete the scene without requiring expensive props. The humor comes from giving completely ordinary workers an extremely unusual appearance while keeping the setup grounded in a familiar suburban activity.

      You can make the display more entertaining by giving each skeleton a different job. One might hold a sponge against the hood while another stands beside a bucket as though waiting for the next customer. Use an old apron or baseball cap if you want extra personality, but keep the accessories simple. Place the scene near the garage or driveway rather than directly beside the sidewalk. In my experience, realistic everyday settings make humorous Halloween displays more believable because visitors recognize the situation before noticing the skeletons. Add pumpkins and leaves for seasonal context without distracting from the car-washing gag.

      Giant Candy Bowl Trap

      • Build an oversized candy bowl display near the front walkway.
      • Place a skeleton or prop hand reaching dramatically toward the candy.
      • Add a simple “Take One” sign for an ironic touch.
      • Use wrapped candy that can safely remain outdoors temporarily.
      • Keep the bowl stable and positioned where guests can approach safely.

      A giant candy bowl can become much funnier when it looks like the Halloween treats have turned into a trap. Use an oversized black cauldron or deep decorative bowl and fill it with brightly wrapped candy. Position a skeleton arm or lightweight prop hand reaching dramatically over the edge, as though it is guarding the treats. A crooked “Take One” sign beside the bowl adds an ironic detail that visitors will notice immediately. Place everything near the front door or walkway where trick-or-treaters naturally stop, but keep enough space around the setup for easy movement.

      The display does not need complicated mechanics to create the illusion of a trap. Simply arranging the arm at an unexpected angle can make the candy bowl feel like it has a hidden creature inside. Choose a strong contrast between the dark container and colorful candy so the centerpiece remains visible in photographs. If real candy will be offered, keep it protected from moisture and replace anything exposed to poor weather. A small porch light can illuminate the bowl after sunset. This idea combines a useful trick-or-treat station with a humorous Halloween prop, making the decoration functional as well as entertaining.

      Ghosts On Lawn Chairs

      • Arrange several white-sheet ghosts in ordinary outdoor chairs.
      • Give each ghost a different relaxed sitting position.
      • Add simple props such as sunglasses, cups, or magazines.
      • Use a patio, deck, or lawn seating area as the setting.
      • Keep the ghost forms loose and uneven for a homemade appearance.

      Forget scary ghosts floating around the yard—these ones look like they have taken over the patio for a lazy afternoon. Drape lightweight white sheets over simple outdoor chairs and shape each figure into a relaxed seated pose. Add sunglasses, plastic cups, or a magazine to give every ghost a different personality. The casual setup works because it transforms familiar patio furniture into a humorous Halloween scene. Choose mismatched chairs if possible, since they make the display feel like a real outdoor gathering rather than a coordinated decoration. Keep the figures clearly visible from the sidewalk for maximum impact.

      For a more convincing appearance, secure the sheets beneath each chair so wind does not send them across the lawn. Leave the bottoms slightly uneven and loose to create natural-looking ghost shapes instead of perfectly formed figures. A small side table, outdoor cushion, or potted plant can make the scene feel connected to a real patio. Keep colors simple with white fabric against green grass, wood, and autumn accents. I’ve noticed that adding ordinary accessories is what makes character-based decorations feel funny rather than generic. After dark, use soft porch lighting to preserve the relaxed atmosphere without making the display look overly dramatic.

    • 17 DIY Halloween Decor Outdoor Ideas to Make Your Yard Eerie

      17 DIY Halloween Decor Outdoor Ideas to Make Your Yard Eerie

      Your yard doesn’t need expensive decorations to become the spookiest spot on the street. A few clever DIY touches can completely change the atmosphere.

      These diy halloween decor outdoor ideas are designed to help you turn an ordinary porch, walkway, garden, or front yard into a memorable Halloween display without making it feel overdone. From crooked graveyards and oversized spiderwebs to eerie ghosts, skeletons, witchy details, and glowing accents, there’s something for every style and budget. I’ve noticed that the most effective outdoor Halloween decorations often use simple materials in unexpected ways. As you explore these ideas, you’ll find practical inspiration you can actually recreate and adapt to your own space.

      Crooked Graveyard

      • Use uneven tombstone shapes for a naturally spooky look.
      • Paint simple cracks and faded lettering for weathered detail.
      • Mix tall and short markers to create visual depth.
      • Add faux moss or fallen branches around the bases.
      • Use low lighting to make the display glow after dark.

      Want your yard to look spooky without spending a fortune? A crooked graveyard is one of the easiest ways to turn an ordinary lawn into a Halloween scene. Use inexpensive foam board, cardboard, or reclaimed wood to create tombstones in different shapes, then paint them in charcoal gray with weathered white lettering. Add a few faux cracks and uneven edges for age. Place the markers at varied angles rather than in straight rows. In my experience, asymmetry makes outdoor decorations feel more believable, especially when combined with scattered leaves, low fog, and warm pathway lights.

      For a convincing graveyard effect, vary the height and spacing of each marker so the display feels naturally aged. Keep the tallest pieces toward the back and smaller stones near the walkway, creating depth without blocking the entrance. Solar spotlights can highlight lettering after dark, while battery candles tucked behind stones add subtle flickering light. You can also surround the display with inexpensive moss, fallen branches, or dark mulch. The finished arrangement transforms a flat front lawn into a layered Halloween focal point that photographs beautifully during both daylight and evening hours.

      Oversized Spiderwebs

      • Stretch large webs across railings, columns, or fences.
      • Mix spider sizes to create a more natural arrangement.
      • Concentrate decoration around the entrance for stronger impact.
      • Choose weather-resistant materials for outdoor use.
      • Use existing porch lights to highlight the web texture.

      A spooky entrance becomes much more memorable when the walkway itself feels like part of the Halloween display. Create oversized black spiderwebs across porch railings, columns, or a nearby fence using weather-resistant cord or webbing. Add several lightweight spiders in different sizes, keeping the largest near the doorway for a strong focal point. White webbing stands out beautifully against dark siding, brick, or greenery. This setup is especially useful for small porches because it draws attention upward instead of taking valuable floor space. The result feels dramatic while remaining inexpensive and easy to install.

      Keep the web arrangement loose and irregular rather than covering every surface evenly. Start with a few large web shapes, then layer smaller strands around them to create believable depth. Choose spiders with different body sizes and positions so they appear to be moving across the scene. Warm porch lighting can reveal the texture at night, while cool daylight makes the white webbing crisp and graphic. I’ve noticed that concentrating decoration around the doorway creates more impact than spreading small pieces across the entire house. A simple black doormat and a few dark planters can finish the look.

      Layered Pumpkin Steps

      • Combine pumpkins in several sizes and shapes.
      • Mix orange, white, green, and unusual seasonal shades.
      • Elevate smaller pumpkins with crates or low stools.
      • Use LED candles for a safe evening glow.
      • Keep the doorway clear for everyday use.

      Turn an ordinary front porch into a glowing Halloween focal point with a collection of carved pumpkins arranged at different heights. Mix traditional orange pumpkins with pale white, green, and deep blue varieties to create a more modern display. Use simple carved faces on some pumpkins and leave others uncut for shape and color contrast. Place them along the steps, beside planters, and around the door rather than clustering everything together. This approach works for both large and small entrances because the arrangement can expand or shrink without losing its visual balance.

      For a polished pumpkin display, combine several sizes and shapes instead of buying identical decorations. Add a few LED candles inside the carved pumpkins so the faces glow safely after sunset. A wooden crate, low stool, or overturned planter can elevate smaller pumpkins and create useful height variation. Keep the surrounding décor restrained so the pumpkin colors remain the stars. During the day, natural light highlights their textures and stems; at night, warm illumination creates a welcoming Halloween atmosphere. The finished porch feels festive and layered without becoming overly crowded or difficult to maintain.

      Witchy Window Silhouettes

      • Cut simple witch shapes from black cardboard or foam board.
      • Place silhouettes behind windows for an easy nighttime effect.
      • Add a small moon shape for stronger contrast.
      • Use interior lamps to create the backlit appearance.
      • Keep the shapes simple so they read clearly from outside.

      Give your windows a spooky transformation with simple black silhouettes that become dramatically visible after sunset. Cut witches, cats, bats, or crooked branches from lightweight black board and position them against the inside of the glass. When a lamp is turned on behind the silhouettes, the figures appear naturally backlit from the street. This idea is inexpensive and particularly useful when you want Halloween impact without covering the entire exterior. I’ve noticed window decorations can make a house feel much more finished because they add visual interest at eye level while leaving the porch uncluttered.

      For a modern look, avoid filling every window with identical shapes. Choose one large silhouette for the main window and smaller supporting shapes for nearby windows. A warm white lamp behind the glass provides enough contrast without creating harsh glare. You can also add a simple crescent moon or scattered bats to build a small nighttime scene. Keep the surrounding curtains open enough for the silhouettes to remain visible from outside. During daylight, the shapes stay subtle, while evening illumination transforms them into a clean, graphic Halloween feature that works beautifully with contemporary home exteriors.

      Hanging Ghost Porch

      • Use lightweight white fabric for soft ghost shapes.
      • Hang figures at different heights around the porch.
      • Keep faces simple with dark circular eyes.
      • Add subtle movement by placing them near natural airflow.
      • Use warm porch lighting to illuminate the fabric.

      Create a playful Halloween entrance by turning lightweight white fabric into floating ghost figures. Rather than making every ghost identical, vary their sizes, heights, and facial expressions so the arrangement feels more spontaneous. Hang them from porch beams, tree branches, or sturdy hooks around the entrance, leaving enough space for people to walk underneath safely. Black felt or fabric can create simple eyes without making the ghosts look overly cartoonish. This setup is particularly effective for homes with covered porches because the fabric catches gentle evening movement. The result feels festive, recognizable, and surprisingly inexpensive.

      Choose breathable, weather-resistant fabric if the ghosts will remain outside for several days. Keep the faces large enough to be visible from the street, but avoid adding too many details that disappear at night. Arrange the tallest ghosts toward the back and smaller figures closer to the walkway to create depth. Warm outdoor bulbs can illuminate the fabric softly, while cooler moonlight adds natural contrast. If your porch has limited space, hang just two or three figures instead of filling the entire area. A restrained arrangement often looks more intentional and photographs better.

      Black Cat Walkway

      • Create oversized cat silhouettes from lightweight board.
      • Position cats along the walkway at different angles.
      • Use matte black surfaces for a clean modern appearance.
      • Add small reflective eyes for nighttime visibility.
      • Pair the silhouettes with simple ground-level lighting.

      Make the path to your front door feel unexpectedly mysterious with a series of oversized black cat silhouettes. Cut different feline shapes from corrugated plastic, foam board, or sturdy cardboard, then secure them along the walkway so they appear to peek from flower beds and shrubs. Use matte black paint for a modern finish and add small reflective or painted eyes for subtle nighttime detail. This idea works particularly well around existing landscaping because the silhouettes can appear naturally hidden among plants. It adds Halloween personality without requiring large inflatables or bulky decorations.

      Vary the poses so some cats appear seated, others crouched, and one or two seem to be looking toward the house. Keep the silhouettes slightly different in scale to avoid a repetitive pattern. Small solar lights positioned near the ground can illuminate the figures without washing out their dark shapes. During the day, the cats create crisp graphic accents against green plants, while after sunset their outlines become more mysterious. I’ve seen simple silhouette displays work especially well when they follow an existing walkway because they guide attention naturally toward the entrance.

      Skeleton Seating

      • Turn ordinary outdoor chairs into spooky focal points.
      • Use lightweight skeleton props that can be removed easily.
      • Add blankets or hats for a more playful character.
      • Position figures where visitors naturally notice them.
      • Keep pathways clear around the seating area.

      Give your porch seating a Halloween makeover by turning an ordinary chair or bench into a spooky character display. Place a realistic skeleton casually in the seat, then add a simple hat, scarf, or old blanket to make the arrangement feel intentionally styled. Instead of covering the entire porch with decorations, let the seated figure become the main focal point. This works especially well for smaller outdoor spaces because the decoration uses furniture you already own. The combination of a familiar seating area and an unexpected skeleton creates humor while keeping the overall arrangement simple.

      Choose a chair with a strong silhouette, such as a wooden armchair, porch rocker, or simple black metal seat. Position the skeleton naturally rather than making it stand stiffly, and angle its head slightly toward the walkway. Add one seasonal accessory that introduces personality without overwhelming the scene. A neutral outdoor rug and a few understated plants can keep the setting contemporary. For evening photos, use a nearby floor lantern or porch light instead of harsh colored lighting. The result feels like a real outdoor seating area that happens to have an amusing Halloween visitor.

      Floating Witch Hats

      • Hang lightweight hats at different heights.
      • Use fishing line for a nearly invisible suspension effect.
      • Mix black hats with a few deep-colored accents.
      • Concentrate them above the porch or doorway.
      • Add small lights nearby for evening visibility.

      Create an unexpected overhead display by suspending pointed witch hats above your porch or entryway. Lightweight black hats can be attached to nearly invisible fishing line and arranged at different heights, creating the illusion that they are floating in midair. For a more modern appearance, mix traditional black with one or two hats in deep plum, charcoal, or midnight blue. This idea is especially useful when floor space is limited because the decoration uses the vertical area above the entrance. It adds Halloween character while keeping the rest of the porch open and functional.

      Space the hats unevenly so they feel naturally suspended rather than arranged in a perfect grid. Keep the lowest pieces high enough that visitors can comfortably walk beneath them. Small warm-white string lights can be woven discreetly along the porch ceiling, illuminating the hats without changing their dark appearance. During daylight, the clean silhouettes create a graphic architectural feature, while evening lighting makes the display feel more mysterious. I’ve noticed that overhead decorations can make a small porch appear more visually layered because they draw the eye upward and create depth without adding furniture or clutter.

      Haunted Mailbox

      • Transform an everyday mailbox into a Halloween focal point.
      • Use removable vinyl shapes for easy decoration.
      • Add faux cobwebs sparingly around the post.
      • Choose weather-resistant details for outdoor durability.
      • Keep the mailbox opening fully accessible.

      Even the smallest outdoor detail can become part of your Halloween decorating plan, and the mailbox is an easy place to start. Wrap the post with a few strands of faux webbing and add removable black or white vinyl shapes around the mailbox itself. A pair of eerie eyes, a small bat silhouette, or simple ghost lettering can create personality without making the decoration complicated. This works particularly well for homes without large porches because it extends the seasonal look toward the street. The result feels intentional and cohesive while leaving your main entrance available for larger decorations.

      Keep the mailbox functional by avoiding decorations around the handle, flag, or opening. Choose weather-resistant vinyl and secure lightweight webbing so wind does not create a messy appearance. A small battery-powered lantern beneath the mailbox can provide subtle illumination after sunset. For a contemporary look, keep the palette restrained with matte black, ivory, and one accent shade such as burgundy. Position the mailbox decoration so it remains visible from the driveway and sidewalk. This small project proves that effective Halloween décor does not always require a large display or expensive materials.

      Mummy Doorway

      • Wrap the doorframe with torn white fabric strips.
      • Add oversized eyes for an instantly recognizable focal point.
      • Use warm lighting to highlight the layered fabric.
      • Keep the center of the doorway completely clear.
      • Combine ivory fabric with charcoal accents for a modern finish.

      Turn a plain front entrance into a playful Halloween feature by transforming the doorway into a giant mummy. Wrap torn strips of gauze or lightweight white fabric around the outer frame, leaving enough space for the door to open normally. Add two oversized dark eyes near the upper section to create the recognizable face. The slightly uneven fabric makes the display feel handmade rather than mass-produced. This is a particularly useful idea for narrow entrances because it decorates the vertical frame instead of filling valuable porch floor space.

      For a more contemporary result, avoid covering every inch of the door with fabric. Keep the actual door visible and concentrate the mummy effect around the trim, allowing the architectural lines to remain clear. Use ivory rather than bright white fabric for a softer appearance, then add charcoal or black details around the eyes. Warm wall sconces or existing porch lights will emphasize the fabric texture after sunset. Secure every strip firmly against wind and weather, especially around the top corners. The finished doorway becomes a playful Halloween focal point while remaining practical for everyday entry.

      Ghost Balloon Cluster

      • Combine white balloons in several sizes for an organic shape.
      • Draw simple expressions with removable black markers.
      • Use transparent balloons to create visual variation.
      • Anchor the cluster securely against outdoor wind.
      • Keep the arrangement beside the entrance rather than blocking it.

      Give your porch a lighter, more playful Halloween look with a cluster of ghost balloons in different sizes. Use matte white balloons as the main shapes, then add simple black eyes and expressions with removable markers. Mix small, medium, and oversized balloons so the group feels organic rather than perfectly uniform. A few transparent balloons filled with tiny white paper pieces can add another layer without introducing a completely different theme. This decoration works beautifully for families because it feels festive and cheerful while still clearly communicating Halloween from the street.

      Place the balloon cluster beside the doorway, around a porch column, or near a staircase instead of directly across the entrance. Use strong outdoor anchors and avoid leaving loose strings where visitors could trip. For a more sophisticated palette, pair white balloons with a few transparent and smoky-gray pieces rather than relying on bright orange. Soft daylight will keep the display airy, while warm evening lighting creates gentle shadows across the balloons. I’ve noticed that oversized balloons photograph especially well from slightly below eye level because they create a fuller, more dimensional composition.

      Black Lantern Path

      • Line the walkway with simple dark lanterns.
      • Use LED candles for safe evening illumination.
      • Mix lantern heights for a layered effect.
      • Keep spacing even enough for safe walking.
      • Add a few fallen leaves instead of extra decorations.

      Create a dramatic Halloween walkway using a series of black lanterns instead of filling the yard with large decorations. Choose lanterns with simple metal frames and place them along both sides of the path at varying heights. Add warm LED candles inside to create a soft glow after sunset. The restrained black-and-amber palette feels sophisticated and works especially well with modern, farmhouse, or traditional exteriors. Because the display follows an existing walkway, it naturally guides visitors toward the front door while creating a strong visual line from the street.

      For the best effect, keep the lanterns close enough to create continuity but far enough apart that the pathway remains comfortable to use. Alternate taller lanterns with shorter versions to prevent the arrangement from looking too rigid. You can scatter a few dried leaves around the bases for seasonal texture without adding another major decoration. Avoid real flames outdoors, especially near dry foliage or fabric. During the day, the black frames provide clean architectural accents; after dark, the warm candlelight transforms the path into an inviting yet distinctly Halloween-inspired entrance.

      Witch Hat Planters

      • Turn existing porch planters into simple Halloween accents.
      • Use tall hats for vertical height without bulky décor.
      • Choose different flowers for a more natural arrangement.
      • Secure lightweight hats against wind.
      • Keep the planter colors coordinated with your home’s exterior.

      Give ordinary porch planters a clever Halloween update by turning them into oversized witch hats. Place a lightweight black witch hat over the top of each planter, allowing the flowers or foliage to spill naturally from the opening. Instead of adding several unrelated decorations, let the plants provide the color, using combinations such as dusty pink flowers, deep purple blooms, or trailing green leaves. The idea works particularly well for modern entrances because the tall pointed shapes create height while the greenery keeps the display fresh and connected to the existing landscape.

      Choose planters with different heights or shapes to create a relaxed layered arrangement. A matte-black hat works well with stone, concrete, terracotta, or neutral planters, while small metallic buckles can add a subtle finishing detail. Secure the hats with hidden clips or garden wire so they remain in place during windy weather. Place the arrangement beside the front door or along the porch edge rather than blocking the walkway. During daylight, the combination looks playful and decorative; after sunset, small landscape lights can softly illuminate the plants and silhouettes.

      Skeleton Garden Party

      • Place skeletons among existing flowers and shrubs.
      • Give each figure a different seated or standing pose.
      • Add simple garden tools for humorous character.
      • Use natural greenery as the main background.
      • Avoid overcrowding the planting beds.

      Turn an ordinary garden bed into a humorous Halloween scene by positioning realistic skeleton figures among existing plants. Instead of arranging them in a formal display, give each skeleton a different pose: one can sit on a garden bench, another can lean against a planter, and another can hold a small gardening tool. This makes the decoration feel like an unexpected discovery within the landscape. The idea works particularly well when your yard already has established greenery because the natural plants soften the skeletal forms and create an interesting contrast between living foliage and spooky details.

      Keep the skeletons slightly separated so each figure remains visible rather than becoming one crowded cluster. Choose accessories that match the garden setting, such as a small watering can, hand trowel, sun hat, or empty plant pot. A weathered wooden bench can become the central anchor while shrubs and flowers frame the scene naturally. Use daylight for a cheerful, slightly absurd appearance, then add discreet ground lighting for evening visibility. I’ve noticed that outdoor Halloween displays often look more convincing when decorations interact with existing landscaping instead of completely replacing the garden’s natural character.

      Spider Egg Sac

      • Create one oversized webbed bundle as a dramatic focal point.
      • Use white or cream fabric for a realistic texture.
      • Add small spiders around the surrounding area.
      • Hang it from a sturdy tree branch or porch beam.
      • Keep the display away from high-traffic walking paths.

      For a more unusual Halloween display, create the unsettling appearance of a giant spider egg sac hanging outdoors. Use layers of stretched white fabric, gauze, or synthetic web material to form an irregular cocoon-like bundle, then attach several small artificial spiders around its surface. A single oversized sac is enough to create the focal point, making this idea useful when you want something more distinctive than traditional pumpkins and ghosts. Hang it from a sturdy tree branch, pergola, or covered porch beam where its unusual shape can be seen clearly.

      The key to making this decoration believable is avoiding a perfectly round or symmetrical shape. Let the fabric overlap unevenly and create subtle folds, then vary the size and placement of the spiders. A natural tree canopy provides a strong dark-green backdrop during daylight, while a small spotlight from below can create dramatic shadows after sunset. Keep the color palette limited to ivory, charcoal, and natural greens so the texture remains the focus. Secure the entire structure carefully and position it away from areas where guests might brush against it.

      Floating Witch Broom

      • Hang old-fashioned brooms beside the front entrance.
      • Use different broom sizes to create visual movement.
      • Add natural twine for a rustic handmade detail.
      • Position them against a contrasting exterior wall.
      • Keep the arrangement simple for a cleaner modern look.

      Add an unexpected Halloween detail to your entrance with a collection of floating witch brooms. Use lightweight decorative brooms made from natural branches, raffia, or dried grass, then suspend them vertically or diagonally beside the doorway. Unlike large inflatables, this idea uses very little space while still creating a recognizable seasonal statement. Choose several broom shapes and lengths rather than identical pieces. The natural brown textures work beautifully against painted siding, stucco, brick, or concrete, giving the display an earthy character that feels different from the usual orange-heavy Halloween decorations.

      Arrange the brooms at slightly different angles so they appear to be casually parked rather than perfectly aligned. Natural jute twine or discreet hooks can secure them without distracting from their shapes. Keep the surrounding décor minimal, perhaps adding one simple planter or a small lantern for balance. Soft daylight highlights the rough textures of the branches and raffia, while a nearby warm wall light gives them definition after sunset. For a more contemporary appearance, pair the natural broom materials with a clean charcoal or white exterior rather than adding multiple competing colors.

      Haunted Tree Eyes

      • Turn an existing tree into a simple spooky focal point.
      • Use removable materials that will not damage the bark.
      • Choose oversized eyes for visibility from the street.
      • Add subtle ground lighting beneath the canopy.
      • Keep surrounding landscaping mostly natural.

      Give an ordinary tree a surprisingly expressive Halloween makeover with oversized glowing eyes tucked between its branches. Instead of covering the entire tree with decorations, use two large lightweight eye shapes positioned at different heights to create an unexpected focal point. White or pale cream surfaces work well during daylight, while hidden LED lights can make them glow after dark. This idea is especially effective for mature front-yard trees because the existing branches provide the structure naturally. The result feels playful and slightly eerie without requiring a large collection of purchased decorations.

      For a realistic outdoor setup, attach the eyes carefully using removable straps or soft ties rather than nails or anything that could damage the bark. Position the eyes where they remain visible through the branches but still look integrated with the tree. A discreet spotlight pointed upward can illuminate the trunk and surrounding foliage after sunset. Keep the rest of the yard relatively simple so the tree remains the visual centerpiece. I’ve noticed that using one oversized feature often creates more impact than covering every available surface, especially when the decoration works with the home’s existing landscape.

      Transform Your Yard With Easy Halloween Ideas 

      A spooky outdoor setup doesn’t have to be complicated to make a big impression. With these diy halloween decor outdoor ideas, you can turn everyday spaces into creepy, creative displays using simple supplies and a little imagination. Choose one small project or combine several ideas to create a full Halloween scene around your home. I’ve seen how small changes can completely transform a porch or yard, especially when lighting and placement are used thoughtfully. Save this post on Pinterest so you can come back when decorating time arrives, try your favorite ideas, and share this inspiration with someone planning their own spooky space. 

    • 18 College Halloween Costume Ideas Everyone Will Love

      18 College Halloween Costume Ideas Everyone Will Love

      Halloween in college is the perfect excuse to dress up, get creative, and make memories with your friends. But finding a costume that feels fun without looking basic can be surprisingly difficult.

      These college halloween costume ideas are packed with easy, recognizable, and photo-friendly looks that work for roommates, couples, friend groups, or solo partygoers. You’ll find everything from funny group concepts and nostalgic characters to clever costumes you can put together with clothes and supplies you already have. In my experience, the best college costumes are the ones that are easy to recognize but still have a personal twist. Whether you’re heading to a campus party, going out with friends, or planning a group photo, these ideas can help you find a look worth remembering.

      Cereal Mascot Crew

      • Bright cereal-inspired colors make the costume instantly recognizable.
      • Cardboard box shapes add humor without requiring complicated sewing.
      • Roommates can choose different cereal characters for variety.
      • A giant spoon or milk carton makes a fun group prop.
      • Comfortable shoes keep the costume practical for parties and campus walks.

      Want a costume that gets laughs without turning into a complicated DIY project? A cereal mascot look is an easy win for college parties because everyone recognizes the playful breakfast theme instantly. Choose bright colors, a simple box-shaped accessory, and one exaggerated prop, then keep the rest of the outfit comfortable for walking between dorms, apartments, and parties. Matching pieces are optional, so roommates can coordinate without looking identical. In my experience, recognizable costumes photograph better when the main colors are bold and the accessories stay simple. The result feels funny, casual, and surprisingly polished.

      Start with a regular outfit in the mascot’s signature colors, then add cardboard, felt, foam board, or printable labels for the recognizable details. A roommate can become a spoon, milk carton, or giant cereal bowl to make the group more entertaining. Keep shoes practical and avoid bulky pieces that make crowded rooms difficult to navigate. For photos, use a campus walkway, dorm lounge, or colorful kitchen backdrop where the costume’s shapes stand out clearly. A few playful poses, oversized props, and contrasting colors can make the final pictures feel spontaneous rather than overly staged or store-bought.

      Traffic Cone Squad

      • Orange clothing creates an instantly noticeable costume base.
      • Reflective tape adds realistic road-marker details.
      • Each roommate can customize the look with different safety accessories.
      • Lightweight foam or cardboard keeps the costume easier to wear.
      • Parking lots and brick walkways make strong photo backdrops.

      The best campus costumes are often the ones people understand in one glance, and a giant traffic cone delivers exactly that reaction. The simple shape makes it easy to build from orange clothing, reflective tape, and lightweight foam or cardboard. Add a black-and-white street-sign detail or a tiny safety vest for extra personality. This idea works especially well for roommates because each person can choose a different road-related accessory. Keep the base outfit comfortable enough for a long night, especially if you will be walking outdoors. The finished look is bold, funny, inexpensive, and instantly recognizable in photos.

      Use orange as the dominant color, then add silver reflective strips to create the visual effect of a real road marker. A black mini sign, white lettering, or toy caution barrier can become a playful prop without making the outfit cumbersome. For group photos, place taller cones behind shorter ones to create a layered composition. I’ve noticed simple costumes often get more attention when one exaggerated detail becomes the focal point. Photograph the group near campus stairs, a parking area, or a brick walkway, where the bright orange shapes contrast naturally with the surroundings and create strong visual separation.

      Laundry Basket Look

      • A laundry basket shape creates instant college-dorm humor.
      • Colorful socks and towels make the costume visually playful.
      • Detergent bottles work as simple, recognizable props.
      • Flexible materials make the outfit easier to move around in.
      • A dorm laundry room creates an authentic setting for photos.

      Nothing says college-party creativity like turning a familiar dorm essential into a costume, and a giant laundry basket is especially easy to recognize. Wear neutral or pastel clothing underneath, then build a lightweight basket shape around the torso using flexible plastic mesh or painted cardboard. Add oversized socks, towels, or shirts around the edges for a funny overflowing effect. This idea works for roommates, couples, or small groups because everyone can represent a different laundry-day problem. The casual theme also feels appropriate for campus life, making it comfortable, relatable, and naturally funny without requiring elaborate makeup or complicated construction.

      For the strongest visual effect, choose a large basket shape with visible weave texture, then fill the top with colorful clothing pieces that look slightly chaotic but intentional. One person can carry detergent as a prop while another wears a giant missing-sock accessory. Use a dorm laundry room, hallway, or bedroom as the setting, with bright overhead lighting softened by nearby lamps. In my experience, adding real everyday objects makes humorous costumes feel more believable in photos. Keep the structure lightweight and secure so you can sit, move, and dance comfortably throughout the night without constantly adjusting the costume.

      Creepy Doll Duo

      • Vintage dresses instantly create a recognizable doll-inspired look.
      • Matching wigs make the duo feel intentionally coordinated.
      • Pale makeup and exaggerated lashes add a playful spooky touch.
      • Old-fashioned shoes and tiny handbags complete the character styling.
      • A dorm hallway or apartment entryway works beautifully for photos.

      A creepy doll duo can turn a simple Halloween outfit into something much more memorable. Start with vintage-inspired dresses, then exaggerate the doll details through curled hair, pale makeup, Mary Jane shoes, and tiny handbags. The contrast between sweet clothing and slightly unsettling styling gives the costume personality without requiring expensive pieces. It also works beautifully for best friends because both outfits can share the same aesthetic while using different colors or accessories. For college parties, keeping the base clothing comfortable is important, so focus the creativity on makeup, hair, and a few recognizable accessories rather than restrictive costume pieces.

      The easiest way to make this look convincing is to create deliberate symmetry between the two outfits. Choose related fabrics such as lace, satin, or cotton, then vary the colors so each person still feels individual. A dorm corridor, apartment staircase, or old brick building can provide a naturally atmospheric background. I’ve noticed that vintage-inspired costumes photograph especially well when the setting has warm lamps and textured surfaces instead of a plain wall. Keep expressions playful rather than overly serious, and add small details like ribbons, bows, miniature purses, or mismatched stockings to make the final look feel collected rather than generic.

      Sims Character Group

      • Green plumbobs instantly communicate the video-game reference.
      • Everyday outfits keep the costume comfortable for parties.
      • Each person can create a different personality through clothing.
      • Simple headpieces provide the main visual recognition.
      • A dorm room setting reinforces the playful gaming theme.

      Why wear a complicated costume when one clever accessory can explain the entire concept? A Sims-inspired group turns ordinary college clothing into a recognizable gaming costume with minimal effort. Each friend can choose a completely different outfit, personality, or color palette while wearing the same bright green plumbob above their head. That flexibility makes it especially useful for groups who do not want to coordinate clothing. The costume also stays comfortable throughout a long night because the main outfit can simply be jeans, skirts, sweaters, or party clothes. The result feels clever, recognizable, and naturally suited to college life.

      Make the headpiece the visual focal point by keeping its shape clean, bright, and slightly oversized. Lightweight foam board, cardstock, or craft foam can create the diamond shape without adding much weight. For photos, arrange friends at different heights and avoid having everyone stand in a straight line. A dorm lounge, gaming corner, apartment living room, or campus common area adds context without distracting from the costumes. In my experience, costumes based on recognizable visual symbols are particularly effective for group pictures because viewers understand the reference almost immediately. Add controllers, laptops, or colorful game-inspired props for extra personality.

      Men In Black Crew

      • Black suits create an instantly coordinated group appearance.
      • Sunglasses provide the strongest recognizable accessory.
      • White shirts and narrow ties keep the outfit polished.
      • A small alien prop adds the humorous Halloween element.
      • Matching silhouettes make group photos look clean and cinematic.

      Sometimes the funniest costumes are the ones that look completely serious at first glance. A Men in Black group gives college friends a polished uniform while adding a playful alien reference that makes the Halloween theme obvious. Black jackets, white shirts, ties, and sunglasses are easy to source from existing wardrobes, making this a strong last-minute option. The coordinated silhouette also looks excellent in group photographs because everyone appears visually connected. Add one small alien accessory, toy device, or futuristic prop rather than covering the entire outfit with costume pieces. The result feels stylish, recognizable, and easy to wear all night.

      Keep the clothing fitted but comfortable, especially if you expect to walk between parties or spend time outdoors. Sunglasses can create the signature look, while an inexpensive alien toy or miniature “classified” folder gives the group a humorous detail for photos. For a stronger visual composition, photograph everyone walking together rather than simply standing shoulder-to-shoulder. Use a modern campus entrance, parking structure, or city-style sidewalk as the background. Cool nighttime lighting and reflective pavement can create a cinematic atmosphere, while maintaining natural expressions keeps the image believable instead of making it resemble a professional costume advertisement.

      Retro Diner Duo

      • Bright diner colors make the outfits instantly recognizable.
      • Checkered patterns add strong visual contrast in photos.
      • Vintage aprons and name tags create convincing details.
      • Paper milkshake cups work as inexpensive props.
      • Red sneakers keep the costumes comfortable for parties.

      Bring a little retro energy to Halloween with a diner-inspired duo that feels playful without becoming difficult to assemble. Start with checkered shirts, white aprons, comfortable sneakers, and vintage-style name tags. One person can carry a milkshake while the other holds a tray with fake fries or a burger prop. The recognizable color combination does most of the visual work, while small accessories make the theme obvious. This costume works especially well for college friends because the pieces can often come from regular clothing or thrift stores. It feels coordinated, colorful, comfortable, and easy to personalize.

      For photographs, look for a diner-style restaurant, apartment kitchen, or campus café with strong visual details. Red, turquoise, white, and chrome create a lively palette that stands apart from darker Halloween costumes. Add retro sunglasses, scarves, or simple curled hairstyles if you want a stronger period reference. I’ve noticed that costumes inspired by familiar everyday jobs become much funnier when the accessories are oversized or slightly exaggerated. Keep the outfits relaxed and avoid overly formal pieces so everyone can move comfortably. A tray, milkshake, or handwritten menu board can provide natural posing opportunities.

      Barbie And Ken

      • Pink and pastel clothing immediately establishes the theme.
      • Matching sunglasses create an easy visual connection.
      • Each person can choose a different Barbie-inspired personality.
      • Bright accessories make simple outfits look intentional.
      • A colorful convertible-style prop adds playful photo potential.

      Few costume references are as instantly recognizable as Barbie and Ken, especially when the outfits lean into bright color and polished styling. Instead of buying character costumes, build the look from clothing you already own: pink dresses, pastel shirts, sunglasses, heels, sneakers, or coordinated accessories. The goal is not perfect imitation but a clear visual reference. This makes the idea flexible for different personalities and budgets. For college parties, the outfits can remain fashionable rather than theatrical, which means they transition easily from Halloween photos to dinner, campus events, or evening gatherings without feeling uncomfortable.

      Make the visual contrast stronger by giving each person a distinct color story while keeping one or two accessories coordinated. A pink handbag, heart-shaped sunglasses, pastel sneakers, or bright jewelry can quickly reinforce the concept. For group pictures, use a colorful wall, campus lawn, apartment balcony, or parking area rather than a plain room. Natural daylight works especially well because it keeps clothing colors vibrant. In my experience, fashion-based costumes look more convincing when the styling feels intentional from head to toe, so pay attention to shoes, hair, accessories, and posture rather than focusing only on the main outfit.

      Tourist Trap

      • Hawaiian shirts create an instantly recognizable vacation look.
      • Neck wallets add an intentionally awkward college-party detail.
      • Sunglasses and bucket hats complete the tourist styling.
      • Maps or oversized cameras work as humorous props.
      • Bright tropical colors photograph beautifully outdoors.

      Turn ordinary vacation clichés into a deliberately ridiculous group costume with exaggerated tourist styling. Hawaiian shirts, cargo shorts, bucket hats, sunglasses, socks with sandals, and oversized cameras are enough to establish the joke immediately. Add neck wallets, printed maps, travel brochures, or tiny rolling suitcases for extra personality. Each friend can exaggerate a different tourist stereotype while maintaining the same overall theme. The costume is especially practical for college because almost every piece can be found cheaply at thrift stores or in existing wardrobes. It is comfortable, recognizable, and easy to wear throughout a crowded Halloween event.

      For the funniest photos, avoid making everyone pose perfectly. Have one person unfold a giant map, another inspect a camera, and another dramatically point toward an imaginary attraction. A campus walkway, brick courtyard, or outdoor staircase provides a believable travel backdrop while still showing the college setting. Use strong daylight to bring out the tropical shirts and colorful accessories. That contrast between vacation clothing and an ordinary university environment creates the humor. I’ve seen simple group costumes become much stronger visually when everyone commits to a slightly different character instead of wearing identical outfits.

      Ghosted Texts

      • White sheets create the classic ghost silhouette.
      • Phone-shaped props make the college reference obvious.
      • Black lettering adds a simple graphic element.
      • Sneakers keep the costume practical for walking.
      • A dorm hallway makes the concept feel naturally campus-related.

      A classic ghost costume becomes much funnier when it connects to modern dating culture. Create simple white ghost outfits, then add oversized smartphone props showing fictional unread or ignored messages. Keep the text minimal so the visual idea remains understandable from a distance. Each person can represent a different texting situation through small accessories or expressions. This approach works particularly well for college students because the reference feels familiar without requiring complicated construction. Use lightweight sheets or fabric with carefully placed openings for visibility and movement. The finished costume combines a classic Halloween symbol with an everyday social joke.

      For safety and comfort, make sure the fabric does not cover the feet or restrict peripheral vision. Instead of cutting complicated shapes, use a lightweight white poncho-style base and attach the phone graphic to the front. A dorm corridor, apartment lobby, or campus walkway can provide a believable setting. Keep the background relatively simple so the white costumes remain the strongest visual element. Warm indoor lighting creates a cozy Halloween atmosphere, while dark accessories provide contrast. A few pumpkins or paper bats can complete the scene without overwhelming the central joke or turning the photograph into a themed set.

      Clueless Clique

      • Plaid outfits instantly create a recognizable fashion reference.
      • Knee socks add a playful school-uniform detail.
      • Mini handbags complete the coordinated styling.
      • Different plaid colors prevent the group from looking identical.
      • A campus staircase works as a natural photo location.

      A coordinated plaid group creates a polished Halloween look while keeping the humor rooted in recognizable pop-culture fashion. Choose different plaid patterns in yellow, red, green, or pink, then combine them with sweaters, knee socks, loafers, and small handbags. The outfits should feel inspired rather than identical, allowing every person to express a different personality. This is a strong option for college friends who enjoy fashion but still want their costume to photograph clearly. The structured color palette also makes group pictures visually cohesive without requiring everyone to purchase matching costumes or complicated accessories.

      To make the reference easier to recognize, pay attention to styling details such as knee-high socks, miniature bags, simple hair accessories, and coordinated color blocking. A university staircase, library entrance, or brick courtyard provides a believable academic backdrop. Shoot from slightly below eye level so the group appears confident and the outfits remain fully visible. Keep poses playful rather than overly serious, especially if the goal is social-media content. In my experience, fashion-reference costumes benefit from strong composition more than excessive props, so let the plaid patterns, accessories, and group styling carry the image.

      Bob Ross And Canvas

      • A blue button-up shirt creates the recognizable artist base.
      • Curly wigs add immediate visual humor.
      • Mini canvases turn the costume into a complete concept.
      • Paint palettes provide easy interactive props.
      • An easel makes the group photo more visually interesting.

      A painter costume becomes much more memorable when it includes a recognizable artistic personality and a physical canvas. Start with a blue button-up shirt, jeans, sneakers, and a curly wig, then add a palette and small landscape painting. Friends can join as colorful canvases, paintbrushes, or other artists for a larger group concept. The beauty of this idea is that the main outfit remains completely comfortable while the accessories provide the character. It also gives college students an opportunity to create part of the costume themselves, making the final result feel more personal than a packaged Halloween outfit.

      A small easel can become the centerpiece of the photo, especially when the canvas features a simple mountain or nature scene. Place the subject inside an art classroom, dorm common room, or apartment corner with visible creative materials nearby. Natural window light can highlight the paint texture while keeping the photograph realistic. Avoid making the studio excessively decorated because the costume should remain the focal point. A palette covered with believable paint marks, a few brushes, and rolled canvases add authentic details. The overall result feels humorous, creative, and strongly connected to a familiar artistic image.

      M&M Color Crew

      • Individual colors let every friend have a distinct identity.
      • Bright shirts create a strong group composition.
      • Large letter graphics make the reference instantly readable.
      • Matching pants simplify costume planning.
      • Candy-colored accessories make the photos especially Pinterest-friendly.

      A candy-inspired group works because everyone gets a bright individual color while still belonging to one recognizable theme. Choose red, yellow, green, blue, orange, or another bold shade, then add a large white letter graphic to the front of each shirt. Matching pants or skirts keep the costume easy to assemble, while colorful sneakers and accessories reinforce the palette. This is an excellent choice for larger friend groups because additional people can simply claim another color. The costume stays comfortable enough for campus parties, and the bright clothing naturally creates an energetic group photograph without complicated props.

      For a strong visual result, arrange the group according to color rather than height, creating a rainbow-like sequence in the photograph. Use a campus lawn, colorful mural, or outdoor courtyard as the background so the clothing remains visually dominant. Keep accessories relatively simple because too many patterns can compete with the main colors. A few candy bags or oversized sweet-themed props can add humor if desired. Natural afternoon sunlight works particularly well for this concept because it keeps every shade vibrant. The finished photograph should feel cheerful, playful, and immediately understandable even when viewed quickly on Pinterest or social media.

      Pirate Crew

      • Black and burgundy clothing creates an easy pirate palette.
      • Bandanas and eye patches provide recognizable details.
      • Toy treasure maps add a playful group prop.
      • Boots make the outfits feel more complete.
      • Mixed textures prevent the costumes from looking store-bought.

      Give a classic Halloween theme a college-friendly update with a pirate crew built from everyday clothing. Black shirts, dark jeans, boots, scarves, belts, and layered jewelry can establish the foundation without requiring full costumes. Add bandanas, eye patches, toy swords, or rolled treasure maps for recognizable details. Each friend can style the outfit differently while keeping the same dark palette. This makes the idea particularly useful for groups who want coordination without identical clothing. It also allows comfortable movement throughout a party. The finished look feels adventurous, slightly theatrical, and much more personalized than matching packaged outfits.

      Texture makes this costume stronger, so combine denim, worn cotton, faux leather, scarves, and metal-looking accessories. Avoid excessive props that become difficult to carry once the group enters a crowded party. For photographs, a brick building, wooden staircase, or dark campus walkway provides a believable backdrop. Slightly cloudy daylight can create atmospheric shadows while keeping clothing details visible. Have everyone hold a map, point toward the distance, or gather around a small treasure chest for natural posing. I’ve noticed group costumes photograph best when the accessories are connected to an action rather than simply held for decoration.

      Emoji Face Squad

      • Oversized yellow circles create an instantly recognizable group.
      • Different expressions give every person a unique role.
      • Black clothing makes the bright faces stand out.
      • Lightweight foam keeps the costume easy to wear.
      • Simple props can reinforce each chosen emoji.

      Turn digital expressions into a wearable group costume by giving each friend a different oversized emoji face. Use lightweight foam board or cardboard circles, then paint or print recognizable expressions in bold yellow and black. Wear simple black clothing underneath so the faces remain the focal point. One person can carry a phone, another can use sunglasses, and another can hold a heart-shaped prop matching the selected expression. The concept works particularly well for college groups because everyone understands the visual language immediately. It is inexpensive, comfortable, customizable, and easy to photograph from a distance.

      For better pictures, choose expressions with obvious visual differences so the group does not look repetitive. A laughing face, heart eyes, sunglasses, shocked expression, or tongue-out face can create an entertaining sequence. Keep the background uncluttered and use a campus courtyard, dorm entrance, or outdoor walkway. Bright natural light will make the yellow faces pop while preserving realistic skin tones and clothing textures. Slightly angled poses can prevent the circular costumes from appearing flat. The oversized shapes also work beautifully for group selfies because they remain recognizable even when the entire body is not visible.

      Minions Mayhem

      • Yellow tops provide an easy base for the group.
      • Denim overalls create the recognizable silhouette.
      • Round goggles complete the character reference.
      • Different Minion personalities prevent identical costumes.
      • A banana prop adds an obvious humorous detail.

      A Minion-inspired group is perfect when friends want something recognizable, colorful, and comfortable. Yellow shirts or sweaters paired with denim overalls create the foundation, while round goggles and black gloves complete the character reference. Everyone can add slightly different accessories or hairstyles to create individual personalities. A banana becomes the easiest prop and gives the group an obvious humorous element for photographs. Because the base clothing is practical, the costume works well for walking across campus, attending parties, or spending several hours outdoors. The bright yellow palette also stands out strongly against typical dark Halloween outfits.

      Choose slightly different shades of denim or yellow so the group feels coordinated without appearing manufactured. For a more playful photograph, have one person hold a banana overhead while the others react dramatically. A dorm courtyard, campus lawn, or brick building gives the scene authentic college context. Natural daylight works well with the bright yellow clothing, while autumn leaves add seasonal color without competing with the costumes. Avoid oversized goggles that obstruct vision, especially in crowded spaces. In my experience, one recognizable prop is usually enough to reinforce a character-inspired group costume.

      Pac-Man Players

      • Bright primary colors create a strong retro-game aesthetic.
      • Ghost costumes let each friend choose a different color.
      • Black clothing provides an easy neutral base.
      • Foam shapes keep the costume lightweight.
      • Arcade-inspired props make group photos more playful.

      Bring a classic arcade game into real life with a colorful group inspired by Pac-Man and the ghost characters. One person can become the yellow character while friends choose different ghost colors using lightweight fabric or foam shapes. Keep the base clothing black or neutral so the bright silhouettes remain visually dominant. This idea works especially well for college groups because the reference is nostalgic, instantly understandable, and easy to adapt. It also gives everyone a defined role without requiring identical outfits. The bold shapes photograph clearly, making the costume particularly strong for social posts and Halloween party pictures.

      An arcade provides the ideal background because glowing screens, dark walls, and colorful reflections naturally reinforce the retro theme. If an arcade is unavailable, use a dorm gaming room with LED lights and simple game-related props. Photograph the group from a slightly wide angle so the colorful silhouettes remain visible together. Avoid making the costumes excessively large because movement becomes difficult in crowded spaces. A few pixel-inspired accessories can add detail without distracting from the main shapes. The contrast between the bright characters and darker environment creates a visually striking photograph that feels nostalgic rather than overly theatrical.

      Fortune Teller Trio

      • Jewel tones create a rich, mysterious visual palette.
      • Scarves and layered jewelry add believable character details.
      • Crystal-ball props provide a strong photography focal point.
      • Each person can choose a different fortune-telling role.
      • Candlelit settings enhance the mysterious Halloween atmosphere.

      Create a mystical group costume using flowing clothes, layered jewelry, scarves, and dramatic accessories rather than complicated theatrical pieces. Jewel tones such as burgundy, emerald, navy, and purple create a rich Halloween palette while allowing each friend to develop a different look. A crystal ball, tarot-style cards, or small decorative candles can establish the fortune-teller concept immediately. This idea is especially flexible because most of the clothing can be thrifted or reused after Halloween. The finished outfits feel atmospheric without being restrictive, making them suitable for college parties, themed gatherings, and photographs.
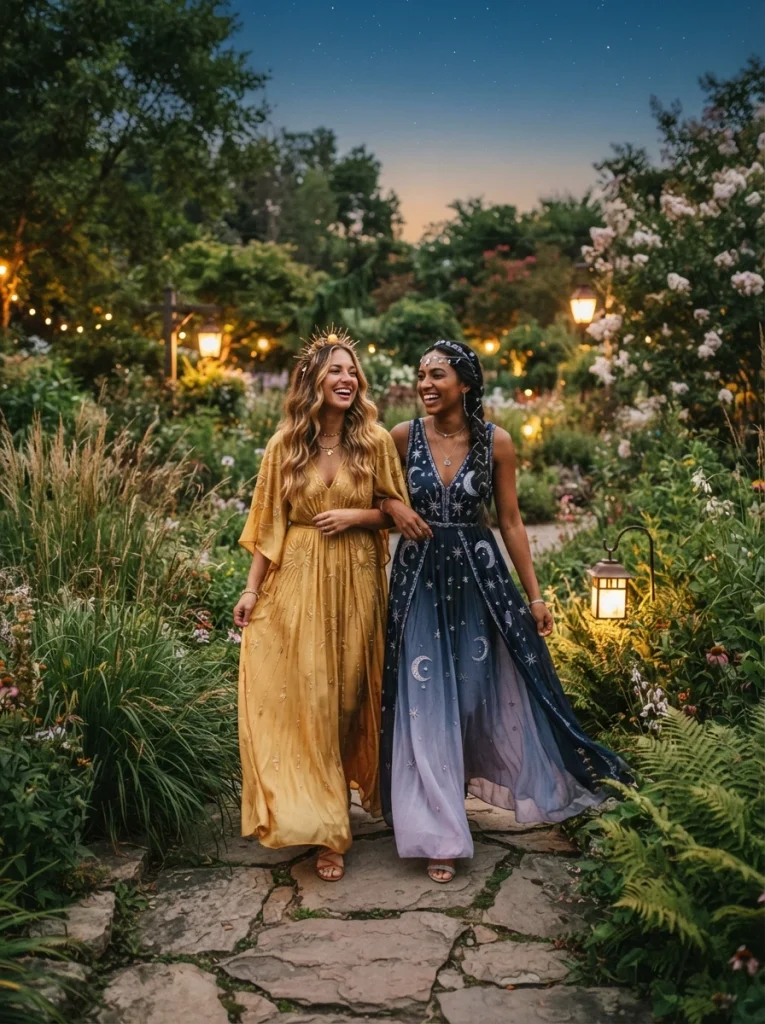
      For the strongest visual composition, arrange a small wooden table between the group members and place the crystal ball or card deck at the center. Use warm lamps or candle-like lighting rather than bright overhead illumination to create depth. Patterned rugs, velvet fabrics, brass accessories, and dark walls can make the setting feel collected and authentic. Keep any real candles safely controlled or replace them with LED alternatives. A slightly low camera angle can emphasize the table and costumes while preserving natural expressions. The final result should feel mysterious, stylish, and distinctly Halloween-inspired without becoming excessively dark.

      Formal Frat Ghosts

      • White formalwear gives the ghost theme an unexpected twist.
      • Black sunglasses create a funny modern contrast.
      • Champagne-style glasses work as simple party props.
      • White sheets can become quick costume accessories.
      • Campus steps provide a strong group-photo composition.

      Combine classic ghosts with exaggerated formal partywear for a costume that feels both polished and ridiculous. Start with white dresses, shirts, suits, or other formal pieces, then add lightweight translucent fabric to suggest ghostly shapes. Black sunglasses create a deliberately modern contrast, while pale makeup keeps the Halloween reference visible. Friends can vary their outfits while maintaining the same white-and-black palette. The concept works especially well for college groups because formalwear is easy to find secondhand or borrow, and the ghost accessories can be created quickly. It is comfortable, funny, recognizable, and suitable for late-night parties.

      Choose an outdoor campus staircase, apartment entrance, or event venue as the photograph location so the formal styling feels believable. Dusk is ideal because warm building lights contrast beautifully with the cooler sky and white clothing. Keep the ghost fabric loose enough for movement but secure it so nobody trips. A few pumpkins or simple Halloween decorations can establish the seasonal setting without overwhelming the outfits. For group photographs, stagger everyone across the steps and use relaxed poses instead of rigid formation. The contrast between elegant clothing and silly ghost details creates the visual joke without requiring complicated makeup or props.

      Find a Costume Your Whole Crew Will Love

      The right costume can turn an ordinary Halloween night into one you’ll talk about long after the party ends. From clever group themes to funny character-inspired looks, these college halloween costume ideas give you plenty of ways to stand out without spending a fortune. Choose an idea that matches your group’s personality, then add your own details through makeup, accessories, or DIY touches. I’ve noticed that costumes feel much more memorable when everyone commits to the theme. Save this post on Pinterest for your planning board, try your favorite look, and share it with friends who still need a costume.

    • 21 Funny Halloween Costumes for Families That Get Big Laughs

      21 Funny Halloween Costumes for Families That Get Big Laughs

      Halloween gets a whole lot more fun when the entire family joins in and the right costume can turn a simple night into a memory everyone talks about. Funny Halloween costumes for families make it easy to coordinate without making every outfit identical. From clever food themes and playful role reversals to nostalgic characters and everyday situations, these ideas are designed to get genuine laughs while still being comfortable enough for kids and adults. Whether you want something simple to DIY or a bold group look for photos, you’ll find plenty of inspiration here. I’ve noticed that the best family costumes are usually the ones with an instantly recognizable idea and a little room for everyone’s personality.

      Classic Cereal Mascots

      • Bright colors make the group instantly recognizable in photos.
      • Each family member can choose a different cereal-inspired character.
      • Cardboard props can make the costumes even more playful.
      • Simple clothing bases keep the outfits comfortable for kids.
      • A shared breakfast theme makes the group look cohesive.

      A cereal mascot theme turns an ordinary family costume into something instantly recognizable and wonderfully silly. Give each person a different character-inspired look using bright pajamas, colorful sweaters, oversized cereal pieces, and playful accessories. The costumes do not need to be exact replicas; recognizable colors and exaggerated props are enough to communicate the joke. I’ve noticed that themes based on familiar childhood favorites work especially well for family photos because everyone understands the concept immediately. They also allow each person to have an individual costume while still creating one coordinated group appearance.

      Keep the outfits comfortable enough for walking, parties, and collecting candy. Parents can take the more elaborate mascot roles, while younger children can wear simple character colors with lightweight accessories. Handmade cardboard cereal bowls, spoons, or oversized cereal pieces can add another layer of humor without requiring expensive costume pieces. For a polished group photo, choose one location with strong autumn decoration and let the colorful costumes provide most of the visual impact. The finished look feels nostalgic, playful, and easygoing, making it a great choice for families who want something funny without complicated construction.

      Parent Kid Mix-Up

      • Switching expected family roles makes the costume instantly funny.
      • Oversized clothing can exaggerate the visual joke.
      • Matching accessories help connect everyone’s outfits.
      • Simple thrifted pieces can create the entire concept.
      • Family photos become funnier when poses emphasize the role reversal.

      Role-reversal costumes are an easy way to create family humor because the joke comes from seeing everyone dressed completely opposite to expectations. Parents can wear oversized school backpacks, playful sweaters, colorful sneakers, or cartoon-inspired accessories, while children wear funny versions of grown-up clothing. The contrast becomes even stronger when everyone poses seriously as though the unusual arrangement is completely normal. In my experience, visual comedy works best when the costumes are simple enough for people to understand instantly. You do not need elaborate makeup or complicated props when the central joke is obvious from the first glance.

      Add small details that exaggerate the swapped roles without making the outfits uncomfortable. A child can carry a briefcase or oversized coffee cup, while a parent carries a lunchbox or wears a cartoon backpack. Avoid fragile props if you will be moving around outdoors. For photographs, try serious expressions, exaggerated posture, or deliberately formal poses to make the situation even more ridiculous. Keep a few shared colors across the outfits so the family still looks coordinated. This idea works particularly well for families who enjoy humor that feels spontaneous, recognizable, and easy to recreate with clothing already at home.

      Matching Potato Heads

      • Interchangeable facial features make every costume slightly different.
      • Neutral clothing creates a simple base for the whole family.
      • Foam or felt pieces keep accessories lightweight.
      • Different hats and glasses can personalize each character.
      • The group looks especially funny when everyone poses together.

      A potato-inspired costume becomes much funnier when every family member gets a different combination of oversized facial features and accessories. Start with simple tan or brown clothing as the base, then add removable felt or foam pieces for eyes, eyebrows, noses, mustaches, lips, and ears. Each person can create a completely different character while keeping the recognizable theme intact. I’ve seen simple handmade costumes like this become memorable because the visual joke is immediate. The concept also works across ages, making it easy for toddlers, older children, parents, and grandparents to participate comfortably.

      Make the accessories lightweight and securely attached, especially for younger children who will be walking around or collecting candy. Add different hats, glasses, bow ties, or wigs to give each character a distinct personality. For group photos, exaggerate the expressions and have everyone stand in slightly different poses so the costumes feel playful rather than identical. A simple neutral background can make the colorful facial pieces stand out, while pumpkins or autumn decorations reinforce the Halloween setting. The result is affordable, recognizable, and intentionally goofy, making it ideal for families who want humor without complicated sewing or makeup.

      Family Group Chat

      • Turn the family into exaggerated smartphone characters.
      • Printed message bubbles make the joke easy to understand.
      • Different poses can represent each person’s personality.
      • Simple solid-color outfits keep the concept visually clear.
      • Oversized phones create a fun prop for photographs.

      Family group-chat costumes turn everyday digital chaos into a funny Halloween concept everyone can recognize. Give each person a different personality from a typical family chat, such as the nonstop texter, the parent sending reminders, the person who only reacts with emojis, or the member who never replies. Use simple clothing with oversized printed message bubbles or phone props to communicate each role. The humor comes from exaggerating familiar habits rather than creating complicated costumes. This makes the idea especially fun for families who already have plenty of inside jokes.

      Make the costumes visually connected by using matching phone-shaped props while giving each person a different message or reaction. One family member could hold a giant thumbs-up, another could carry a dramatic “Where are you?” message, and another could display endless laughing emojis. Keep the props lightweight and easy to carry throughout the evening. For photos, arrange everyone like a real group conversation, with exaggerated reactions and different poses. The result feels playful and personal, allowing the family’s own communication habits to become part of the costume joke without requiring expensive materials or elaborate makeup.

      Tourist Dad Squad

      • Matching vacation shirts make the theme instantly recognizable.
      • Sunglasses and cameras exaggerate the tourist character.
      • Fanny packs provide both humor and practical storage.
      • Kids can carry oversized maps or souvenir props.
      • Different accessories give each family member a distinct role.

      A family dressed as exaggerated tourists can turn ordinary vacation clichés into an easy Halloween laugh. Think loud patterned shirts, oversized sunglasses, comfortable sneakers, camera straps, fanny packs, bucket hats, and ridiculously large maps. One person can play the confused navigator while another becomes the enthusiastic photographer. The concept works because the visual details are instantly familiar, even before anyone explains the joke. I’ve noticed that costumes based on recognizable everyday characters often photograph better than complicated fantasy outfits because the humor is visible through simple clothing, accessories, and exaggerated body language.

      Lean into the comedy with deliberately mismatched vacation accessories and playful poses. Someone can hold a giant map upside down, another can point dramatically toward an obvious destination, and the youngest child can carry a souvenir bag. Keep the clothing comfortable if you plan to spend the evening outdoors. A coordinated color family, such as tropical shirts with khaki bottoms, can keep the group looking intentional despite the exaggerated accessories. Add a toy camera, travel guide, or oversized sunglasses for extra personality. The finished group costume feels lighthearted, affordable, and perfect for families who enjoy recognizable visual humor.

      Breakfast Crew

      • Pajamas make this costume comfortable and easy to assemble.
      • Cereal boxes provide instantly recognizable visual props.
      • Slippers and robes add exaggerated morning personality.
      • Each person can represent a different breakfast favorite.
      • A shared kitchen setting makes group photos especially funny.

      A breakfast-themed family costume turns an ordinary morning routine into a playful Halloween scene. Parents and children can dress as exaggerated breakfast characters using pajamas, robes, slippers, cereal boxes, toast-shaped accessories, fruit costumes, or oversized coffee props. Each person can represent a different breakfast favorite while sharing a common color palette. The idea feels especially approachable because many of the pieces can be created from clothing and household materials. In my experience, simple concepts become much more memorable when everyone commits to the same visual joke and exaggerates their expressions for photographs.

      Give every family member a distinct breakfast role so the group does not look like repeated versions of one costume. One person could become a cereal bowl, another toast, another orange juice, and another a sleepy coffee cup. Use lightweight cardboard or foam for oversized food shapes and avoid sharp edges or difficult-to-carry pieces. Photograph the family around a breakfast table or kitchen island with playful props arranged nearby. The combination of pajamas, food-inspired accessories, and exaggerated morning expressions creates an instantly understandable Halloween joke. It is comfortable, customizable, and especially suitable for families with younger children.

      Oops Wrong Decade

      • Dress every family member in a different exaggerated decade.
      • Mismatched eras make the group photo instantly funny.
      • Thrift-store clothing can create convincing retro looks.
      • Accessories help identify each decade quickly.
      • Keep the poses intentionally serious for stronger visual comedy.

      A family dressed in completely different decades creates an easy visual joke because everyone looks like they arrived from a different point in history. One person can represent the 1950s, another the 1970s, another the 1980s, and someone else the 1990s. Use recognizable clothing silhouettes, hairstyles, sunglasses, and accessories rather than expensive costume pieces. The more confidently everyone commits to their assigned era, the funnier the group becomes. In my experience, exaggerated styling works best when the family keeps a straight face during photos, making the mismatched outfits look intentionally ridiculous.

      Build each decade around a few signature details instead of trying to recreate an entire historical wardrobe. A retro cardigan, oversized glasses, bright windbreaker, denim jacket, or patterned shirt can communicate an era immediately. Thrift stores and existing closets are useful places to find pieces without spending much. For photographs, line everyone up chronologically or create deliberately mismatched poses to emphasize the contrast. Keep footwear comfortable if the costumes will be worn outdoors. The finished family look feels nostalgic, humorous, and highly customizable, giving every person an individual character while still creating one obvious group concept.

      Human Board Game

      • Turn each family member into a recognizable game piece.
      • Oversized cardboard props make the idea photograph well.
      • Bright colors help distinguish different playing pieces.
      • Simple outfits keep movement comfortable.
      • A giant game-board floor can complete the visual joke.

      A human board-game costume transforms the whole family into oversized playing pieces for a Halloween look that feels playful and instantly visual. Choose a familiar game-inspired concept, then assign each person a different role using coordinated shirts, cardboard tokens, dice props, or large printed cards. You can make the pieces yourself from lightweight foam board and fabric, keeping construction manageable. The best part is that everyone contributes to one larger idea while still having an individual costume. This approach works particularly well for families who enjoy games and want a costume that encourages interaction.

      Use exaggerated proportions to make the concept easier to recognize in photographs. An oversized cardboard dice, giant playing card, or colorful game token can become the centerpiece of one person’s outfit. Keep the base clothing comfortable and secure any props carefully so children can move freely. For a group photo, arrange everyone around a homemade board pattern on the floor or pose as though the game is actively underway. Strong contrasting colors can separate each character visually. The result is funny, creative, and highly photographable without requiring advanced crafting skills or elaborate makeup.

      Family Parking Lot

      • Turn everyday traffic frustration into a playful costume.
      • Road-sign props make each character instantly recognizable.
      • Reflective details add visual interest after dark.
      • Kids can become cones, signs, or crossing symbols.
      • Simple clothing makes the costumes comfortable for walking.

      A family traffic-theme costume turns everyday road signs and parking-lot characters into a surprisingly funny Halloween group. Parents can dress as exaggerated parking attendants or drivers, while children become traffic cones, crossing signs, speed-limit signs, or parking meters. The humor comes from turning ordinary objects into people and combining them into one chaotic roadside scene. Use cardboard, foam board, reflective tape, and bright clothing to create recognizable shapes without making the costumes difficult to wear. This idea gives every family member a different role while maintaining one clear visual theme.

      Keep the construction lightweight and make sure signs or props do not block a child’s vision or movement. A bright orange cone costume, oversized directional sign, or humorous parking-ticket accessory can communicate the character immediately. For photographs, arrange the family as though everyone is navigating an imaginary parking lot, with one person looking confused and another directing traffic. Neutral clothing underneath the props keeps the costumes comfortable. Add a few exaggerated road markings to the photo setting if desired. The finished group looks coordinated, ridiculous, and instantly understandable, making it ideal for families who prefer clever humor over traditional spooky costumes.

      Inflatable Family Foods

      • Oversized food costumes make the group instantly noticeable.
      • Each family member can choose a different favorite food.
      • Inflatable designs leave plenty of room for movement.
      • Contrasting food shapes create funny group photos.
      • Matching shoes or accessories can tie the costumes together.

      An oversized food theme can turn the whole family into a walking dinner party, and the exaggerated proportions make the joke immediately obvious. Choose completely different foods for each person, such as a giant pizza slice, taco, hot dog, carton of fries, or bowl of noodles. Inflatable costumes are especially effective because their exaggerated shapes create instant visual comedy. I’ve noticed that food costumes work well for family groups because there is no pressure to make everyone match perfectly. Each person gets a character they like while the overall theme remains obvious.

      Keep the costumes comfortable enough for walking, sitting, and moving through crowded Halloween events. If younger children are participating, choose lightweight options with clear visibility and easy access to their hands. You can make the group even funnier by giving everyone deliberately serious expressions while posing together like a formal family portrait. Choose a simple outdoor background so the colorful food shapes remain the focus. For a coordinated finish, use matching neutral footwear or small accessories across the group. The result is cheerful, recognizable, and easy to photograph, making it a strong choice for families who want humor without complicated costume preparation.

      Social Media Influencers

      • Turn familiar online personalities into exaggerated family characters.
      • Oversized phones create instantly recognizable props.
      • Ring lights add another layer of visual humor.
      • Each person can represent a different content style.
      • Matching accessories make the group feel connected.

      A family influencer theme turns familiar social-media habits into an exaggerated Halloween costume everyone can understand. One person can become a beauty creator with an oversized phone and ring light, another can act like a fitness influencer, while children can represent gaming, dance, cooking, or toy-review personalities. The humor comes from exaggerating everyday online behavior rather than copying a specific real person. In my experience, recognizable modern habits often create stronger laughs because people immediately understand the reference. Keep the costumes playful and fictional rather than depending on exact celebrity impersonation.

      Create oversized props from lightweight cardboard or foam board to make each character visually clear. A giant phone, fake microphone, ring light, selfie stick, or product box can instantly communicate the role. Give each family member a different pose, such as filming, taking selfies, reviewing an imaginary product, or dramatically checking analytics. Keep the base outfits comfortable and coordinated through a few shared colors. For photographs, arrange everyone as though they are simultaneously creating content. The final group becomes a humorous snapshot of internet culture while remaining flexible enough for different ages and personalities.

      One Big Family Pizza

      • Each person represents a different pizza topping.
      • A shared crust design makes the group look connected.
      • Felt toppings are lightweight and easy to attach.
      • Bright colors make the costume highly photographable.
      • A pizza-box prop can complete the family concept.

      A giant family pizza costume works because everyone becomes one part of the same ridiculous meal. Create a large pizza-slice or pizza-topping concept for each family member, using felt, foam, cardboard, or fabric to represent pepperoni, mushrooms, olives, peppers, cheese, or other favorites. Parents can become larger slices while children represent smaller toppings. The concept is funny because the family only makes complete sense when everyone stands together. I’ve seen group food themes work especially well in photographs because strong shapes and colors make the idea readable even from a distance.

      Keep the individual costumes lightweight and flexible so children can walk comfortably and adults can move naturally. Use a consistent cheese-and-crust color foundation, then give each person a different topping for variety. A large cardboard pizza box labeled with a playful fictional name can add another visual joke without requiring complicated construction. For group pictures, arrange everyone in a circle or line as though the pizza has just been assembled. Avoid covering faces with oversized toppings, especially for young children. The finished costume is silly, coordinated, affordable, and perfect for families who want a memorable food-inspired Halloween look.

      Family Emoji Crew

      • Turn familiar emojis into oversized wearable characters.
      • Each person can choose a different expression or symbol.
      • Bright yellow bases make the group instantly recognizable.
      • Foam or felt details keep the costumes lightweight.
      • Matching black outlines make different emojis look cohesive.

      Emoji costumes can turn a familiar digital language into a funny family Halloween group with very little complicated construction. Give each person a different expression, such as laughing, crying with laughter, heart eyes, sunglasses, surprise, or a silly tongue-out face. Use yellow shirts, dresses, or simple tunics as the base, then add large black-and-white facial details with felt or foam. The exaggerated expressions become especially funny when family members pose according to their assigned emoji. This concept gives everyone an individual character while keeping the entire group visually connected.

      Make the facial details large enough to read clearly in photographs but light enough for comfortable movement. You can personalize each character by choosing emojis that match everyone’s personality, which makes the costume feel more intentional. For group photos, have everyone recreate the expression of their emoji using exaggerated body language and facial poses. Keep accessories minimal because the oversized faces already provide plenty of visual interest. A plain background or simple Halloween setting will help the bright costumes stand out. The result is playful, inexpensive, recognizable, and easy to customize for different ages.

      Family Delivery Crew

      • Turn the whole family into a humorous delivery team.
      • Cardboard boxes create simple oversized costume pieces.
      • Matching caps make the group look coordinated.
      • Fake package labels can add personalized jokes.
      • Comfortable clothing keeps the costumes practical for trick-or-treating.

      A family delivery crew costume turns the familiar sight of package deliveries into a playful Halloween group idea. Dress everyone in comfortable neutral clothing with matching caps, lightweight cardboard packages, and humorous fictional delivery labels. Parents can carry oversized boxes while children become smaller parcels, delivery workers, or enthusiastic package receivers. The comedy comes from making an ordinary family activity look like a coordinated professional operation. I’ve noticed that costumes based on everyday experiences often create easy laughs because people recognize the situation immediately without needing an explanation.

      Use empty lightweight boxes and secure them carefully so children can move, see, and use their hands comfortably. Add fictional labels with playful phrases rather than using real company branding. For example, each package can have a silly family-related destination or exaggerated delivery instruction. Take group photos beside a front door or porch decorated with pumpkins to reinforce the delivery theme. Matching sneakers or caps can visually connect everyone even when their individual roles differ. The finished costume is funny, practical, and easy to assemble, making it especially useful for families who prefer simple DIY ideas.

      Human Family Portrait

      • Turn every family member into an oversized framed portrait.
      • Matching frames create a strong group visual.
      • Different poses make each portrait character unique.
      • Lightweight cardboard keeps the costume manageable.
      • Vintage styling adds another layer of visual humor.

      A human family portrait costume takes the idea of a formal family photograph and turns it into an oversized Halloween joke. Create lightweight rectangular frames from cardboard or foam board, then let each person pose inside their own “portrait.” Dress everyone in deliberately mismatched formal outfits, exaggerated vintage clothing, or completely different styles to make the collection feel absurd. The humor comes from treating the family as a gallery of serious portraits. This concept works particularly well for photographs because the frames naturally create a strong visual structure around every person.

      Make each frame slightly different while keeping the overall dimensions similar enough for a cohesive group appearance. Add simple painted details or faux wood textures to make the frames look decorative without making them heavy. Encourage everyone to use exaggeratedly serious expressions and formal poses for the photographs. Children can hold smaller frames or use playful poses to contrast with the adults. Choose a plain wall, porch, or hallway as the background so the framed costumes remain dominant. The finished group looks quirky, creative, and intentionally ridiculous while requiring relatively simple materials and construction.

      Family Office Workers

      • Turn everyday office roles into exaggerated Halloween characters.
      • Name badges make each role instantly understandable.
      • Briefcases and folders create easy visual props.
      • Children can become tiny bosses or office assistants.
      • Serious poses make the concept even funnier.

      A family office costume turns ordinary workplace characters into an exaggerated group comedy. Parents can dress as overly serious executives, while children become tiny managers, interns, receptionists, or exhausted coworkers. Use simple button-down shirts, blazers, ties, skirts, trousers, name badges, folders, and lightweight briefcases to establish each role. The humor comes from treating the entire family like a busy corporate team. I’ve noticed that exaggerated everyday characters often work better than complicated costumes because the joke becomes recognizable through clothing and behavior alone.

      Give each person a ridiculous office personality to make the group more entertaining. One child might carry a giant “important documents” folder, while another wears oversized glasses and pretends to conduct a serious meeting. Parents can pose with coffee cups, clipboards, or toy laptops. Keep the props lightweight and avoid anything that could interfere with walking or visibility. For photographs, arrange everyone around a desk or standing in a mock office meeting, using completely serious expressions. The contrast between professional behavior and family members creates a simple, relatable joke that works especially well for group photos.

      Human GPS Family

      • Turn navigation problems into a recognizable family joke.
      • Oversized arrows make the costumes visually obvious.
      • Different roles allow everyone to participate.
      • Cardboard props are inexpensive and easy to customize.
      • Confused expressions make the group photos more entertaining.

      A human GPS costume turns family navigation chaos into a funny Halloween group idea. One person can become the GPS voice, another the driver, another the passenger who insists they know the way, and a child can become an oversized directional arrow. Use bright directional signs, paper maps, cardboard navigation screens, and simple clothing to communicate each role. The joke becomes even stronger when everyone appears confused despite having several navigation “experts” in the group. This concept feels especially relatable for families who have experienced the classic argument over which road to take.

      Make the visual details oversized enough to be understood in photographs without creating difficult costumes. A large cardboard arrow can be attached safely to clothing, while a parent can carry a giant fictional map or navigation screen. Add humorous destination signs such as “Wrong Turn,” “Snack Stop,” or “Almost There” to personalize the group. During photos, exaggerate the confusion with pointing gestures, dramatic facial expressions, and people facing different directions. Keep the clothing comfortable for outdoor activities and make sure props remain lightweight. The final result is playful, recognizable, and perfect for families who enjoy everyday situational humor.

      Family Game Night

      • Turn familiar tabletop games into wearable characters.
      • Oversized dice create an easy centerpiece for photos.
      • Each person can represent a different game element.
      • Bright accessories add playful visual contrast.
      • A shared game theme keeps mismatched costumes cohesive.

      A family game-night costume turns a familiar evening activity into a playful Halloween group that feels instantly recognizable. Give each person a different role, such as a giant dice, playing card, game piece, spinner, or scorekeeper. Use colorful clothing, lightweight cardboard, felt, and foam to create the main shapes without making the costumes difficult to wear. The funniest part comes from exaggerating ordinary game-night details while keeping everyone’s character connected. In my experience, familiar themes work especially well for family costumes because guests understand the concept immediately, even when the individual outfits are simple.

      Make the costumes more entertaining by giving everyone a specific personality connected to their role. One person can carry an oversized scorecard, another can hold giant dice, while children become colorful playing pieces. For photographs, arrange the family around a small table with cards, snacks, and game accessories scattered around it. Keep props lightweight and avoid sharp edges or anything that blocks vision. Use a few shared colors across the outfits to make the group feel coordinated. The finished costume feels playful, nostalgic, and easy to personalize, giving every family member a distinct part in one funny Halloween scene.

      Family Rock Paper Scissors

      • Turn each family member into one giant hand gesture.
      • Oversized shapes make the joke obvious from a distance.
      • Simple colored clothing keeps the costumes comfortable.
      • Foam-board props are lightweight and easy to customize.
      • Different poses make group photos more dynamic.

      A rock-paper-scissors family costume turns a simple childhood game into a funny visual group idea. Assign each person one of the three choices, then exaggerate the shapes with lightweight foam, cardboard, or fabric. One person can become a giant rock, another a paper sheet, and another a dramatic pair of scissors. If the family is larger, repeat the choices while giving each character different accessories. The humor comes from seeing familiar game symbols transformed into people. This makes the costume easy to understand, inexpensive to create, and naturally suited to group photographs.

      Keep the base outfits simple so the oversized symbols remain the main attraction. Use lightweight materials and secure them carefully so children can move freely while trick-or-treating. For photographs, position the family as though an actual game is about to begin, with everyone dramatically facing their opponent. Exaggerated facial expressions can make the scene even more entertaining without requiring makeup. Add a small homemade scoreboard or playful game-card prop for extra detail. The finished group feels creative and deliberately silly, while the simple construction makes it practical for families who want a funny costume without spending weeks preparing.
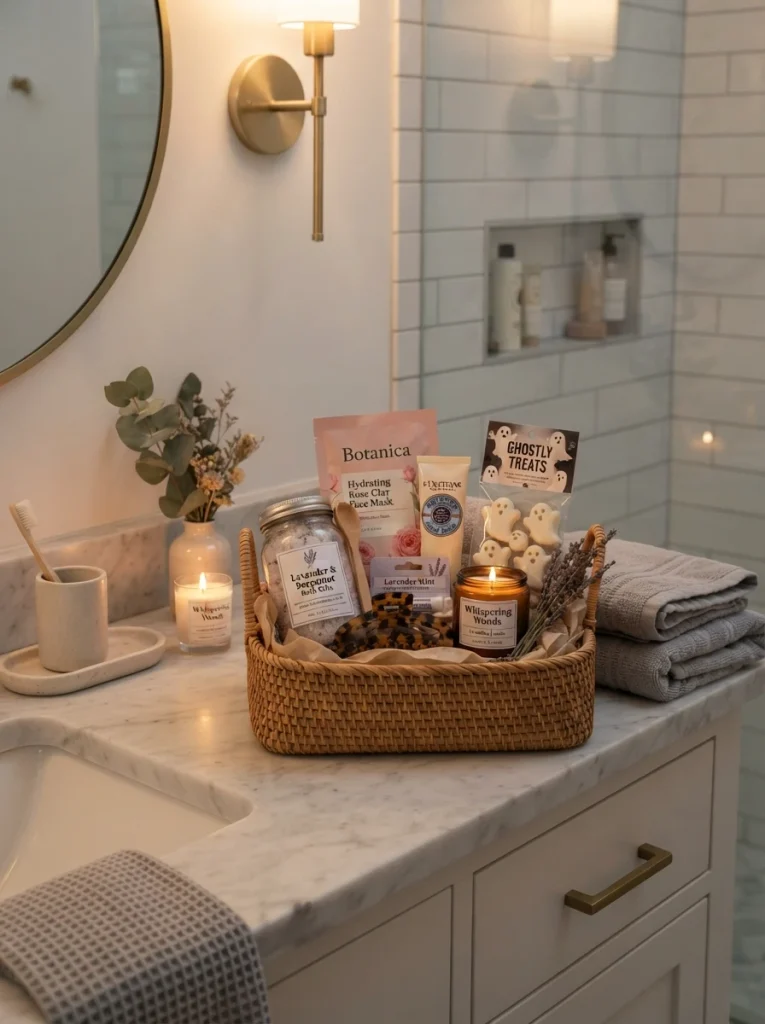
      Family Weather Forecast

      • Turn each person into a different weather condition.
      • Oversized clouds and suns create strong visual shapes.
      • Metallic or reflective details add playful dimension.
      • Children can choose colorful weather characters.
      • A weather-map backdrop can make photos even funnier.

      A family weather forecast costume turns everyday weather reports into a playful Halloween group. Give each person a different condition, such as sunshine, rain, thunderstorms, wind, snow, or an overly dramatic weather presenter. Use lightweight fabric, cardboard clouds, paper raindrops, umbrellas, and simple clothing to build recognizable characters. The family becomes funnier when everyone behaves as though they are part of a serious television forecast. In my experience, costumes built around familiar everyday concepts are particularly effective because guests understand the joke immediately without needing a long explanation.

      Create visual variety by giving each weather character its own shape and accessories while keeping a few colors consistent throughout the group. A child can wear a cloud-shaped costume with dangling raindrops, while an adult carries a large weather map or microphone. For photographs, position everyone like a television forecast, with one person pointing toward an imaginary storm and others reacting dramatically. Use lightweight materials that will not restrict movement or visibility. The final costume is colorful, customizable, and funny without relying on complicated makeup, making it suitable for families with children of different ages.

      Family Sock Drawer

      • Turn mismatched socks into a deliberately chaotic family costume.
      • Bold patterns make every character visually different.
      • Oversized sock shapes create immediate comedy.
      • Simple clothing underneath keeps the costumes comfortable.
      • A laundry basket can become the perfect group prop.

      A family sock-drawer costume turns one of the messiest household situations into a surprisingly funny Halloween idea. Dress each family member as an oversized, mismatched sock using colorful fabric, felt, or simple clothing pieces, then give everyone a completely different pattern. Stripes, polka dots, cartoon prints, and clashing colors make the group look intentionally chaotic. The joke becomes even stronger when one family member plays the “missing sock.” In my experience, costumes based on ordinary household moments often get genuine laughs because everyone recognizes the situation immediately.

      Make each sock character slightly different in shape, color, and personality while keeping the basic concept consistent. A large laundry basket can work as a shared prop, with one person pretending to search desperately for the missing pair. For photographs, spread the family around the basket or pose as though a serious sock investigation is underway. Keep materials lightweight and make sure costumes allow comfortable walking and sitting. The finished group looks colorful, ridiculous, and highly memorable, making this a great choice for families who want a funny DIY costume that does not require complicated construction.

      Make Your Family Halloween Unforgettable

      The best family costumes are not necessarily the most complicated; they’re the ones that make everyone smile and enjoy being part of the joke. These ideas give you plenty of ways to create a memorable look using simple clothing, playful props, and a shared theme. Choose one idea that fits your family’s personality, add your own funny details, and make it yours. I’ve seen how a little creativity can turn an ordinary Halloween into a favorite family memory. Save this post on Pinterest for later, try your favorite look, and share it with another family planning their Halloween costumes.